Rainbow Vibes

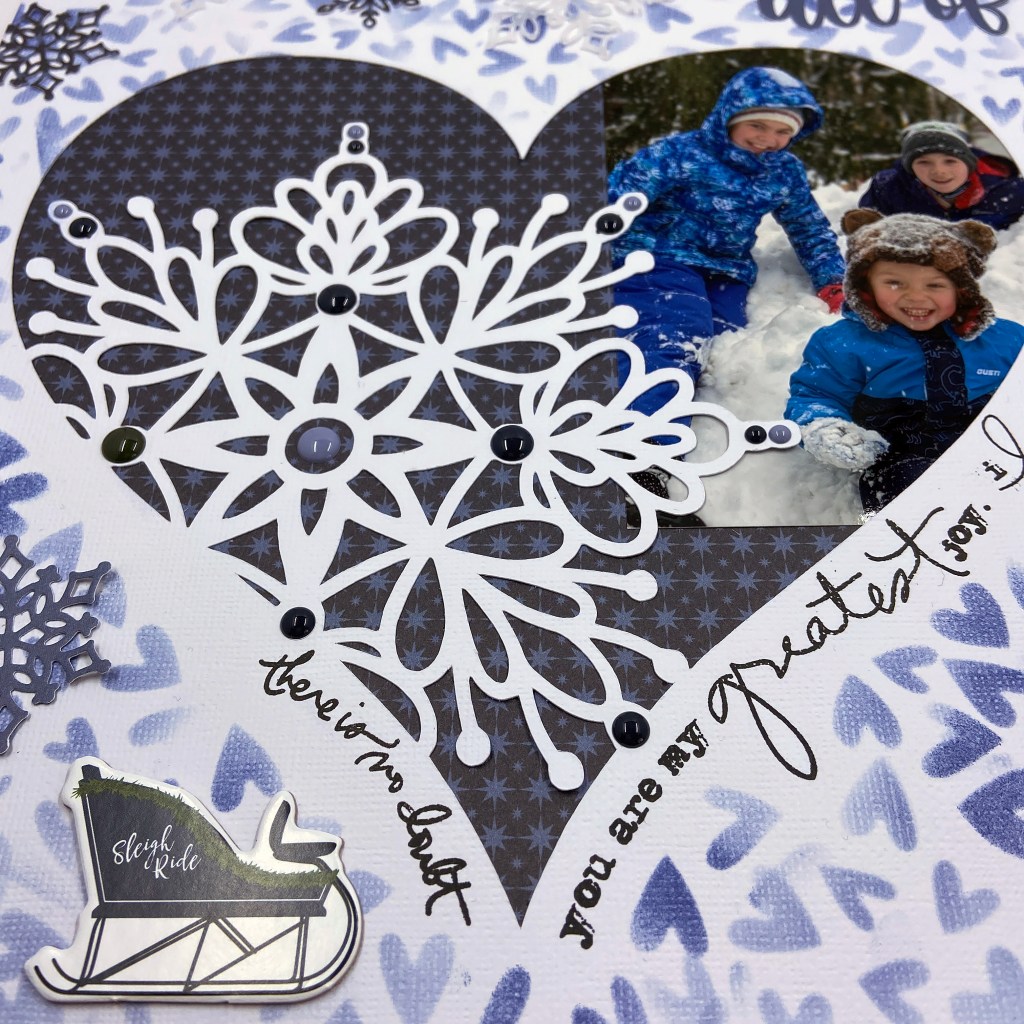
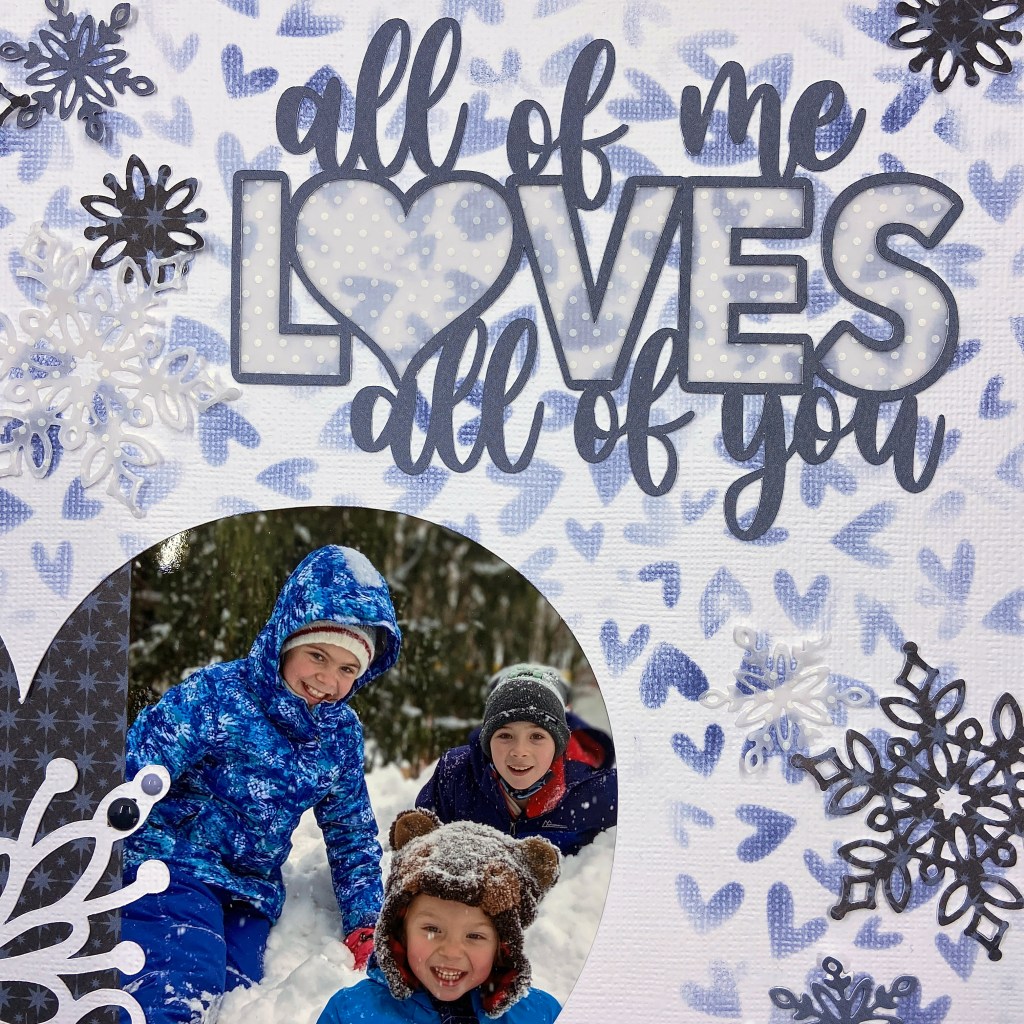
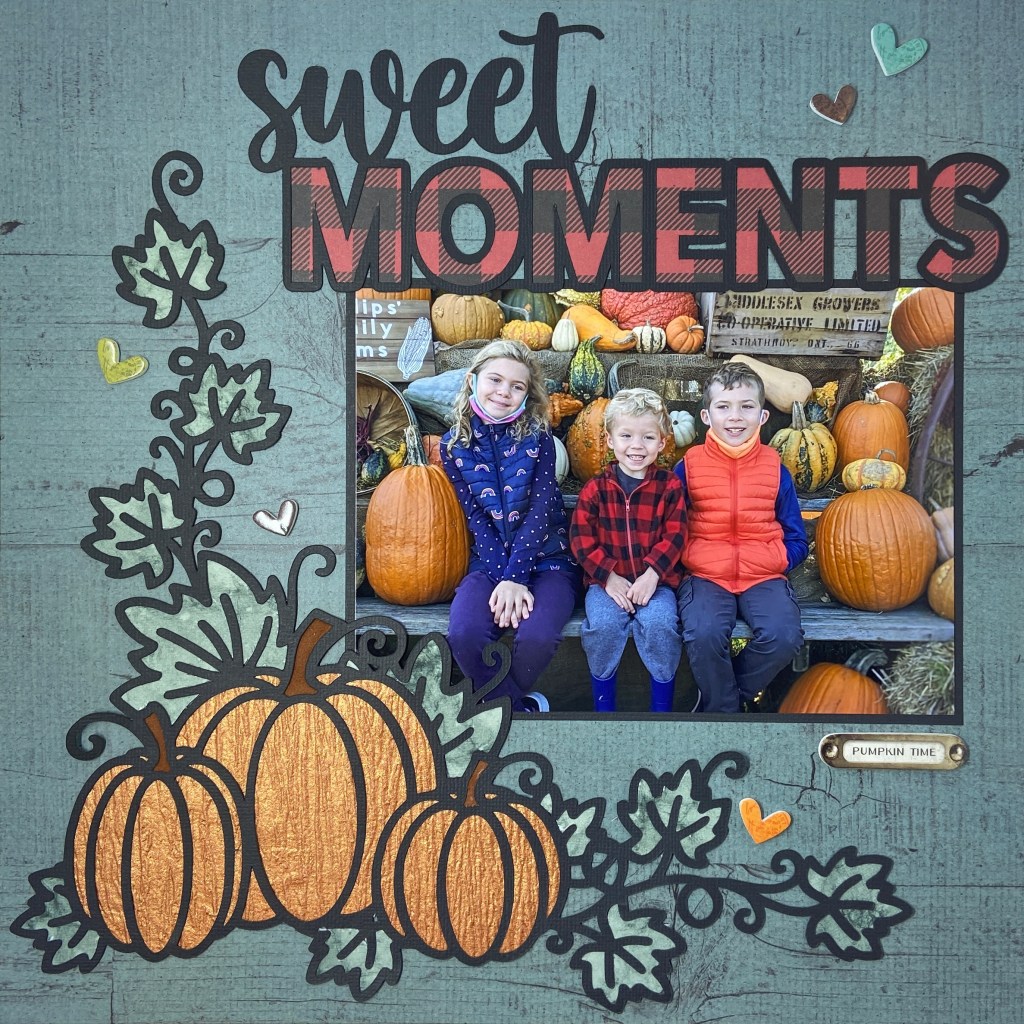
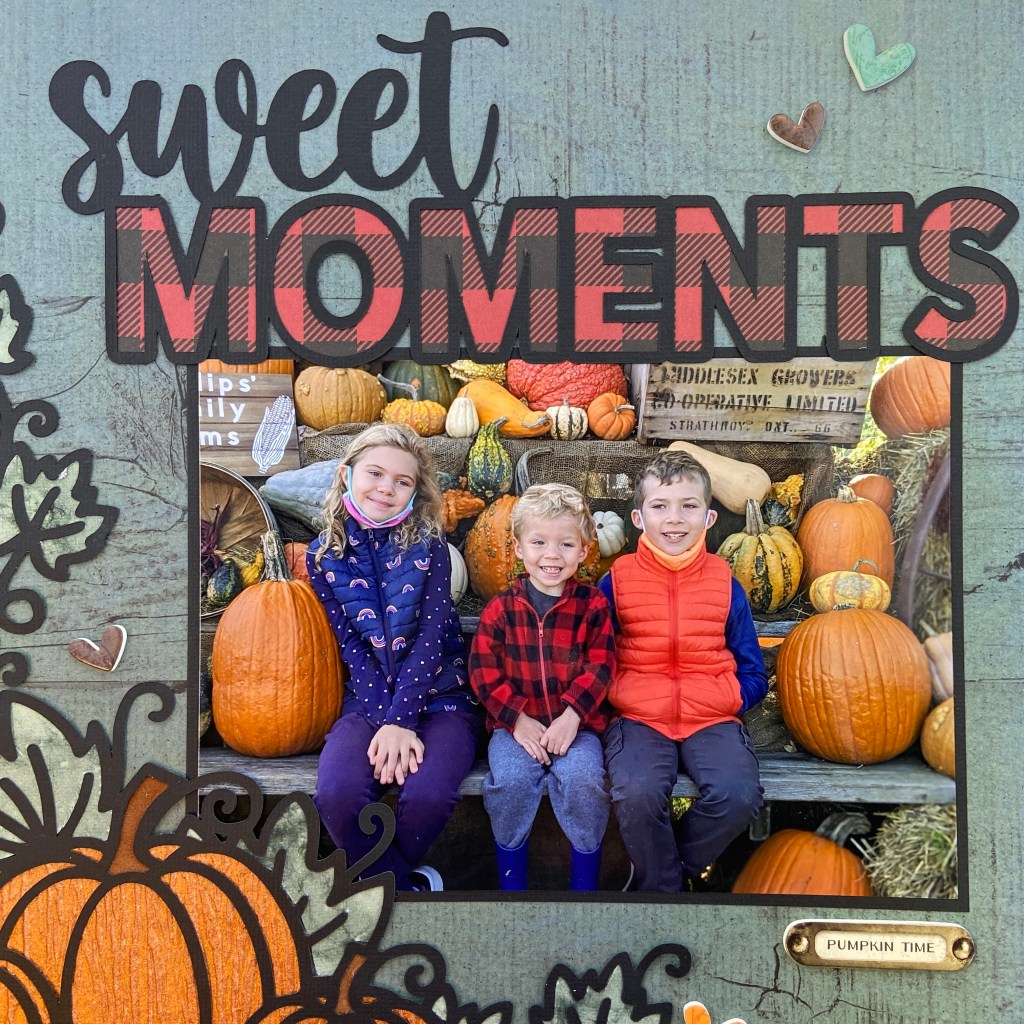
Well, life derailed me these past three months, but I’m happy to say I’m back in my craft room and starting to get creative again! After a few false starts, I’m pleased with the results of this layout. It seemed fitting to work on a layout about rainbows after the ups and downs we’ve been through lately. This fun picture of our youngest grandson, Ben, captures the joy he was feeling at that moment. And let’s admit it, who wouldn’t want to play on that rainbow xylophone?!

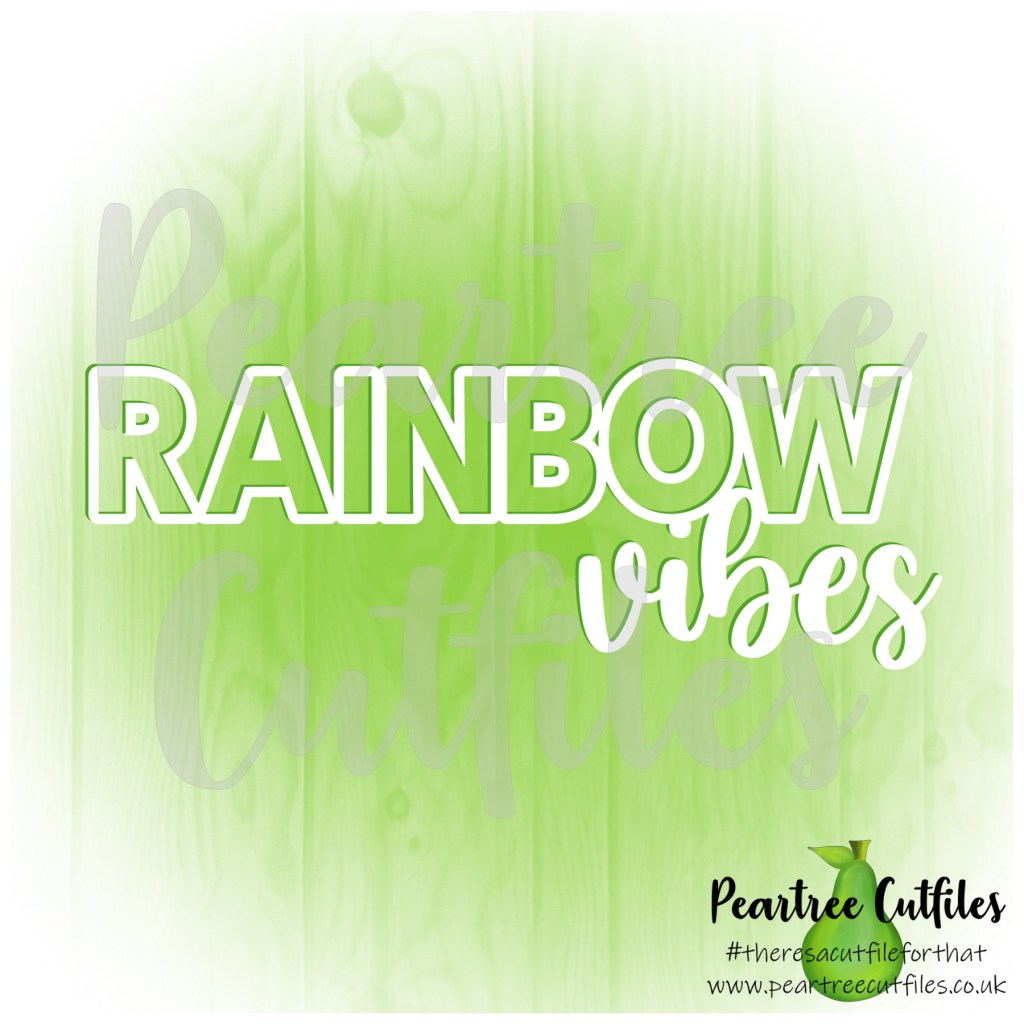
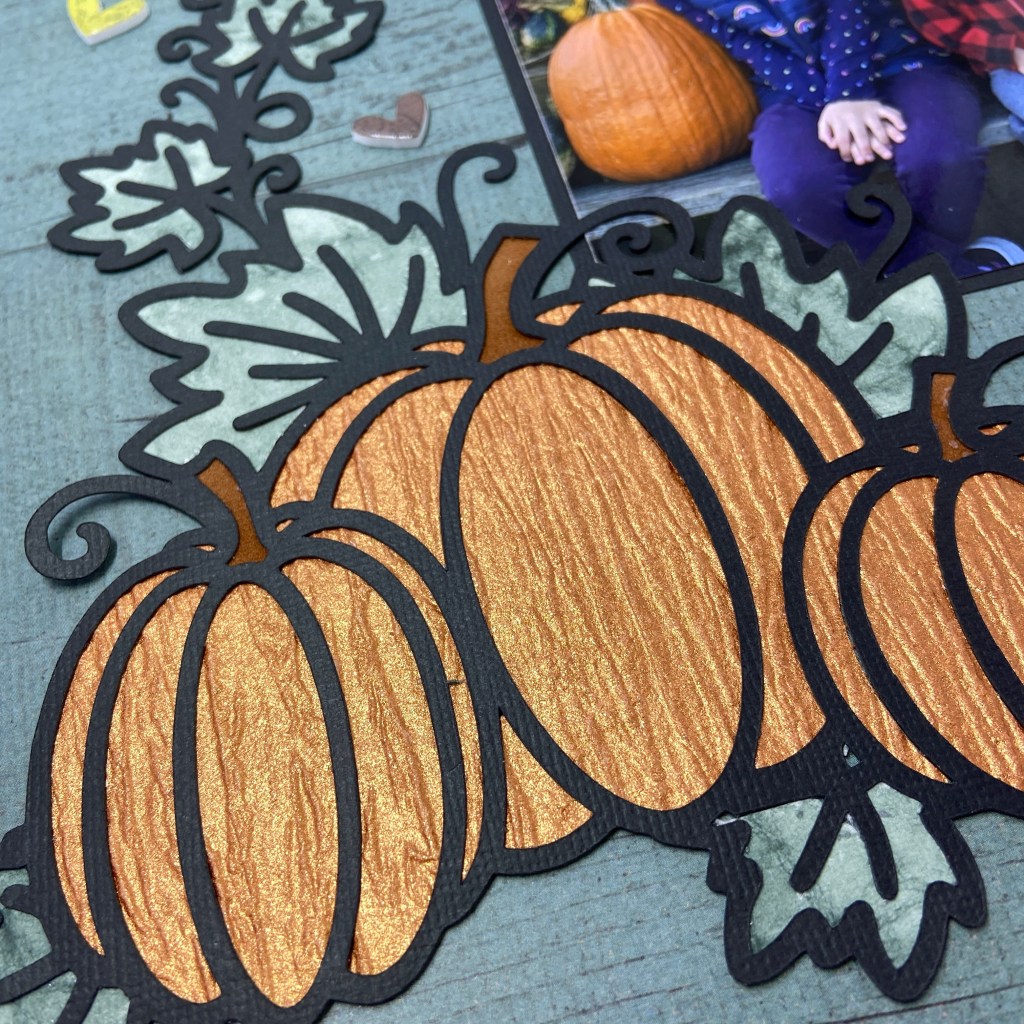
I was excited to use Pretty Little Studio’s Wildflowers collection to create this layout. The background paper is called Color Palette. I paired it with a cut file from Peartree Cutfiles called Rainbow Vibes. I used black American Crafts Precision Cardstock to cut the main title and backed it with coordinating cardstock colours matching the page’s rainbow. I took the liberty of adding a soft green to mirror the colours found in a rainbow. Once I reached this stage with the title, I set it aside.

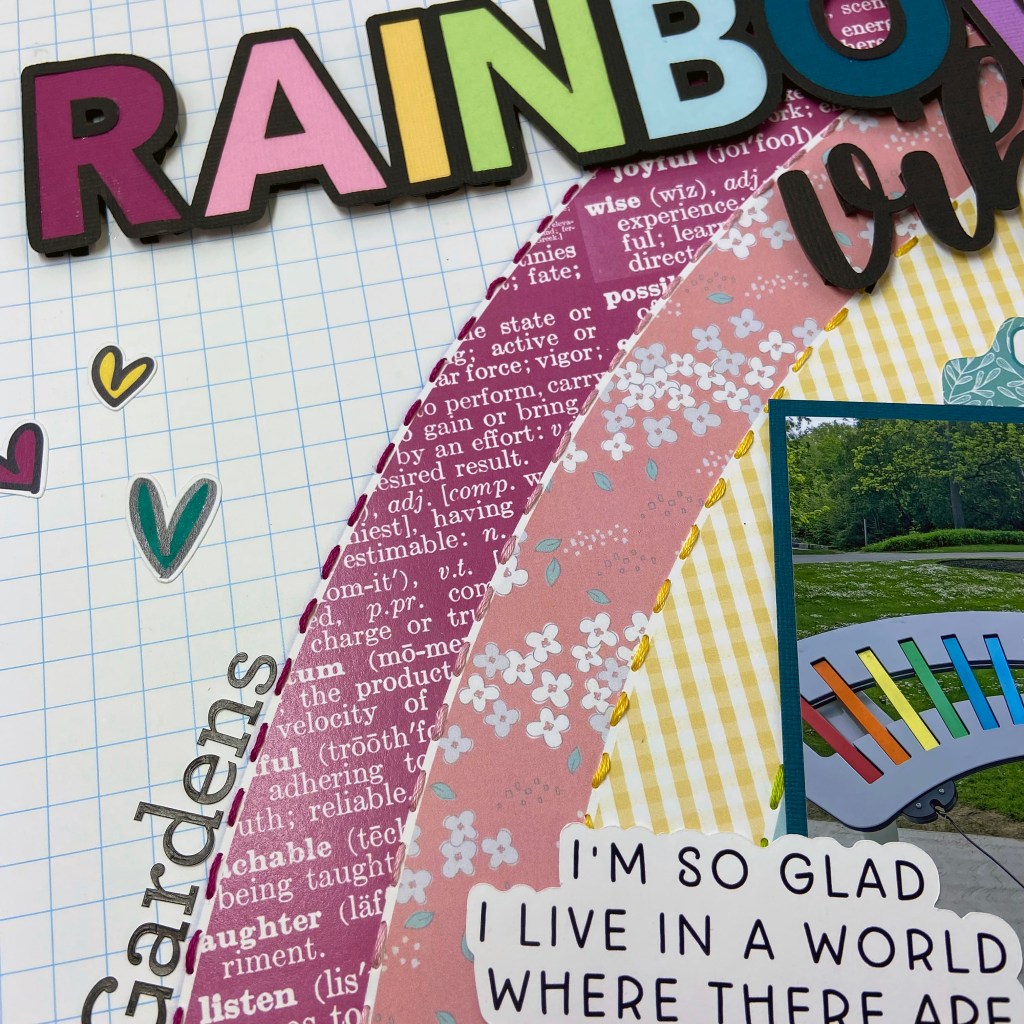
The next step was to add stitching to the rainbow on the patterned paper. A paper piercer was used to punch holes in the small white channels found between each colour of the rainbow. Each channel was stitched with a separate colour using a simple straight stitch. Seven colours were used overall, including a soft green to bring continuity to the layout. The following DMC embroidery threads were used, moving from left across the layout (718, 3689, 725, 907, 3761, 0851, 554). One exception is the teal embroidery floss; it is an Anchor product. I love the bit of texture these stitched channels add to the design. After the stitching was completed, I placed the title and photo in their respective positions. The title was elevated slightly by using Taylored Expressions Foam Sticky Strips. These strips are highly flexible and come in both black and white options.

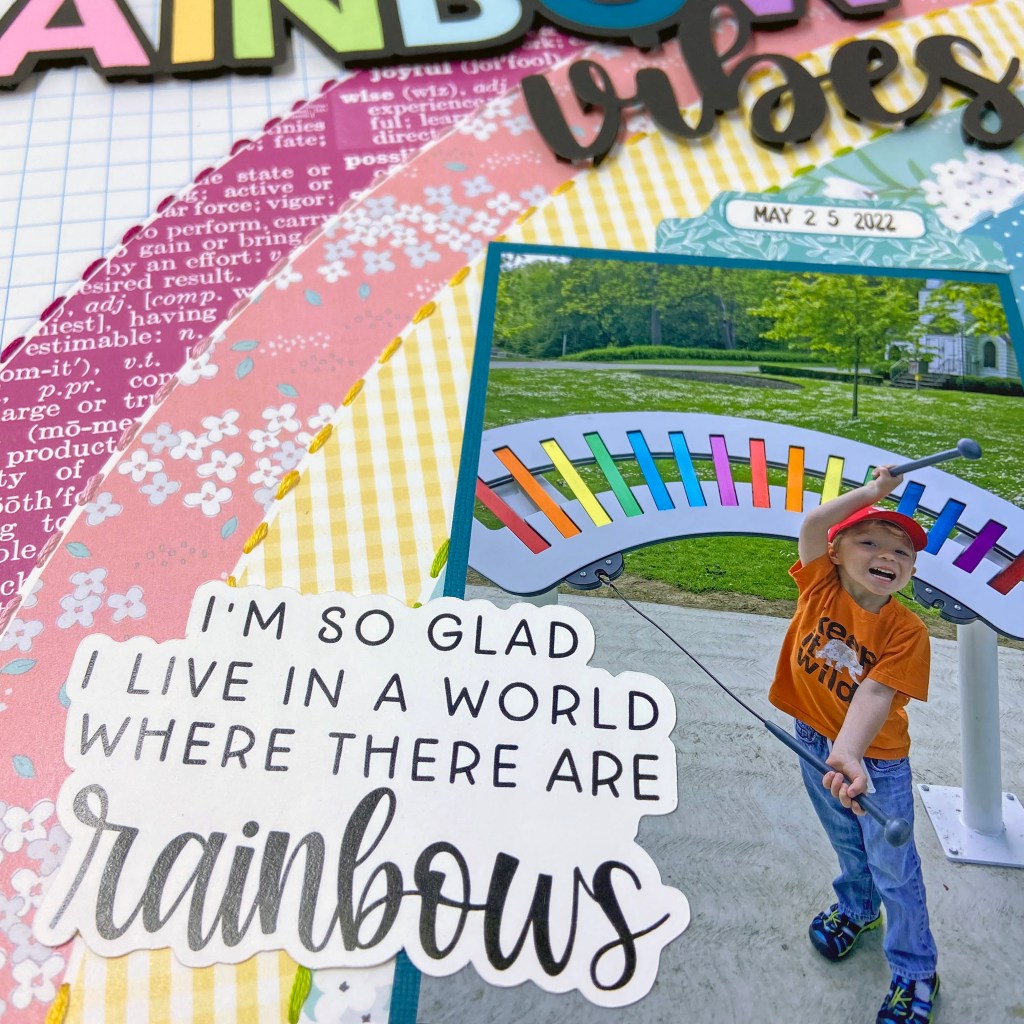
The final steps included adding ephemera from the Wildflowers collection. Three hearts and the rainbow phrase were added from the Chocolate Bunny Word Die-Cuts package. The pink and yellow hearts were included in the package, but the third heart, teal in colour, came as a black and white image. I used a Copic marker to colour the centre to coordinate with the Rainbow Vibes title and the rainbow on the patterned paper. Doodlebug Designs “my type” stickers were used to add “Storybook Gardens”.

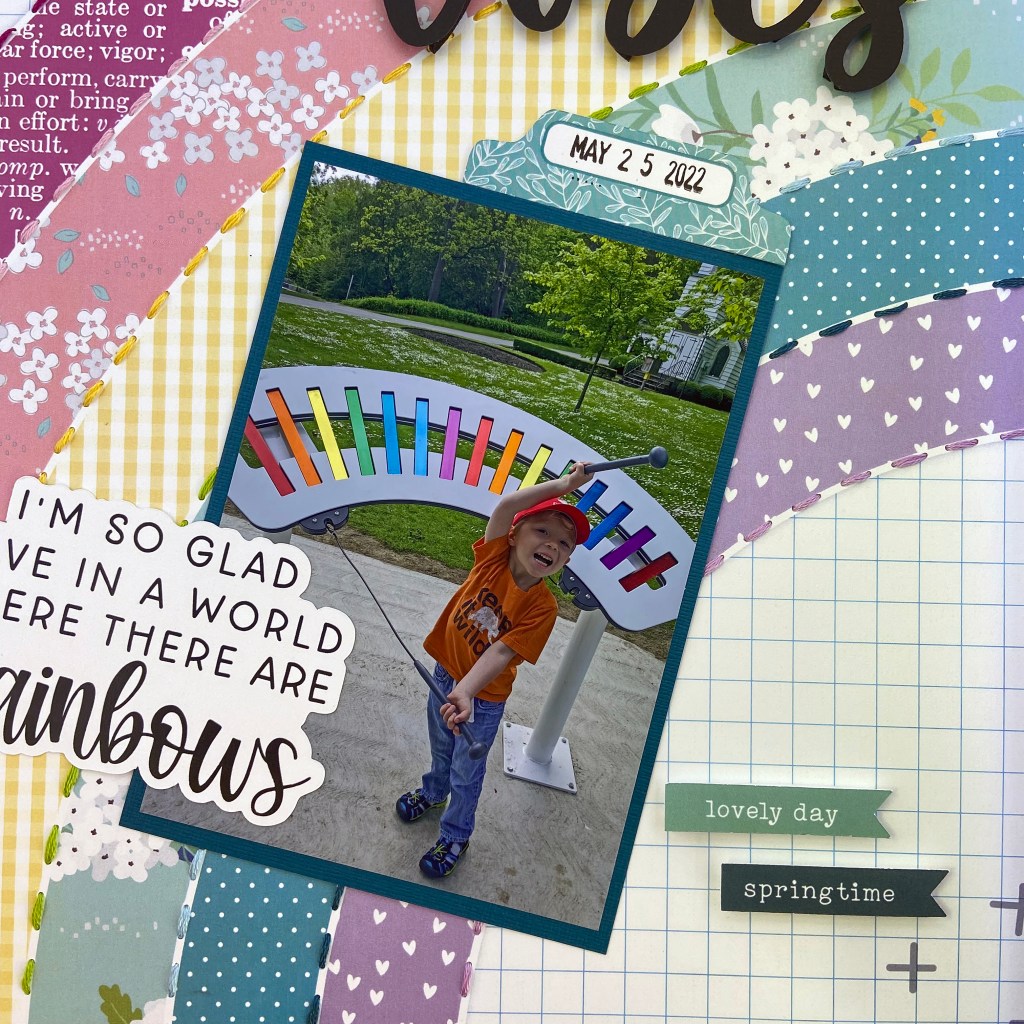
To complete the layout, I used more ephemera from the Wildflowers collection found in the Spring Mix Die-Cuts package. These elements include the tab above the picture where the date was stamped and the two small flag banners in the bottom right-hand corner of the completed design. Foam Sticky Stips were used to raise these two small elements.

And there you have it! Such a fun layout to design and work on as I try to get back in my creative groove! I hope it’s brought a smile to your face today. Thanks so much for checking in.

Until next time, stay safe, stay well, and Happy Scrapping!

Right Here Right Now

Do you remember the joy of Springtime and the welcome change of activities from winter? Owen wanted a basketball for his birthday and was thrilled when his wishes came true this year. I turned, once again, to Cocoa Vanilla Studio’s No Limits collection to document this special moment. I love how the colours in the photo work so well with the colours in this collection. The background patterned paper for this layout is called Spark.

The Right Here Right Now title came from Peartree Cutfiles. I chose several coordinating papers from the No Limits collection to complete this title.

I backed the words in the cut file with four coordinating patterned papers (Stardust, Latitude, Nebula and Orbit) while I popped up the orange arrows (Spark) using fun foam. By doing this, I helped draw emphasis to the picture below.

The Always be Your Awesome Self phrase was cut from the Universal patterned paper sheet. I chose a coordinating green ink and inked around the edges of this 3″ x 4″ phrase for further emphasis. It was also backed with fun foam for dimension. Next, I chose two coordinating phrase strips from the 3″ x 4″ rainbow phrase block as seen on the Universal patterned paper. The edges of these phrase strips were highlighted in coordinating inks.

Before adhering any of the phrase elements to the layout, I took time to plan out the remaining embellishments I would use from this collection. The blue star, rocket ship, and blue ticket were all chosen from the coordinating Die Cut Ephemera package. The edges of the star and ticket were inked with coordinating blue ink. At this stage, all of the phrases and ephemera were layered and adhered directly to the layout. The final touch was adding the date for prosperity. Doodlebug Designs Inc., Teensy Type alphabet stickers, were used to do this.

Thanks for joining me today, I hope you’ve enjoyed learning how this layout came together. This is a wonderful collection of papers and ephemera for all the boys and men in your life. I hope you have as much fun creating with it as I did!

Until next time, stay safe, stay well, and Happy Scrapping!

All of Me Loves All of You

Happy Valentine’s Day, friends! Today’s post comes to you in celebration of all things love and my three beautiful grandchildren who fill my heart to the top every single day! These three are so happy and full of joy it’s a pleasure to spend every moment with them. How lucky I am that all I have to do is walk across the street to see them!

The starting point for this layout was selecting two cut files from Peartree Cutfiles. The Snowflake Heart was an obvious choice for fitting with Valentines Day and the picture I chose. The title All of Me Loves All of You was the perfect fit for how I feel about my grandkids. It simply says it all! The foundation of the page is white textured Precision Cardstock from American Crafts. I opened both cut files in Silhouette software and sized them on the page to ensure I would have enough space to fit both. I slid the title off the cutting area to focus on the snowflake heart. Next, I traced the design and used the Release Compound Path function to allow direct access to all the design components. Finally, I removed the outside cutting line of the large heart before sending the file to cut. I did not want the cut file as a separate element but wanted it cut directly into the white cardstock.

I pulled beautiful Ali Edwards stamps from my stash to stamp around the base of the heart. I pulled from two of her collections for Technique Tuesday, Sweet Baby and Loving Words. My 12″ x 12″ Misti came in handy for this task. This wonderful tool allowed me to bend and wrap my stamps around the cut out design. Once the stamping was complete, I set about inking the blue hearts on the remaining background of the white cardstock. For this task, I used the Lots of Heart stencil from My Favorite Things (MFT). I liked the random whimsical look of this stencil, as it helped mimic falling snowflakes. I chose Tim Holtz’s Chipped Sapphire Distress Ink for the stenciled hearts. I liked the way this shade coordinated with the papers from Carta Bella’s Welcome Winter collection, which were chosen to complement my grandchildren’s snowsuits.

I then moved on to cutting and backing my title for the layout. I chose the Light Blue coordinating solid paper from the Welcome Winter line for the outline. I backfilled the word Loves with a finely dotted vellum from an old collection by Papertrey Ink called Sheer Basics. The completed cut file was then secured to the page before moving to the final stages.

I placed my photo on the upper right-hand side of the Snowflake Heart, behind the white cardstock. I then back-filled the entire background of the cut file with the Winter Wonderland patterned paper from the Welcome Winter collection pack. The remaining elements for this layout were a few chipboard accents from the same collection and a slew of die-cut snowflakes in various sizes and papers from coordinating vellum and solid patterned papers. The beautiful Snowfall Thinlits Dies belong to a set created by Sizzix for Stampin-Up! The final step was adding some enamel dots from the Welcome Winter collection to the large snowflake in the cut file.

This layout did take some time to complete, but I am so happy with the end result. Don’t be afraid to experiment and play while you create your scrapbook pages. It’s a fun way to complete a page, and to strengthen your paper crafting skills!

May your Valentine Day be filled with love and joy! Thanks for stopping by, and until next time, stay safe, stay well, and Happy Scrapping!

Moments Happen Everywhere

I love impromptu pictures and how they capture precious moments in time. This picture speaks to me in so many ways. First, it captures the love these two hold for each other. Second, it shows that a great photo doesn’t have to be staged. And third, I love how the sun rays are wrapping themselves around these two. This photo gives me all the feels!

I chose the Hike patterned paper from Reminisce’s Take a Hike collection pack as the foundation page for this layout. It was a perfect fit for a picture from Sean and Tanis’ camping, hiking and climbing adventures last summer. I loved how the colours in the patterned paper and the photo matched so well. The long blades of grass on the left-hand side of the page mirror the sun rays coming in from the right-hand side of the photograph. Photographic background papers are a real asset when you wish to create a layout quickly. Not only do they fill the page, but they also help set the mood of the page right from the start.

The title, Moments happen Everywhere, also reinforced the impromptu photograph and the setting in Peter Lougheed Provincial Park. The cut file came from Peartree Cutfiles as part of my September 2021 Pearscription. After resizing and cutting the file from black cardstock, I backfilled it with a patterned paper from the Simple Stories Snow Patrol collection that depicts the cross-section of a tree trunk. It was perfect for enhancing the woodsy feel of this layout.

I enjoy digging into my scrapbook stash to complete a layout. For this one, I pulled out embellishments and ephemera from Heidi Swapp’s Wolf Pack collection. They all fit perfectly and reinforced the outdoor, hiking focus of the layout. Mixing and matching paper collections and ephemera is a great way to use older products you don’t want to give up. The final touch was to add a couple of copper brads to the sign of the hiker on the trail post.

And that’s a wrap on today’s layout. Thanks for joining me and I hope you’ve enjoyed the warm walk down a hiking trail on this cold, snowy February day. Until next time, stay safe, stay well, and Happy Scrapping!

‘Tis the Season to Sparkle

Christmas keeps popping back onto my scrapping desk! I fell in love with this beautiful photo of my granddaughter with the Christmas lights in the background. She was with her family as they took a walk through Victoria Park after dark to enjoy all the beautiful Christmas lights and displays. It was a fun evening that I wanted to document for her scrapbook.

This layout came together quite quickly. Peartree Cutfiles, Tis the Season to Sparkle, cut file seemed like the perfect fit for the dazzling Christmas lights in the photo. I chose to cut it quite large for this layout to emphasize this point.

The paper in this layout comes from the equally named Tis the Season paper collection by Pretty Little Studio. Specifically, I used the Jack Frost paper for the layout background and Tidings – Red paper to back the words.

All of the stars found in the title were cut from Lawn Fawn‘s Holographic 2.0 paper. They were added to the layout using small foam dots to provide dimension and emphasis.

All the ephemera used to complete the layout belongs to the Tis the Season collection. The gorgeous tree limbs, holly and pinecone came from the Holiday Greenery Die-Cuts sold with this collection.

And that’s a wrap on this quick and simple, pretty little layout! Thanks for checking in and until next time, stay safe, stay well, and Happy Scrapping!

Get Lost in a Good Book

For as long as I can remember, I have loved reading. For me, the best part of reading is the ability to let your imagination paint the picture from the written word. I’ve yet to meet a movie that did a book proper justice. Reading and scrapbooking have a lot in common. Both hobbies take me away from the stress found in everyday life. I read before going to sleep every night, even when the light annoys my husband! It’s part of my nighttime ritual that helps me relax, unwind and put the troubles of the world aside.

For several years now, I’ve made a list of each book I’ve read within a calendar year. January 1st, I take a picture of all the books I’ve read throughout the previous year. I’ve always had grand plans of scrapbooking the photo, and this year those plans became a reality. I dug into my stash of patterned paper for this layout and used the 12″ Noel Joy paper by BoBunny for the foundation of the page. I’ve always loved the antique books on this patterned paper.

I chose the Get Lost in a Good Book cut file from Peartree Cutfiles to document my reading list from 2020.

I began by cutting the file in black cardstock and then backed the words with a gorgeous patterned paper by Bazzill Basics Paper called Antique Script. I love how the title stacks on top of a book. Because some of the books I read in 2020 were quite old copies, it is hard to see their titles in the picture. I wanted to include the book titles in this layout and decided on creating a little book from the book base in the cut file.

I started by cutting a duplicate book cover to mimic the front and back covers. Next, I cut multiple “pages” from heavy vellum to fill the book. I used these vellum pages to record the names of each book found in the picture. Using vellum tape, I adhered these pages together on the left-hand side and secured the second book cover to the top to complete the book. The result is a 3D embellishment that mimics a book.

To help balance the weight of the newly created book on the right-hand side of the layout, I mounted the picture on fun foam before adhering it to the background paper. I found coordinating stickers from the Photoplay Holiday Cheer paper pack to create the subtitle 2020 Reading List. The final touch was adding the three chipboard stars found around the picture. These stars also came from a very old paper collection in my scrapbook stash – My Mind’s Eye, Vintage Christmas.

And that’s a wrap on my first layout for 2022! I appreciate you stopping by and hope I’ve enticed you to look at cut files in new and different ways.

Until next time, stay safe, stay well, and Happy Scrapping!

Christmas Fun

It’s hard to believe that we’re only nine days away from Christmas! I love watching my grandchildren get excited about the end of school and the break at Christmas. They love to be involved in the preparations and anticipation of Christmas day. Last year, Owen made a beautiful gingerbread tree to help decorate the dining room. He did a great job and had so much fun decorating it. It was such a special memory that it deserved a unique page in his scrapbook!

I was looking for an excuse to try the recent trend of paper folding, and this project presented the perfect opportunity. To create this gorgeous tree, I cut strips of paper 3″ long by 1″ wide in each of the coordinating patterned papers from Photoplay’s Kringle & Co collection pack. Each strip was folded in half, lengthwise, and adhered with strong double-sided tape. Then they were secured to the background using the same double-sided tape. I ran a bone folder over each section at the top to ensure a good stronghold.

I embellished the tree with a variety of Bits & Pieces Snowflakes from Taylored Expressions. The star at the top came from an older collection of Basic Grey‘s chipboard pieces. It was painted yellow and embellished with gold glitter. The banner in the top right-hand corner was created using a die-cut from Your Next Stamp from the Fishtale/Banner set. I use this set quite often and the versatility it provides. The paper banner was adhered to fun foam for dimension and also embellished with a few of the snowflakes as found on the Christmas tree.

The Christmas Fun title comes from Peartree Cutfiles and includes a second option called Holiday Fun. Once again, it is a wonderfully versatile cut file that can be used for many layouts over the years. Once the cut file was resized to fit my project, it was backed with the back-side of the Snow is Falling patterned paper from the Kringle & Co paper collection.

To complete the layout I used a couple of the present stickers found in the main Kringle & Co paper pack and adhered them to the bottom left of the Christmas tree. I added the date using doodlebug design inc‘s black teensy type number stickers.

Creating the Christmas tree was a time-consuming part of this layout. However, it was well worth the perseverance, I am thrilled with the result! Once it was completed, the rest of the layout came together quite quickly. What new skill will you add to your scrapbooking toolkit this coming year?

Thanks for checking in today, and until next time, stay safe, stay well, and Happy Scrapping!

Sweet Moments

How can it be December already? I’m not quite ready to jump on the Christmas bandwagon just yet. So today, I’m sharing another Fall layout using some of my October Peartree Pearscription files. It was a family tradition to take our children to the Pumpkin Lady each year to pick out the best pumpkin we could find. I’m so thrilled that my daughter carries on this tradition with her family. I love everything about this photo she captured from this year’s trip to the pumpkin patch. I wonder what my grandchildren’s children will say when they see their parents with face masks. We can only hope and pray that this pandemic will be a story from their past.

The stunning Pumkin Corner from the October Pearscription was a foundation piece for this layout. I dug into my stash of textured papers to create the warm Fall feeling for this cut file. The pumpkins were backed with a heavily textured burnt orange cardstock and the leaves were backed with a suede style paper with a green tye-dyed effect.

The title for this layout, Sweet Moments, was the free cut file offered by Peartree Cutfiles in October (purchase 5 cut files, receive one free). It’s highly versatile and could be used on so many different layouts. I highly recommend taking advantage of the monthly freebie from Peartree. When you sign up for the monthly Pearscription, it is included automatically with your purchase. A pretty “sweet” deal! I chose to back the title with a buffalo plaid patterned paper that coordinated with my youngest grandson’s jacket.

The large picture and cut files were placed on patterned paper from Simple Stories from their Simple Vintage Country Harvest collection pack. The specific paper is Item #16309, called Give Thanks. I chose this paper for its rustic feel and the way it offsets the picture.

Just a few embellishments were added to complete the layout. I selected the Pumpkin Time phrase and several hearts in different sizes and coordinating colours from the Foam Stickers that belong to this Simple Stories collection to complement the picture and cut files.

Overall, this was a fairly easy layout to assemble and I am thrilled with the result. Perhaps next year my grandchildren will be able to visit the Pumpkin Lady without wearing a face mask!

Thanks for checking in, and until next time, stay safe, stay well and Happy Scrapping!

Together We Have It All

This.

Like all mothers out there, I am proud of my family and all their accomplishments. What I admire most is their ability to be positive and focused, regardless of what life presents. Core to our relationship is an understanding that one of the most important aspects is our strong connection. We are here for each other through thick and thin, for better for worse. Our strong relationship makes us rich in so many ways. This foundation is what matters most to us. When life throws us a monkey wrench, we carry on together.

This summer, I felt like one of the luckiest women in the world. After many months of separation due to COVID, my family reunited in August! Sean and Tanis travelled from Edmonton to join us at the cottage. It has been six long years since Sean had the opportunity to spend time there, and the first time Tanis was able to travel east during the summer. Honestly, having everyone together at our happy place was a dream come true!

As I began designing a layout concept to document this event, I came up with the title but was unable to source it out. I turned to Marie Hurst, owner of Peartree Cutfiles, and asked for her help. Not only did she agree to design the cut file Together we Have it All, but she also exceeded all my expectations! I’m simply in love with the result! Thank you, Marie, I’m so deeply grateful!

I utilized two Cocoa Vanilla Studio collections in this layout, Daydream and These Days. I love how the collections work well together and allow for the mixing and matching of embellishments. All papers in this layout came from the Daydream collection. The background paper is Sweet Serenity, and those used in the title are Garden Variety (backside), All Aflutter and Daisy Days, respectfully. To create the completed title, I offset the letters slightly and then adhered them on top of the base title using Taylored Expressions Foam Sticky Strips. I filled the two cut out hearts with puffy hearts from both the Daydream and These Days collections. They were a perfect fit and complement to finish off the title.

A selection of embellishments from the These Days Die Cut Ephemera package completed the layout. To create the dimension on the butterflies, I placed score lines on either side of the butterfly’s bodies and then gently folded the wings up. Scor-Tape was then applied in the thin centre channel to adhere the butterflies to the page.

The best thing we have in life is to hold on to one another. No matter where we go, what life throws our way, together, we truly have it all. Thank you, Marie, for helping me document a very special time this summer!

Until next time, stay safe, stay well and Happy Scrapping!

Party!

I’m long overdue in posting this two-page layout for Ben’s 2nd Birthday! There’s nothing better than a summer birthday when the air is hot, the water refreshing and the birthday cake is ice cream! We are so lucky to have the opportunity to celebrate this sweet boy’s Birthday at the cottage.

The gorgeous ink base pages for this double page layout came from a craft smart paper pad called Rainbow Inks purchased at Michael’s. This paper pad is an excellent alternative for someone like me who is slightly intimidated to create the backdrop myself. I was attracted to the turquoise page with the internal square offset and rotated the second page to balance the double page layout.

I love the Star Cake cut file from Peartree Cutfiles. It was perfect for documenting Ben’s big day. The file was cut from black cardstock and then the interior pieces were offset with coordinating patterned papers from Doodlebug Design’s Party Time paper pack. Lawn fawn’s “holographic 2.0” paper was used to back the stars in this cut file. The number 2 was added to the cake using a chipboard piece from Basic Grey called dark chocolate chip.

I enjoy making my grandchildren shirts for their Birthday and found the perfect design for a two-year-old in the Silhouette Design Store. The Two Nado Birthday Phrase was designed by Sarah Bailey (Design ID#315079). I used black and turquoise Heat Transfer Vinyl to create Ben’s t-shirt. I replicated this design for the second page of this layout. 

The rest of the layout came together quickly using several “odds & ends” from Doodlebug Design’s Dragon Tails ephemera package. The PARTY title, coordinating birthday presents and stars on both pages all belong to this package. The green Happy Birthday stickers are also a Doodlebug Design product and belong to a multicolour cardstock sticker sheet. You can stretch your scrapbook stash when companies coordinate the colours between different paper collections and releases! The finishing touch was to add the date using white Thickers Happy Life foam letter stickers. 

We sure had fun celebrating Ben’s 2nd Birthday, and I’m excited to add these pages to his personal scrapbook. I hope you’ve found some inspiration to scrapbook a special birthday in your family. Until next time, stay safe, stay well and Happy Scrapping!