Tower Explosion Box

Explosion Boxes are all the rage in the crafting industry right now. Our granddaughter recently celebrated a milestone birthday – her 10th – and I wanted to make something extra special to help her celebrate during these challenging times. Maddie was lucky enough to have had a kids birthday party last year, but COVID has changed our world and how we celebrate at present. She has been completing school this year online, so she’s also missing the direct connection with her friends. She recently told me that when she has kids her age, and they tell her they’re bored, she’ll reply “You don’t know what bored is – because you didn’t live through COVID!” Wise words from someone just turning 10!

I did some researching into explosion boxes and came across this beautiful Tower Explosion Box by Les Pens̩es en Papier РSVG designs. There is a helpful YouTube video tutorial to help you assemble the project, and you can find it here: https://www.youtube.com/watch?v=9NKimnjlEvE. While I initially hesitated to purchase the cut file due to the price, I felt it was more than fair when I downloaded the files and instructions to complete. There are total of 36 svg cut files to complete the project, and the download includes cut files for both the Silhouette and Cricut, a supply list and download instructions. I used a Silhouette to complete the project. The YouTube video will guide you through the construction of the tower and all the flowers as seen in the project.

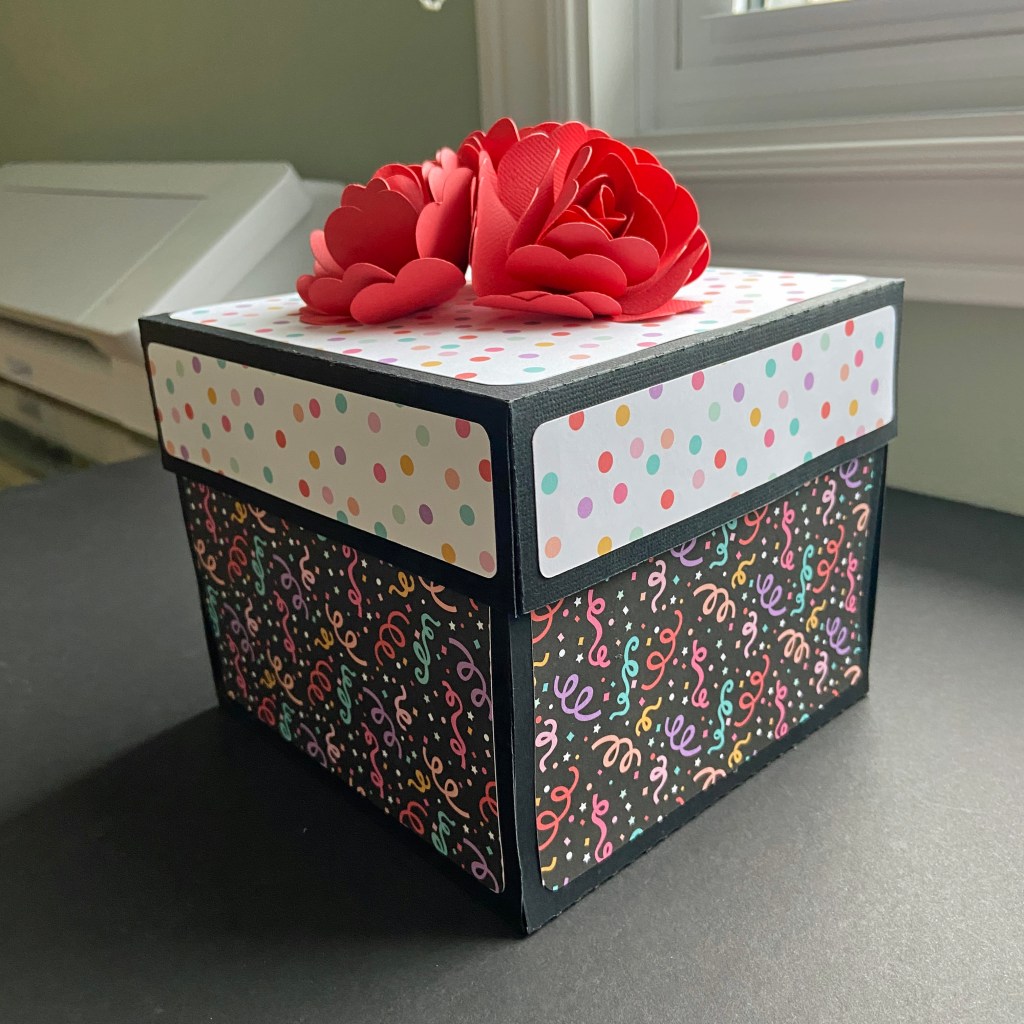
To complete this project I used 12 sheets of 12″ x 12″ black Precision Cardstock from American Crafts, the It’s Your Birthday paper collection pack from Echo Park Paper Co., and 2 sheets of 12″ x 12″ coordinating cardstock to create the flowers. The paper pack includes twelve double-sided papers and a full coordinating element sticker sheet. I used eleven of the patterned papers and approximately 3/4’s of the sticker sheet to decorate the project. I did substitute the use of a glue gun in this project and opted to use Glossy Accents by Ranger Ink to construct and attach the flowers seen in this project. It has always been my go-to heavy bond glue and worked perfectly to hold all these pieces in place.

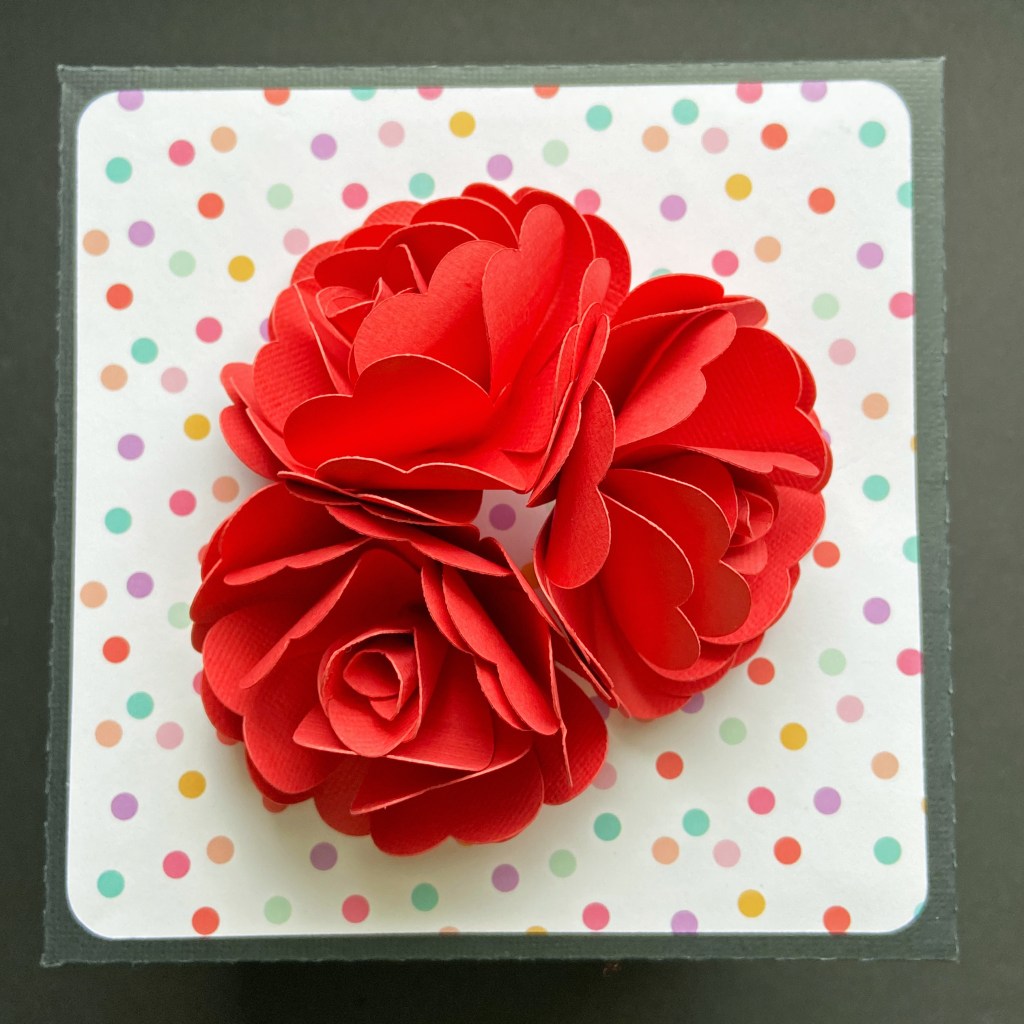
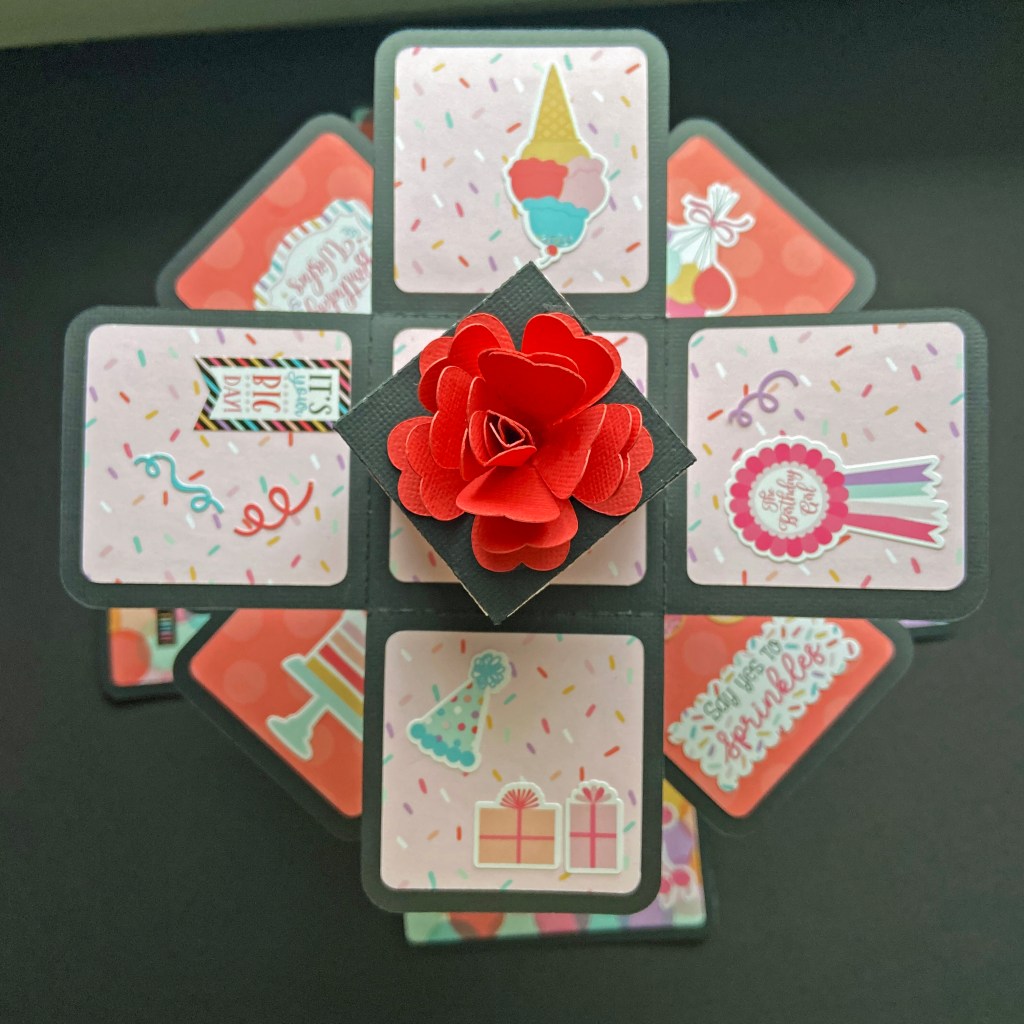
Once completed, the tower explosion box folds up neatly into the largest box or bottom layer of the project. The next two pictures show you the full tower folded down into itself, and a top view of the lid adorned with 3 of the beautiful flowers included in the cut file.

The following pictures show the first “explosion” when the largest lid is removed from the box. As you can see, it reveals another box and lid.

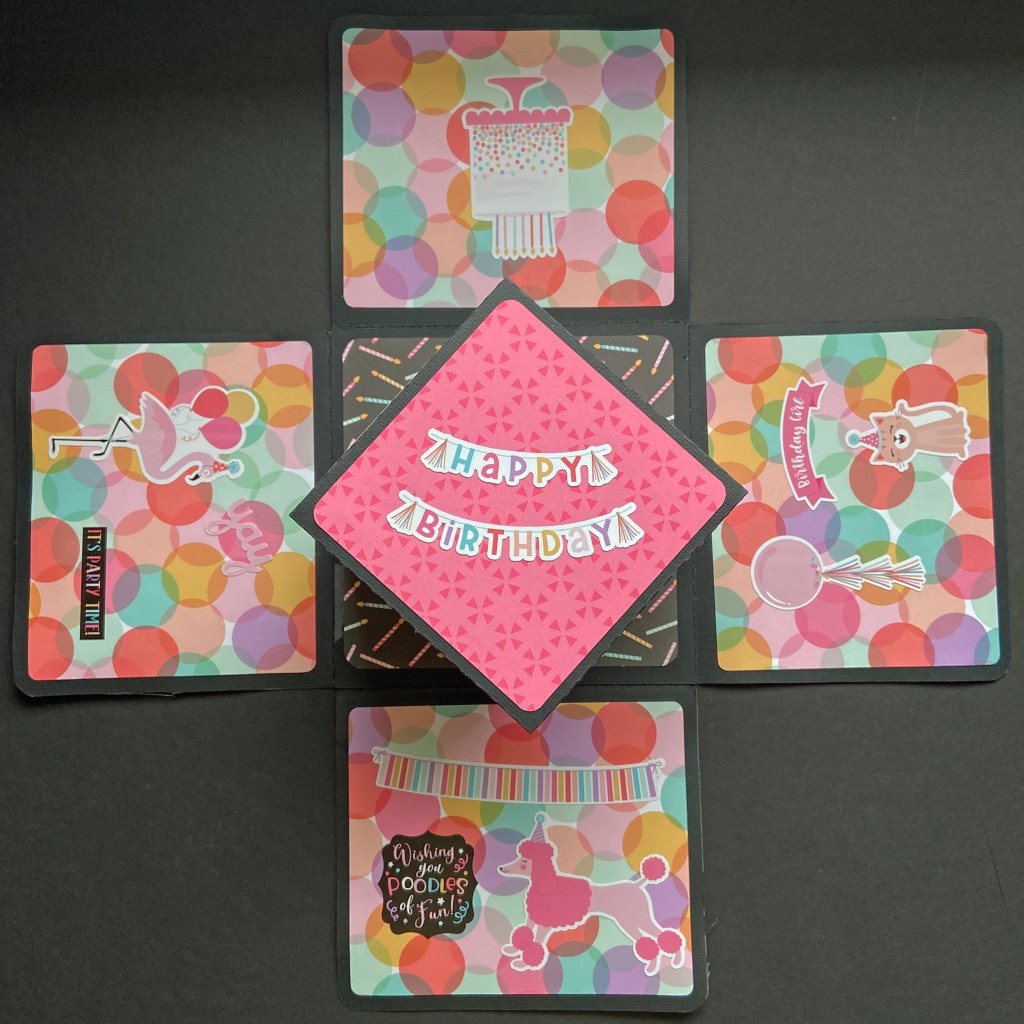
The next two pictures show the 2nd explosion with the 2nd box lid in place and removed. Once the lid is removed, it reveals a surprise interior – 4 more boxes!

At this stage, you simply reach inside the towering stack and pull the remaining boxes up by grasping the smallest box with the flower on top. As you do so, you reveal 4 more layers of boxes. There are built-in paper extenders (which you can’t see once the project is completed) that allow you to twist each level slightly to rest on the level before. This helps fan out the layers for a pretty presentation. The smallest box at the top remains intact.

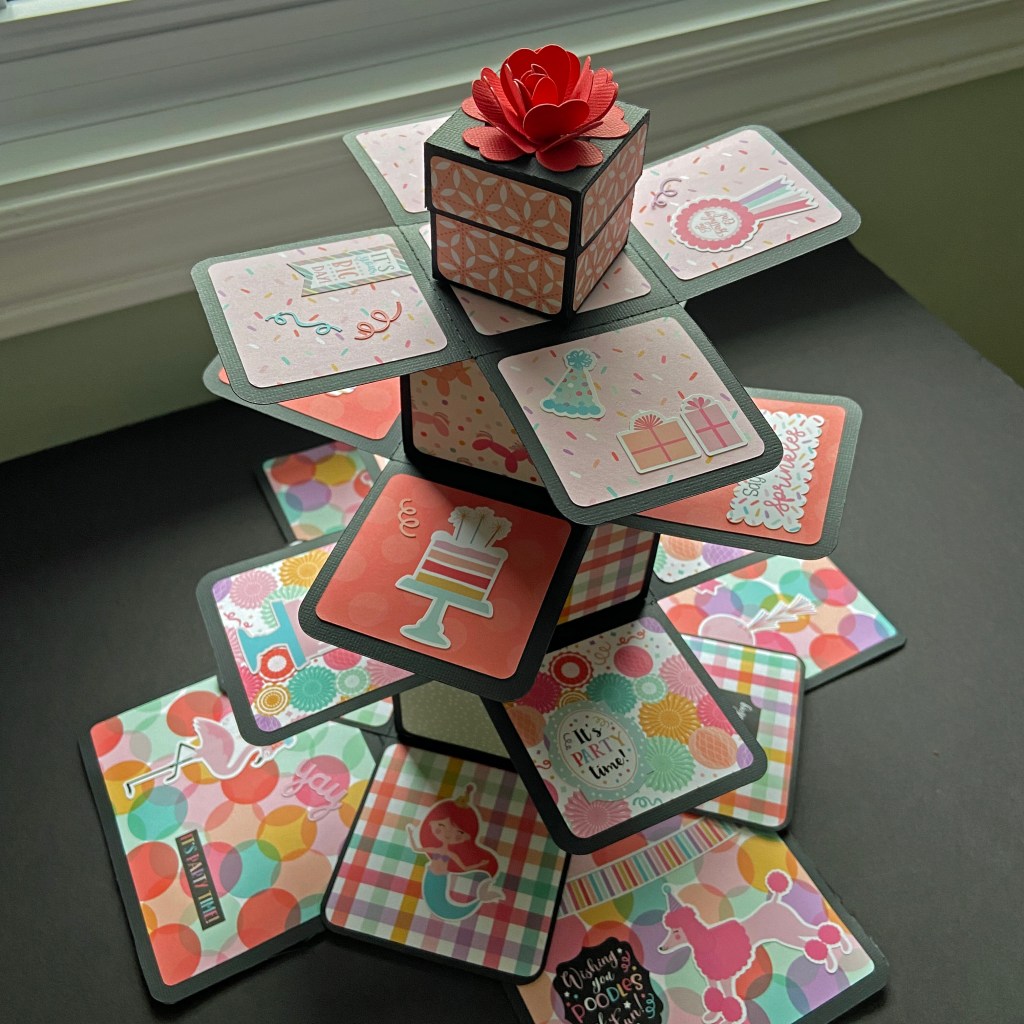
The smallest closed box at the top of the tower provided an excellent opportunity to sneak in a special gift for Maddie. I had a small pair of earrings to give her for her special birthday. I dug into my paper crafting stash and came up with the small shopping bag seen in the pictures below. It was the perfect size to fit within the small box.

I hope you’ve enjoyed the photos of this project. I highly recommend this project, it was fun to make, fun to give, and loved by my granddaughter! Thanks for joining me, stay safe, well and Happy Scrapping!

Love

In February, I started subscribing to monthly digital cut files from Peartree Cutfiles, called a Pearscription, https://www.peartreecutfiles.co.uk/pearscription/. I used one of the five exclusive February files to complete this layout. All the files were unique and beautiful, but this Trio of Hearts cut file immediately grabbed my attention. It didn’t take me long to figure out what I’d like to do with it. Three hearts – three grandchildren – it seemed a perfect match!

I had two specific plans in place when I started this layout; 1) I wanted to break open the Cocoa Vanilla Studio Daydream collection I’ve had for a while, and 2) I wanted to stitch the cut file, rather than cut it out. I recently viewed an excellent video tutorial by Belinda James that teaches you how to turn a digital cut file into a stitching file on your Silhouette machine (Creating stitching templates with your Silhouette). The video was easy to follow, you can find it here: https://www.youtube.com/watch?v=Fht1LT2dxko&t=635s. It does take some practice to learn the spacing that’s right for you, but truly worth the effort. I would suggest that you do a practice cut the first time round to see if you like the spacing. In my first attempt, I found the spacing between stitching holes too close for my liking. The settings were easily adjusted to give the spacing I desired.

Once I had the stitching file completed, I spent time matching DMC floss to the colours found in the Daydream collection. I planned on using the Garden Variety sheet for the border, so this specific paper is what I used to match my colours too (DMC #351, 352, 353, 522, 743, 932, 3051, 3053, 3820). As I prepared to stitch, it became apparent that the stitching file looked quite complicated to the naked eye (like a hard puzzle) in the areas where the flower clusters lay. So before I started any stitching, I went back to my Silhouette Cameo 4 and used a Sketch Pen in light grey to trace out the cut file. I used this sketch as a template (similar to any stitching project) and coloured the file using markers that matched the colours in my final design. This coloured template helped speed up the overall process when it came time to stitch. Here are some photos of the stitching process for this project.

And the final and completed cut file, fully stitched. I love how pretty and delicate it turned out.

Once the stitching was completed, I planned on adding a straight 1/2″ border to the page with the Garden Variety patterned paper. However, at this juncture, I decided it would look better if I kept some of the flowers in the border intact. This involved some careful measuring and fussy cutting. I liked the look of some of these beautiful flowers spilling over from the border. I also dug into the Daydream Die Cut Ephemera pack and found 3 die cuts that were the perfect fit and shape of flowers that I had fussy cut and included in the border. I adhered these to the respective spots on the border with double-sided foam adhesive to provide some additional dimension to the layout. This required some trimming of the die cuts when they spilt over the edge of the page.

I wanted to add photos to the inside of each heart, but as you can see from the heart shapes, a traditionally sized photo just wouldn’t do the trick. To achieve the photo sizes in the completed layout, I started with a piece of acetate. The first step was to place the acetate over each heart section and use a marker to trace out the area and size for each completed photo. These acetate patterns were cut out and measured to help determine the photo size I should print to achieve this result. Once the photos were printed and ready to go, I simply placed the acetate over top of the photo and traced the shape directly onto the photo for easy alignment and trimming. To give you an idea of how I achieved it, here’s a picture of the layout with the acetate templates in place.

Once the photos were in place, I added small words and phrases from the Daydream Accessory Stickers sheet that came with the full paper pack of this collection. These stickers were centred and adhered within each heart in the white space above each stitched flower cluster. Here’s a close-up of the largest completed heart.

The title for this layout came from a set of Pinkfresh puffy phrase stickers belonging to the joyful day collection. The word love was the perfect size and colour to complement the layout and also express how I feel about these 3 beauties. The final step to completing this layout was adding a few random flowers found in the Daydream Die Cut Ephemera pack to help balance out the remaining white spaces of the layout.

This layout stretched some of my skills to new levels, and I love that this hobby continually provides this opportunity. I hope I’ve inspired you to try something new yourself. Thanks for joining me, stay safe, well, and Happy Scrapping!

Fall

I had fun creating this Fall layout for Owen. The picture was taken at the cottage on Thanksgiving weekend 2020, and the weather was perfect for lots of playtime outside! Fun Fact: I have many, many pictures of Owen’s Mom and Uncle around this very tree, as they grew up, so this shot was extra special to me.

The foundation of the page came from the Leaf Pile patterned paper from the Glorious Autumn Kit paper pack by Reminisce. It was a perfect match for the wonderful colour we have on display each Fall in Muskoka. The title for the page is a cut file from Peartree Cutfiles called Fall Tags. You can find it here: https://www.peartreecutfiles.co.uk/product/fall-tags/.

I have some wonderful Fall shaker elements that matched the patterned paper perfectly, and this inspired me to make the tags into individual shaker boxes. The first step was to cut the Fall Tags cut file out twice – one for the top and one as a base for the bottom. I then very carefully punched small holes in one of the cut files to prepare it for hand stitching. I carefully stitched the full cut file using 5 separate colours of DMC floss to match the colours in the patterned paper (DMC 221, 921, 742, 3021, 347). Because the cut file had delicate borders, I only used 3 strands of each colour to stitch around the edges. Once the stitching was completed, I backed the leaves, mushrooms, and pumpkin, that can be seen around each letter. The following picture will help you see the detail of the completed top level.

To create the shaker pockets, I utilized the negative cutouts from the letters of the cut file as a guide and traced each onto a piece of acetate twice (one for the top and one for the bottom of each shaker pocket). I wanted the patterned base paper to show through the completed shaker tags, so the second piece of acetate was necessary to achieve this. The acetate letters were cut slightly larger than the tracing marks to ensure they completed covered each letter and securely held the shaker contents. Once the acetate was in place on the stitched title, I used Foam Sticky Strips from taylored expressions and carefully placed the strips around all edges of each tag and the banner at the top. Before removing the backing of the foam strips, I placed the Fall Shaker Elements in each letter. After the Shaker Elements were added, I removed the backing from the Foam Sticky Strips. I won’t lie, this was a very tricky and tedious step, and it required lots of patience, as the shaker elements kept moving around and liked to stick to the foam – but I feel the effort was worth the result! Once the backing was removed, I placed the second layer of letter acetate cutouts over the letters to secure everything nice and firm and to allow me to lift the cut file without losing any shaker elements. I chose to then adhere everything to the additional cardstock cutout of the cut file. This provided more stability to the overall completed cutout. I also adhered the small stitched centre to the letter A to complete the overall title. Here’s a couple more closeups to show you the completed shaker title.

Once the title was completed, the layout came together quite quickly. I adhered the photo and title first and then added several falling leaves to complement the patterned paper. These included No. 6 Forever Flowers from Prima Marketing Inc., which have been in my stash for years, and a few wooden diecut leaves. Finally, the two wooden slices were added to the bottom left of the picture.

I hope I’ve encouraged you to try a shaker pocket title on a future layout! Thanks for visiting, stay safe and Happy Scrapping!

Valentine’s Day 2021!

While I’m not the type of girl who looks for roses or gifts on Valentine’s Day, I certainly love to show my family how much they mean to me on this special day. This year especially, I look forward to the positive distraction the day will bring! I love to make Valentine cards for my family, and this year I was inspired by the very talented Zsoka Marko who posted a video using a Paige Evan’s cut file. I love interactive cards, and this was the perfect fit for my 3 grandchildren. You can find Zsoka’s video here: https://www.youtube.com/watch?v=_RO1hIrGCpo&t=384s.

Each of these cards was made with Paige Evan’s Folding Heart Mini Album cut file, Design ID #300594, found in the Silhouette Design Store. I cut one single heart and 2 of the folding hearts to make each card. There is space for 4 heart photos within each card, providing a great opportunity to personalize each one. To achieve the heart-shaped photos, I traced the cut single heart onto a piece of clear acetate to create a template that was positioned and traced directly onto my chosen photos. I simply cut the photos a bit smaller than the tracing lines to fit them in the appropriate spots. Liquid glue was used to secure all the cut file pieces together, and a tape runner was used for securing the pictures in place. Ribbons were selected from my stash to coordinate with each paper collection. When the folding hearts were fully completed, I used double-sided adhesive sheets, cut to fit, to ensure a good stronghold to the front of the card. These cards measure 6″ tall by 5 ” wide. To complete the front of each card, I dug into my Doodlebug Design Inc. stash again and pulled two coordinating paper frills in bubblegum, blue jean, and limeade to complement the completed hearts.

Madison’s card was created using the Lovebugs collection of papers and stickers from Doodlebug Designs Inc.

Owen’s card was completed using the Legendary collection of papers and stickers from Cocoa Vanilla Studio.

Benjamin’s card was completed using the Boys Rule collection of papers and stickers from Cocoa Vanilla Studio.

I can’t wait to give my grandchildren these personalize cards on Sunday! I hope you all find special ways to enjoy Valentine’s Day this year, and to show your love to those who mean so much to you!

Stay well, stay healthy and Happy Scrapping!

Frosty

And now for something on the lighter side! Our youngest grandson Ben, is just approaching 2 & 1/2 years of age. He really loves the outdoors….but not in winter!!

Every time our daughter puts him in his snowsuit, and takes him outdoors, he literally just stands there. We live directly across the street, so we get the advantage of seeing them outside. While our daughter will shovel the drive, and the two oldest play in the snow, Ben just keeps standing there….. He can’t be enticed to play in the snow with his siblings, he is so unimpressed with this cold white stuff. He walks and acts like his Mother just put him in a straight jacket. It really is pretty comical from the warm interior of my living room! This picture was taken in early January when we had perfect snow for making snowballs and snowmen. Lindsay took Ben out to build a snowman – but again – no interest – didn’t want to leave the driveway. Lindsay diligently built Ben a snowman with arms and a carrot nose, and still – nothing doing – he simply couldn’t be enticed to come see it. Thankfully, she patiently carried him over to grab a photo. You can see from his face, he was still unimpressed and would rather have been inside with his cars. Oh Ben, you do make us giggle!

I used two cut files from Peartree Cutfiles to make this page. The “Build a Snowman” and “Frosty” files to be exact. Both cut files were cut on my Silhouette using a fine silver glittery cardstock. You will find all of the Peartree Cutfiles here: www.peartreecutfiles.co.uk/

The patterned paper for this layout was a mix of two Photoplay collections. The solid grey cardstock came from the Christmas Cheer “Solids Plus” collection pack, and the red and black lumberjack paper, that backs the Frosty title, came from the “O Canada” collection pack. I choose the red and black lumberjack paper because it matched the fabric of Ben’s hat, and I chose the grey cardstock for two reasons; it was a grey overcast day, and it fit the mood of my grandson!

Before I assembled the page, I flicked diluted white paint over the grey cardstock to mimic the look of a snowfall. Constructing the snowman was super simple, as I only needed the nose and arms to replicate the snowman in the picture. I completed the layout with hand journaling to give context to the picture. I felt it important to give Ben some understanding as to why I scrapped this particular moment, when he looks back on it in the years to come.

I hope you are also finding fun ways to be creative and pass the time during these COVID lockdowns. I wish you good health and Happy Scrapping!