You Are Some Bunny Special

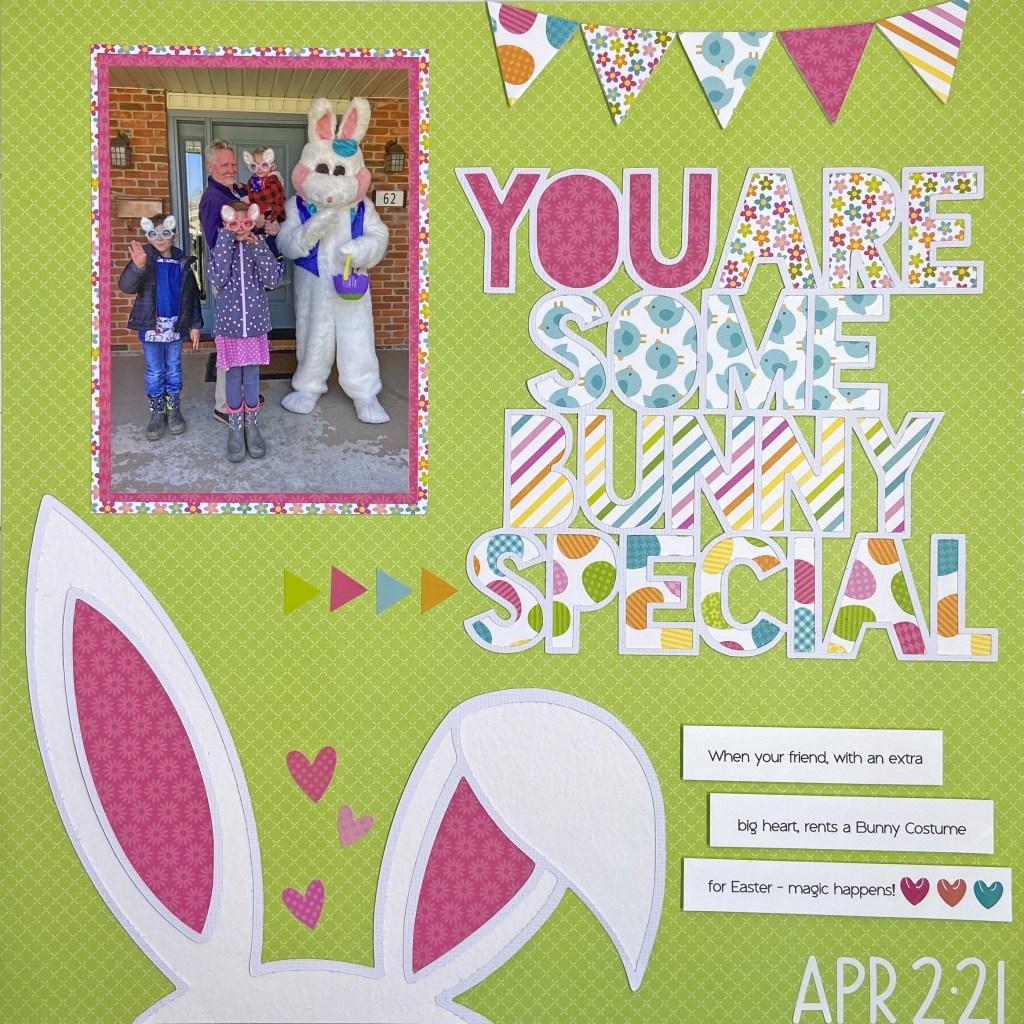
Did you know the Easter Bunny is 6′ tall and that he has a kind and generous heart equally as large? I am very lucky to have a dear friend Gerry, who rented an Easter Bunny costume to spread some joy to young and old this past Easter. He offered to come and surprise our grandchildren and even brought the chocolate eggs to spread more cheer! We were very honoured to be on his list of visits this past Easter. Maddy and Owen couldn’t figure out who was in the costume. Owen asked me where he came from and I replied that I found him hopping around in my backyard. Owen quickly responded with “No Nana, he drove here – I can see his van in your driveway!”. That boy doesn’t miss a trick! Ben was quite taken with the Easter Bunny. After the visit was over, he kept asking his Mom if the Easter Bunny could come to Easter Dinner! Wouldn’t that be something to see!

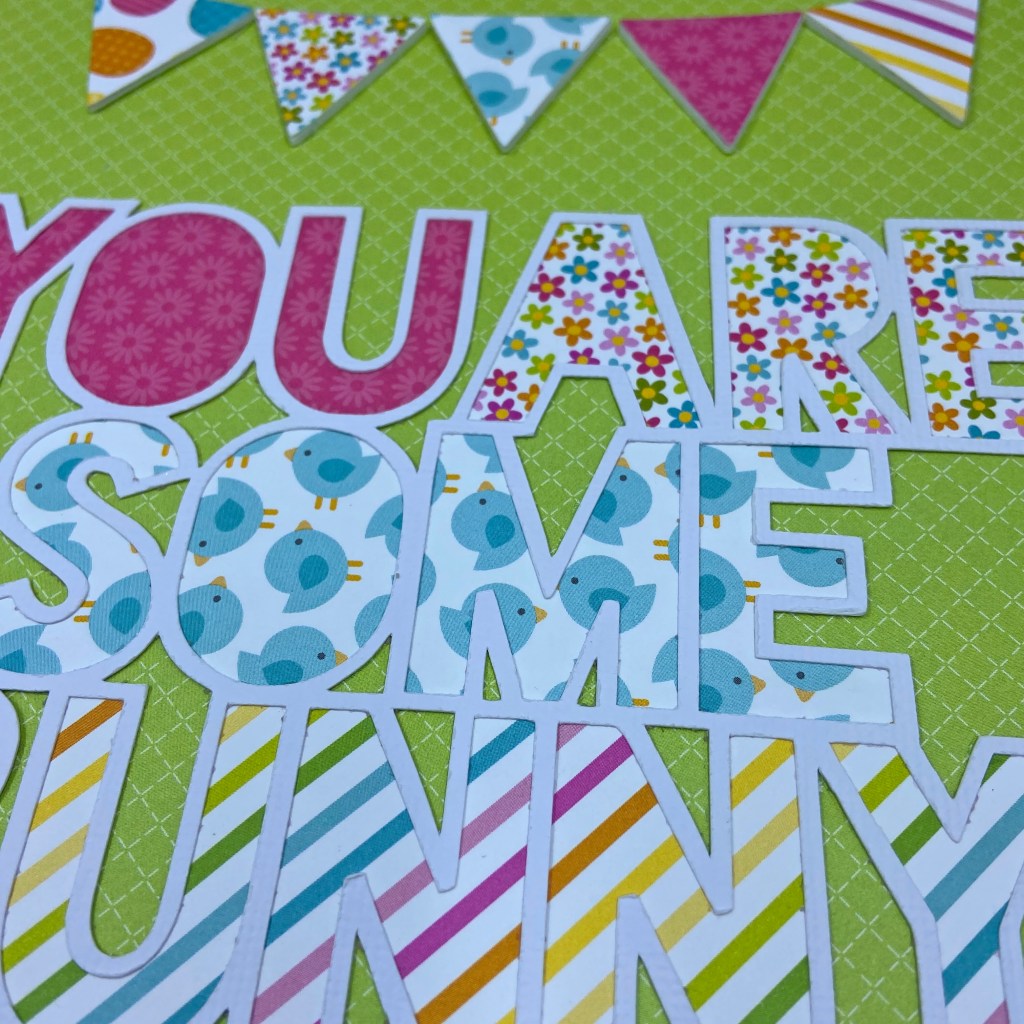
Coordinating papers from 3 separate Doodlebug Designs collections were used to complete this layout; Springtime, Hello Spring and Easter Parade. Two cut files were used to create this fun page. The large title cut file comes from Cut to You and is called Some Bunny Special. You can find it here https://createdbygwen.com.au/product/some-bunny-special-title-cut-file/. I selected 5 coordinating patterned papers from the 3 collections listed above to back the title and add further whimsy to the layout.

The bunny cut file in the bottom left comes from Peartree Cutfiles and is called Floral Bunny Ears https://www.peartreecutfiles.co.uk/product/floral-bunny-ears/.

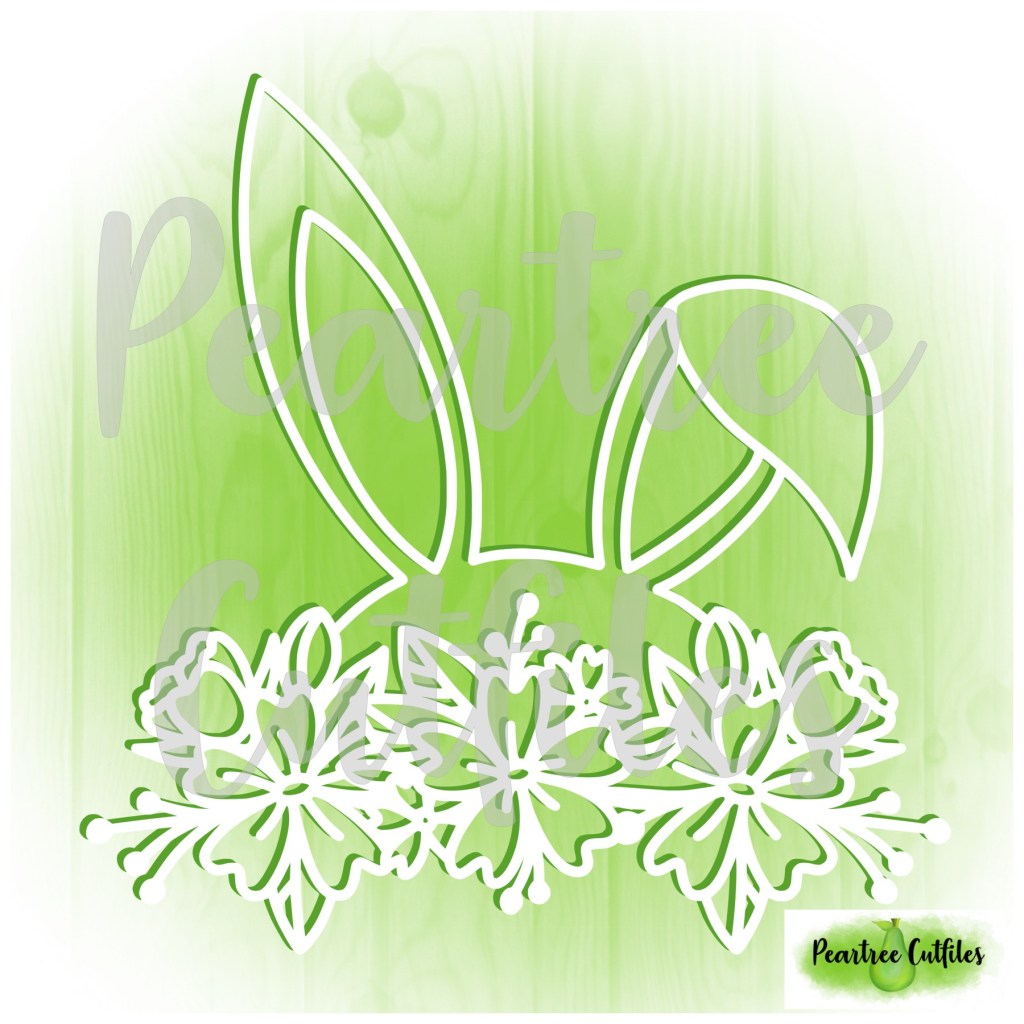
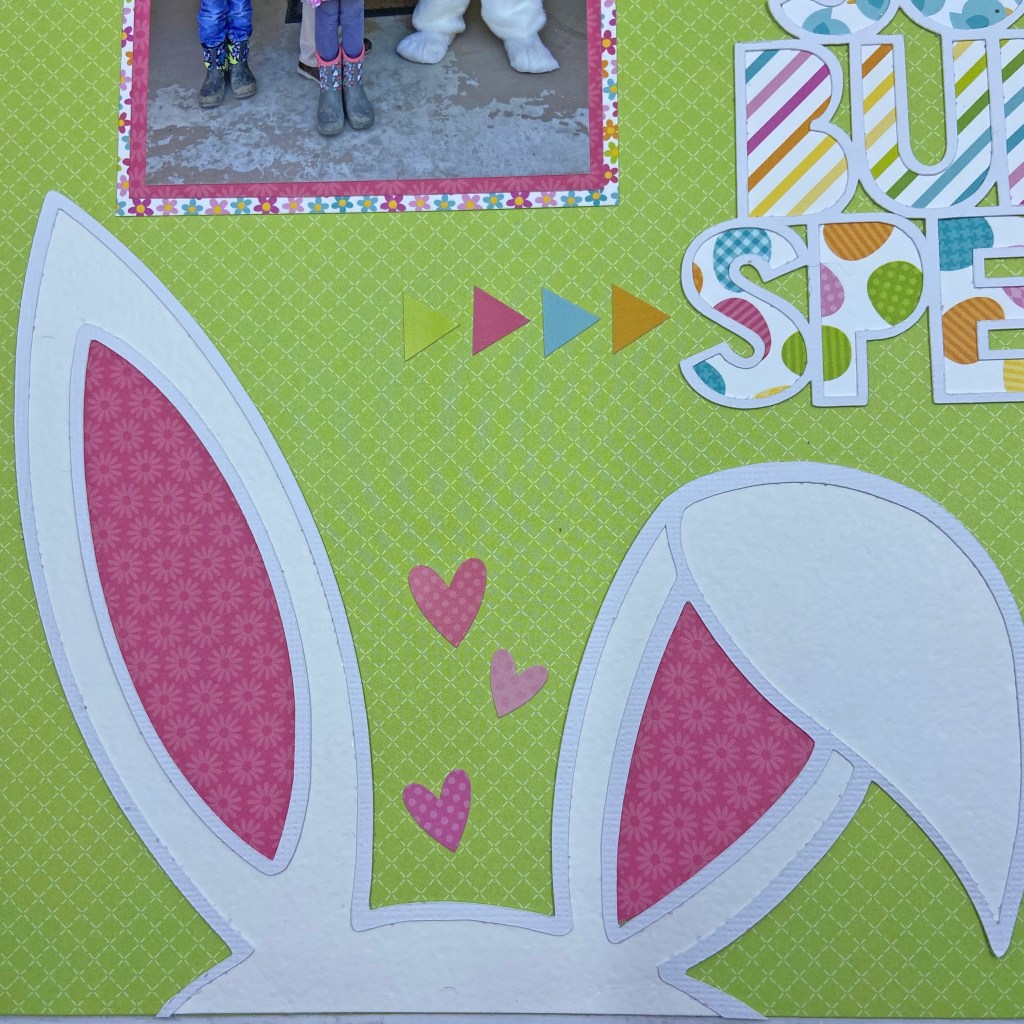
I only wanted to use the head and ears of this file and did not want the floral sections. To achieve this and minimize wasted paper, I positioned the cut file at the bottom of the white cardstock, leaving the floral portion outside the cutting area of the Silhouette mat. Hopefully, this tip will have you looking at some of your cut files a bit differently and get you thinking about how you can manipulate them to fit the vision of your project. The bunny ears were cut from white cardstock and backed with a soft textured white cardstock and coordinating pink patterned paper. This picture provides a closer look.

The banner in the top right of the layout was made by cutting 5 triangles from coordinating patterned papers. Each of these was backed with fun foam to add some dimension to the project.

The finishing touches on the layout included adding sticker hearts (between the bunny ears) and sticker arrows to the left of the word SPECIAL in the title. The photo was matted with 2 coordinating patterned papers. The journaling found in the bottom right was printed on white cardstock and cut to size. These strips were also backed with fun foam. The 3 hearts found at the end of the journaling come from the Rainbow Hearts Shape Sprinkles by Doodlebug Designs. The date was added using Doodlebug stickers called Sunshine.

It has been such a tough year with COVID, the ongoing restrictions, and multiple lockdowns. Thank you Gerry for providing a welcome diversion from our current situation. Your kindness and generosity were so deeply appreciated! This visit by the Easter Bunny was such a bright spot this Spring and a reminder of better times to come. Maybe next year the Easter Bunny will get to come to Easter Dinner! Until next time, stay safe, stay well, and Happy Scrapping!

Obsessed With You

I’m very excited to share my first project as a Design Team member for Marcy and Milly SVG Cut Files! This is a new Canadian company with an online store on Etsy. You can find their shop here: https://www.etsy.com/ca/shop/MarcyMilly?ref=usf_2020. Before you shop, be sure to follow them on Facebook https://www.facebook.com/marcymillysvg and Instagram https://www.instagram.com/marcymillysvg/. In coordination with their Grand Store Opening, they are currently running a 50% off sale, so be sure to follow them on one of these accounts to get the discount code before you shop!

I was attracted to the Obsessed With You cut file for more than one reason. Anyone who knows me knows that I have a slight obsession with my grandchildren, Maddie, Owen and Ben. These beautiful siblings have an extremely tight bond and the oldest two are also a little obsessed with taking care of their younger brother. So the obsession is mutual all around! We are so very lucky! Here’s a direct link to the Obsessed With You cut file: https://www.etsy.com/ca/listing/976615088/obsessed-with-you-svg-cut-file-digital?ref=shop_home_active_11.

The patterned papers, chipboard accents and enamel dots used in this project all came from Carta Bella’s Flower Garden collection. The first step in creating this page was to open the cut file and photo in the Silhouette software. This allowed me to play with the sizing of the photo and the cut file before the photo was printed or the cut file cut on the Silhouette. The title was cut with white cardstock and backed with coordinating papers from the Flower Garden collection. When this step was completed, I decided to pull in some colour and texture and made the decision to add the hand stitching to the solid letters. To achieve this, I used a paper piercer to make the stitching lines within each solid letter. A simple backstitch was used to stitch the letters using #776 DMC floss. To pull more pink into the layout and to provide a bit more dimension, I traced the solid heart in the word YOU onto coordinating pink patterned paper. I used the same pink paper to cut the small pink heart found in the word “with”. Both of these hearts were secured using pop dots. The following pictures provide a closeup of all these details.

I just love the colour combination of this paper collection. The black and white striped paper was perfect for creating a border on the top and bottom of the page. While I could simply have adhered the 12″ x 11″ aqua base paper on top of the striped paper, it would have resulted in using up the whole black and white page. The backside of this paper is lovely, and I know I could use it on another project, so I decided to cut 12″ strips of black and white paper and adhered it to the top and bottom of the aqua sheet to save on paper. Two coordinating sheets of patterned paper were used to mat the photo and helped to pull these colours through the entire page. At this stage, I centred and adhered the photo and title to the base page.

I wanted to find a way to pull more of the black and coordinating patterned papers into the layout. Creating the small cut-ins on both sides of the layout helped me achieve this. These small elements provide pops of colour and balance to the overall design. I love how the backside of the aqua paper provides a light flowery backdrop to the bold black and white flowers underneath. To achieve this look I used an Exacto Knife and cut a straight horizontal line 1 & 1/4″ from each edge. A bone folder and ruler were used to mark the folding lines and ensured a clean, straight line to fold the papers back. Small strips of the black and white flower paper were cut to fit in behind these openings. To complete the layout, the Love Grows Here sticker was added to the photo, the chipboard accent was “hung” from the title, and coordinating enamel dots were added to the page.

I hope I’ve encouraged you to try some of these techniques on your next layout. While you’re thinking of your next page, take some time to look through the lovely Marcy and Milly SVG Cut Files. I know you’ll find something special for your next project! Until next time, stay safe, stay well, and Happy Scrapping!

Explore

Our youngest grandson Ben is now 2 & 1/2. He is on the move from the time he opens his eyes in the morning until he closes them at night. He’s full of curiosity and loves to explore everything around him. Like many boys his age, his favourite things are cars, trucks, and airplanes. But nothing gets Ben more excited than Garbage Day! It is his favourite day of his week, and he can often hear the garbage truck coming from a few blocks away!! When I saw the Cut to You Pie Graph cut file, I knew it would be perfect to visually represent how my grandson spends his day. You can find the cut file here https://createdbygwen.com.au/product/pie-graph-cut-file/.

My first step in creating this layout was to resize the Pie Graph cut file and then cut it from white cardstock. I used the Little Dreamer Boy paper collection and chipboard accents from Echo Park to complete this layout. The star background is the backside of the Little Dude patterned paper. I then decided which coordinating papers I would use to backfill the pie graph, and cut those accordingly. These pieces were set aside at this stage. To add some texture and dimension to the page, I hand stitched each section of the pie graph in a coordinating colour using DMC floss. The specific colours used in this layout were 336, 522, 816, 921, and 932. To prepare the cut file for stitching I took a paper piercer and pierced holes approximately 1/4″ apart around each section of the cut file. A simple backstitch was used to complete the stitching. When all the stitching was completed the coordinating patterned papers were adhered to the back of the cut file to complete the pie graph. The completed cut file was then positioned and adhered to the background paper.

Once the cut file was completed and in place, the layout came together quite quickly. Two patterned papers were used to mat the photo. The coordinating elements on this layout came from the Little Dreamer Boy 12 x 12 Element Sticker sheet and the Chipboard Accents. The date was added with white Happy Life Thickers, by American Crafts. Here are some further closeups of the detail in this layout.

I’m very pleased with how this page turned out. It will be put in a frame for Ben to hang in his room. I know he’ll love looking at the vehicles on the page – especially the garbage truck! I hope I’ve brought a smile to your face today, thanks for stopping by. Until next time, stay safe, stay well and Happy Scrapping!

Never Grow Up

We have been blessed with beautiful spring weather for the last couple of weeks. It’s such a relief to be able to get out and enjoy the outdoors – especially since we’re under our third “Stay at Home” order. Our youngest grandson Ben is now two and a half. Every day is a new day of discoveries for him. He loves being outdoors and he and his siblings have a wonderful treehouse in their backyard. My daughter managed to get Ben to slow down long enough to capture this beautiful photo of him in the upper level of their treehouse.

The perfect cut file to complement this picture was the Tree House cut file from Peartree Cutfiles. You can find it here https://www.peartreecutfiles.co.uk/product/tree-house/

While it does take some time and patience to back this large cut file, it was worth all the effort. I used patterned papers for the background and the tree trunk from Shimelle’s Never Grow Up paper line. I also used a Copic marker to colour the rope ladder found to the left of the tree trunk. When I’m working on a cut file this large, I use the fill option in the Silhouette Studio software to map out the colours first. This ensures I don’t miss any of the pieces as I cut the backing, and also speeds things up overall.

I wanted this cut file to take centre stage on the layout, so I kept the embellishments to a minimum. The Never Grow Up title, get OUTSIDE banner, snail and vellum ant all came from a coordinating ephemera package from the Never Grow Up line. I adhered some fun foam to the back of the Never Grow Up title, to provide a bit of dimension and texture to the layout. The two little layered butterflies belong to the Flower Wild Free collection by Prima Marketing Inc. The date was added using Doodlebug Design Inc‘s, my type stickers.

Thanks for stopping in today, I hope I’ve inspired you to get outside to enjoy the spring weather! Until next time, stay safe, stay well, and Happy Scrapping!

Precious Moments

I spent some time last week sorting and clearing out some of my electronic picture files. I’m so happy I did because I came across this gem of a photo that I’d forgotten about. I LOVE everything about this photo – the sweet dog Lillie, her curiosity, the ripples in the water and the colours all combined to make this photo simply spectacular! My soon to be (not soon enough!) daughter-in-law, Tanis, took this gorgeous photo of Lillie when the two of them were camping and hiking at Horseshoe Lake in Jasper National Park, Alberta in 2017. Sure makes you want to run to the mountains, doesn’t it?!

I used two cut files from Peartree Cutfiles to complete this layout. The Arrow Border cut file was a perfect match for drawing focus on this outstanding photo. You can find it here https://www.peartreecutfiles.co.uk/product/arrow-border/. I wanted to pull on the colours from the lake to complete the border and accomplished this by using coordinating papers from Cocoa Vanilla Studio’s Happiness collection. I raised some of the arrows for further emphasis and accomplished this by adhering black fun foam to the back of the turquoise and aqua arrows around the border. The remaining arrows were simply backed with coordinating patterned paper or Huckleberry Pie cardstock from Bazzill. The Moments title can be found here https://www.peartreecutfiles.co.uk/product/moments/. It was backed with Huckleberry Pie cardstock and I used Lawn Fawn’s Metallic Cardstock in “Holographic 2.0” to back some of the camera elements.

One of the reasons I’ve enjoyed using Cocoa Vanilla Studio collections is the fact that many of these collections work together. With this in mind, I searched through my collections to find a background paper that fit the layout I had in mind. The background paper in this layout came from the Boy’s Rule collection, specifically the Messed Up patterned paper sheet.

In wishing to keep the photo the main focus of the completed layout, I only added a few additional elements to complete it. The word “precious” was added above the title phrase and it came from the sticker sheet in the Happiness paper collection. The date and Lillie’s name were added with my type cardstock stickers, and the blue heart came from the Rainbow Hearts Shape Sprinkles package – all elements from Doodlebug Designs. Here are a few more photos to provide more detail on the completed layout.

So glad you stopped by today. Until next time, stay safe, stay well and Happy Scrapping!