From Cut Files to T-Shirts!

I spend most of my crafting time working on scrapbook pages, cards or designing classes. But one of my sidelines from working with cut files has been creating t-shirts for my grandchildren. With Christmas less than two weeks away, I spent some time yesterday making each of the grandchildren a t-shirt. Making t-shirts is a great way to personalize a gift for the recipient. I chose three cut file patterns that truly represented each of their personalities.

I purchase blank t-shirts from a local company called Bright Swan. A great Canadian company with excellent service and selection! Siser Heat Transfer Vinyl (HTV) is my go-to when making t-shirts. I use a Cricuit Easy Press (9″ x 9″) to transfer the vinyl to the t-shirts and find that this machine meets all my needs. It is very cost-efficient and can be stored easily, compared to a larger heat press.

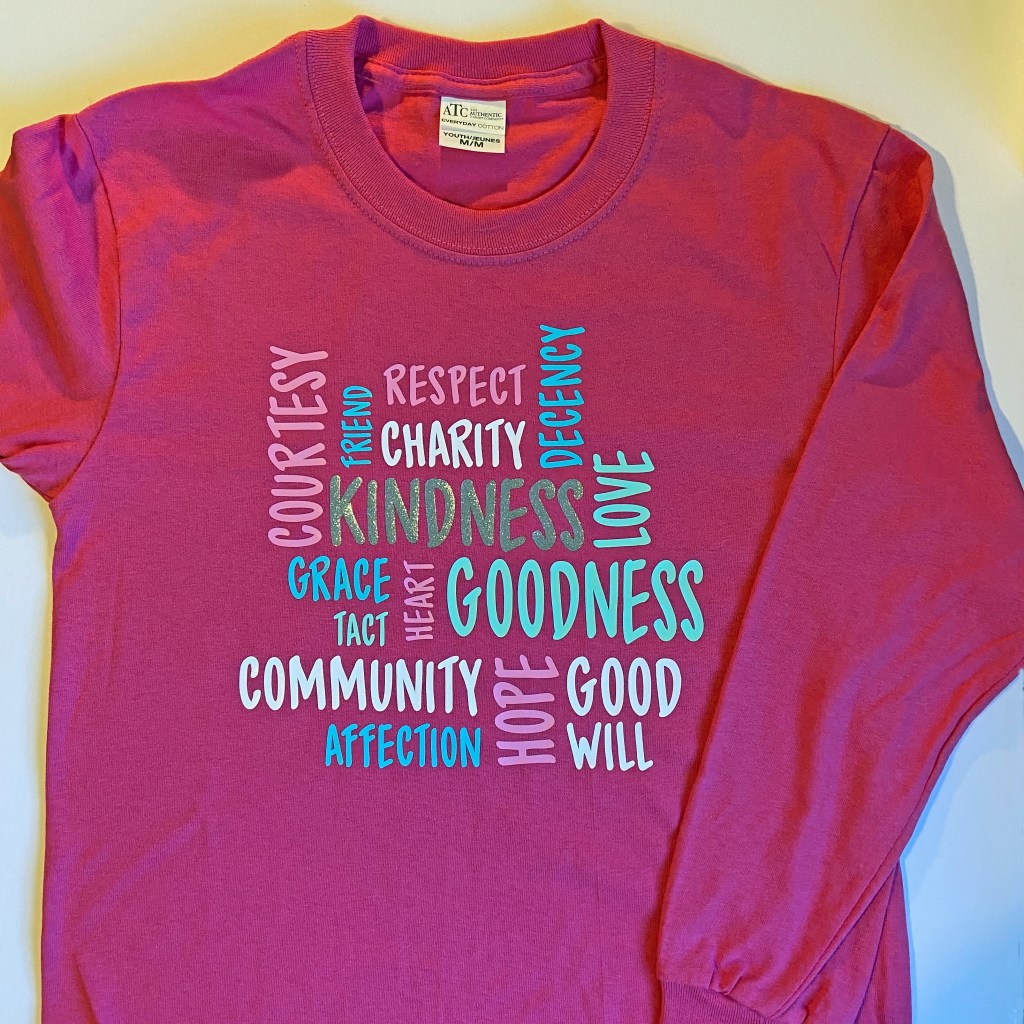
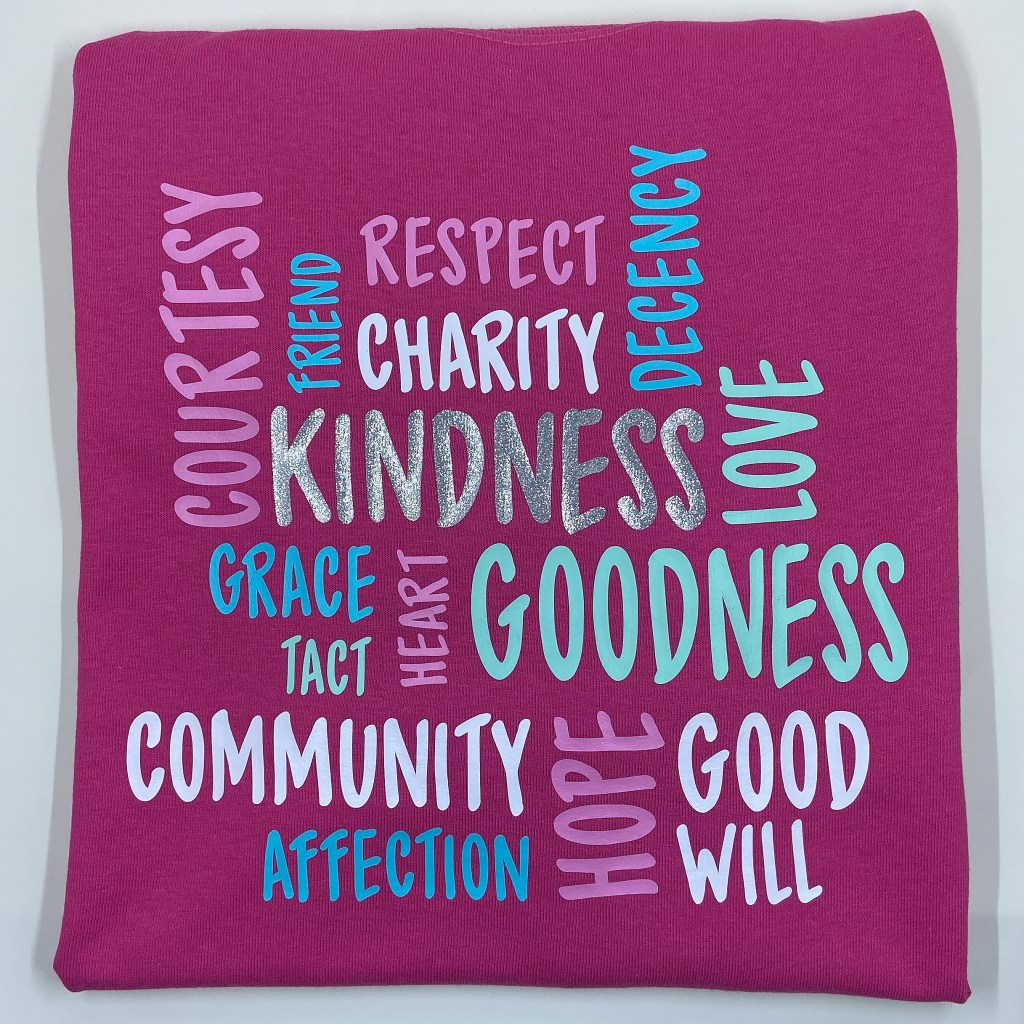
The first t-shirt is for my oldest grandchild, Madison. She is very kind and caring and very aware of the impact that acts of kindness have on others around her. It was, therefore, fitting that I chose a cut file from Marcy Milly SVG to make her t-shirt. The World Kindness Day is a FREE cut file released on November 13, 2021, in honour of World Kindness Day.

I started this project by opening the SVG cut file in Silhouette Design Studio software (I use Designer Edition). Next, I ungrouped the file. Step three involved using the Fill panel to change the colours to those I would be using. These steps made the process much easier, as I now had a visual guide of the end product, and I was able to select the words by colour when it came time for cutting. The individual words, or group of words, were cut separately to minimize the waste of vinyl. Drawing a box or rectangle around each word, using the drawing tools in Silhouette, makes the weeding process very easy. Once all the individual files were cut, weeded and ready to go, I returned to the Silhouette software program to determine the centre point of the design. I gently fold the design where it intersects with the midline of the t-shirt. For this specific cut file the words Respect, Charity, Kindness, Goodness, Community and Affection all intersected with the centre line. Before adhering the design to the t-shirt, I fold the t-shirt in half and make a gentle press line to use as a guide. I’m very happy with the results and think Maddie is going to love this t-shirt!

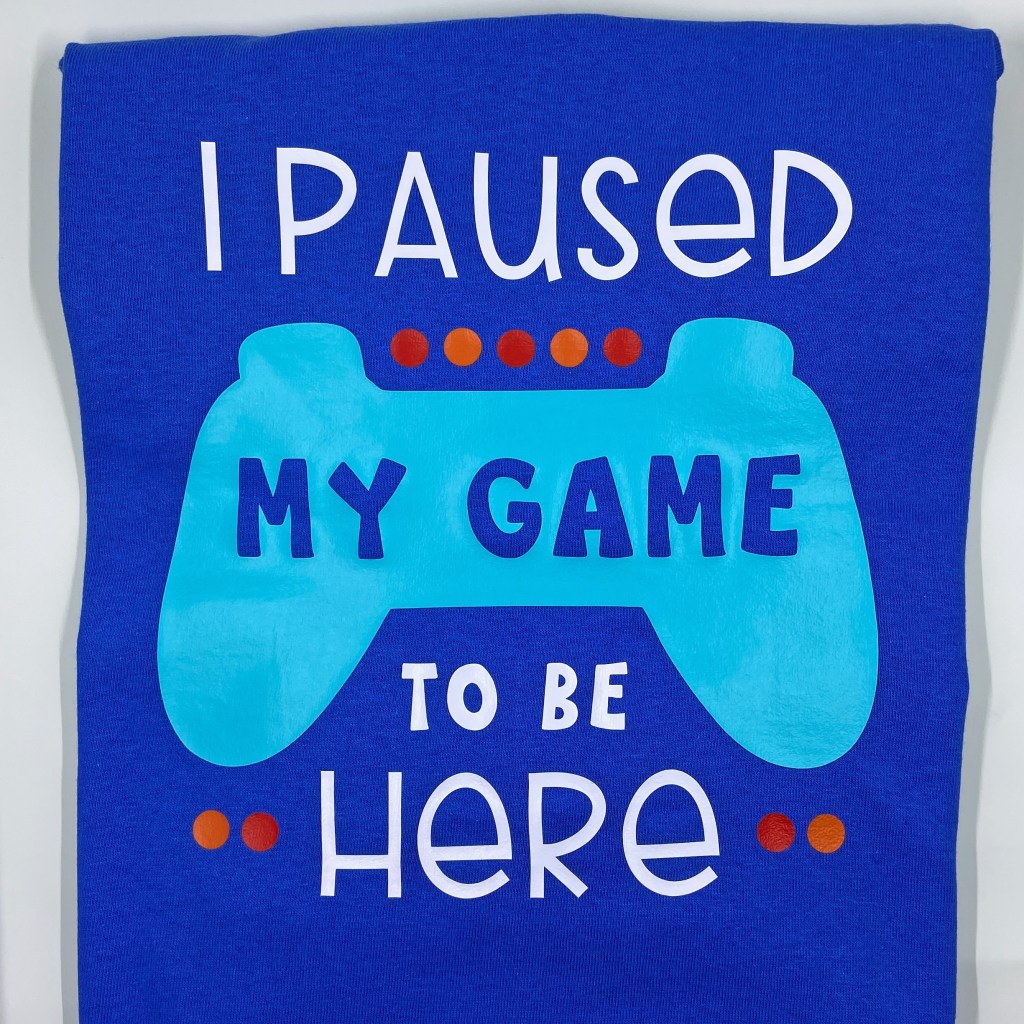
The second t-shirt is for my oldest grandson, Owen. He loves playing video games and finds it amusing that I can’t keep up with him! This design came from Silhouette Studio. It was created by Hand Drawn Cuts and is Design ID #365234. I followed the same process as above and specifically used the turquoise HTV to match his controller. I grouped the coloured dots in the cut file to ensure they were spaced exactly as intended when pressing them to the t-shirt. I know Owen will love this t-shirt, and also find it amusing to wear to school!

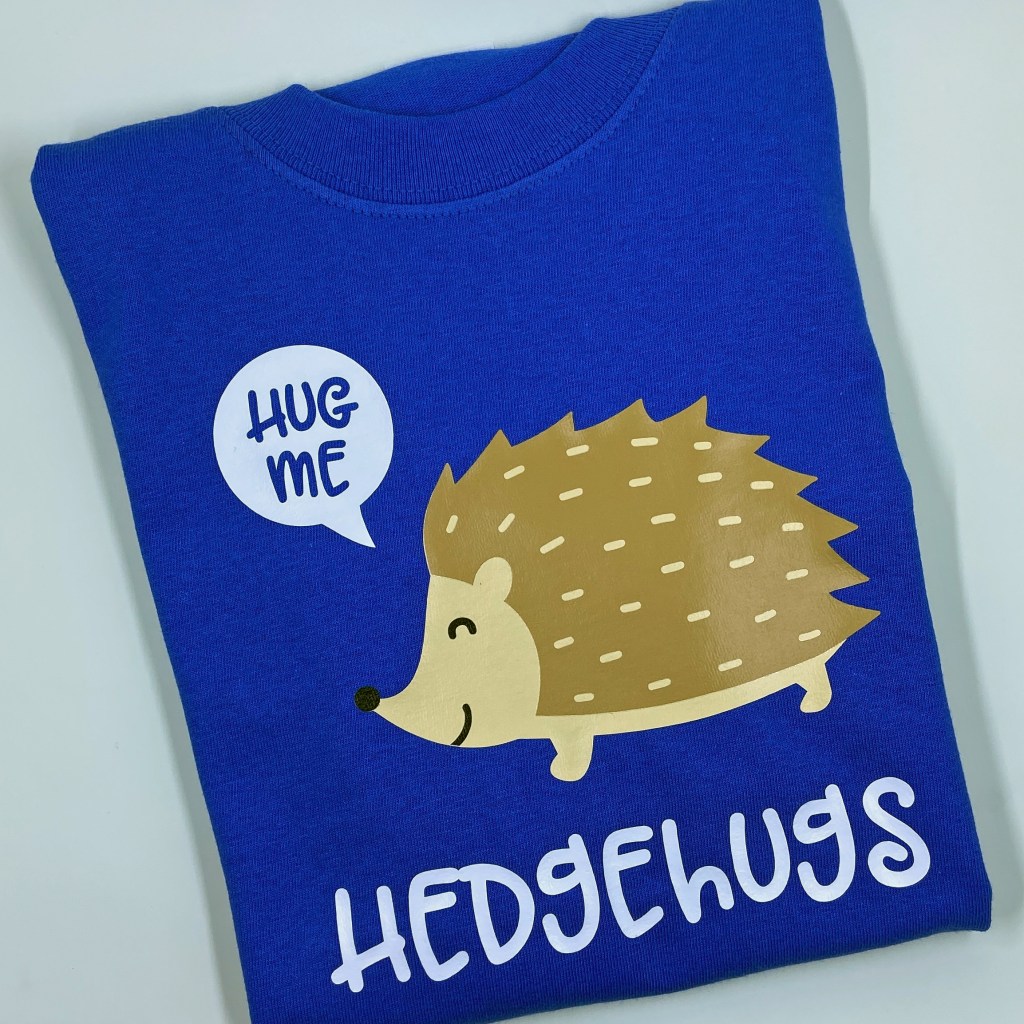
Our youngest grandson Benjamin has a love for hedgehogs! This is also a Silhouette Studio design. It was created by Planeta Silhouette and is Design ID #212569. This design included layering the cut files that are all associated with the hedgehog. It was very easy to align and it pressed beautifully. Ben is going to love this t-shirt and who can resist giving him a hug when he’s wearing it?!

All I have left to do now is wrap these cute shirts and place them under the Christmas tree. I’m pretty sure I’m just as excited as they are for the big day!

I hope I’ve encouraged you to look at extending the use of your electronic cut files. Don’t be intimidated, making these shirts was not difficult, and I know you’ll find joy in making personalized shirts for your loved ones! Until next time, stay safe, stay well and Happy Scrapping!

Together We Have It All

This.

Like all mothers out there, I am proud of my family and all their accomplishments. What I admire most is their ability to be positive and focused, regardless of what life presents. Core to our relationship is an understanding that one of the most important aspects is our strong connection. We are here for each other through thick and thin, for better for worse. Our strong relationship makes us rich in so many ways. This foundation is what matters most to us. When life throws us a monkey wrench, we carry on together.

This summer, I felt like one of the luckiest women in the world. After many months of separation due to COVID, my family reunited in August! Sean and Tanis travelled from Edmonton to join us at the cottage. It has been six long years since Sean had the opportunity to spend time there, and the first time Tanis was able to travel east during the summer. Honestly, having everyone together at our happy place was a dream come true!

As I began designing a layout concept to document this event, I came up with the title but was unable to source it out. I turned to Marie Hurst, owner of Peartree Cutfiles, and asked for her help. Not only did she agree to design the cut file Together we Have it All, but she also exceeded all my expectations! I’m simply in love with the result! Thank you, Marie, I’m so deeply grateful!

I utilized two Cocoa Vanilla Studio collections in this layout, Daydream and These Days. I love how the collections work well together and allow for the mixing and matching of embellishments. All papers in this layout came from the Daydream collection. The background paper is Sweet Serenity, and those used in the title are Garden Variety (backside), All Aflutter and Daisy Days, respectfully. To create the completed title, I offset the letters slightly and then adhered them on top of the base title using Taylored Expressions Foam Sticky Strips. I filled the two cut out hearts with puffy hearts from both the Daydream and These Days collections. They were a perfect fit and complement to finish off the title.

A selection of embellishments from the These Days Die Cut Ephemera package completed the layout. To create the dimension on the butterflies, I placed score lines on either side of the butterfly’s bodies and then gently folded the wings up. Scor-Tape was then applied in the thin centre channel to adhere the butterflies to the page.

The best thing we have in life is to hold on to one another. No matter where we go, what life throws our way, together, we truly have it all. Thank you, Marie, for helping me document a very special time this summer!

Until next time, stay safe, stay well and Happy Scrapping!

Giving Thanks

Fall is such a gorgeous season! It’s so refreshing to feel the temperature cool down and inspiring to see the leaves changing colour. There’s nothing better than spending time at the cottage during this season. It is a quiet time to relax and take in the beauty of our surroundings. We celebrate Thanksgiving at the cottage each year. It is the weekend we close for the season and say goodbye until the spring. We reflect on a great year of new memories and give thanks for such a wonderful summer getaway.

The Fall Words cut file from Marcy Milly SVG was the perfect compliment to the photo of my grandchildren on a beautiful fall day. This cut file is very versatile, providing multiple words for multiple layout options. I chose Cocoa Vanilla’s Legendary collection for the base page of this layout. The specific paper is called One Way. The large fir tree caught my attention immediately. I knew the tree would be one of the focal points on the layout. To provide some depth and texture, I layered the tree. First, I flipped the cut file horizontally to provide the proper placement on the left-hand side of the layout. Next, I enlarged the cut file to approximately 11″ in height and cut it from Bazzill Cardstock called Capers. I then resized the tree slightly smaller (3/4″) and cut it again. I made a 1/4″ score line along the straight edge of the smaller tree and used a 1/8″ Scor-Tape to adhere the two trees together. Before adding fun foam and pop dots between the trees for dimension, I adhered the tree to the layout first. I’m very happy with the overall effect this created, giving the feel of a real fir tree.

To help fill the blank space at the top of the layout, I used Paige Evan’s Leaf Banner. It can be purchased from the Silhouette Studio Store and is Design ID #383307. Brown cardstock was used to cut the file and I backed it with several coordinating fall colours of cardstock. The stunning brass folded leaf charm was a recent find at a Local Scrapbooking Store, The Scrapbook Shop in Listowel, ON. This was my first trip to this store, and my first visit to a Local Scrapbooking Store since COVID began. I will be back, it is a gem!

The layout was completed by adding the title using the Giving Thanks words from the Marcy Milly SVG cut file. It was so appropriate, as this picture was taken on Thanksgiving Weekend, 2017!

Thanks for popping in, and until next time, stay safe, stay well, and Happy Scrapping!

Summer

Cottage season is over, and crafting season is back on! While I love summer and the cottage, I am always happy to get back into my craft room. It seemed fitting to share a summer layout with you as I get back into my crafting groove.

This summer, my son Sean, and his fiancé Tanis traveled from out west to our cottage in Muskoka. It was Sean’s first trip back in six years and his first trip to bring Tanis. We had a wonderful week with them and loved introducing Tanis to everything we love to do in the summer at the cottage. Tanis had a go at tubing and enjoyed a fun-filled, action-packed ride with Maddie and Owen! This picture represents the fun they all had!

To document this moment I used the FREE SUMMER SVG cut file from Marcy Milly SVG.

I selected a photo of our dock to backfill the cut file. You can accomplish this effect in two different ways. You can trace the outline of the cut file onto your photo and then fussy cut, or you can open the photo in Silhouette software and then open the SVG cut file over the top. This positioning allows you to move the cut file exactly where you want it cut. To achieve this, release the compound path of the cut file and remove the outline of the cut file and any extra inside pieces. This isolates the six letters that spell SUMMER. Then create a slight offset of the individual letters (0.05 works well) and delete the original (internal letters) before you cut. The result gives you a slightly larger backing to securely adhere the letters to the back of the cut file. The following pictures provide some close-ups of the title.

This layout was designed using Cocoa Vanilla Studio’s Boys Rule collection. The specific paper was called Entitled, and I used stickers, word phrases and chipboard embellishments from the collection to complete the layout.

Thickers Happy Life foam letter stickers were used to add the subtitle Tubing with Auntie Tanis and the date.

We had such a lovely summer this year and made exceptional memories that I look forward to documenting this winter. I hope you all have wonderful summer memories to get you through the long cold winter ahead. Thanks for visiting, and until next time, stay safe, stay well and Happy Scrapping!

Party!

I’m long overdue in posting this two-page layout for Ben’s 2nd Birthday! There’s nothing better than a summer birthday when the air is hot, the water refreshing and the birthday cake is ice cream! We are so lucky to have the opportunity to celebrate this sweet boy’s Birthday at the cottage.

The gorgeous ink base pages for this double page layout came from a craft smart paper pad called Rainbow Inks purchased at Michael’s. This paper pad is an excellent alternative for someone like me who is slightly intimidated to create the backdrop myself. I was attracted to the turquoise page with the internal square offset and rotated the second page to balance the double page layout.

I love the Star Cake cut file from Peartree Cutfiles. It was perfect for documenting Ben’s big day. The file was cut from black cardstock and then the interior pieces were offset with coordinating patterned papers from Doodlebug Design’s Party Time paper pack. Lawn fawn’s “holographic 2.0” paper was used to back the stars in this cut file. The number 2 was added to the cake using a chipboard piece from Basic Grey called dark chocolate chip.

I enjoy making my grandchildren shirts for their Birthday and found the perfect design for a two-year-old in the Silhouette Design Store. The Two Nado Birthday Phrase was designed by Sarah Bailey (Design ID#315079). I used black and turquoise Heat Transfer Vinyl to create Ben’s t-shirt. I replicated this design for the second page of this layout. 

The rest of the layout came together quickly using several “odds & ends” from Doodlebug Design’s Dragon Tails ephemera package. The PARTY title, coordinating birthday presents and stars on both pages all belong to this package. The green Happy Birthday stickers are also a Doodlebug Design product and belong to a multicolour cardstock sticker sheet. You can stretch your scrapbook stash when companies coordinate the colours between different paper collections and releases! The finishing touch was to add the date using white Thickers Happy Life foam letter stickers. 

We sure had fun celebrating Ben’s 2nd Birthday, and I’m excited to add these pages to his personal scrapbook. I hope you’ve found some inspiration to scrapbook a special birthday in your family. Until next time, stay safe, stay well and Happy Scrapping!

The Girls!

With summer just around the corner, it’s time to share a highlight from summer 2020. We’ve just come out of a very long lockdown and I can’t wait to make some fun memories this summer with my family and friends! This photo is one of my favourites from last summer as it captures 3 generations. We get so busy having fun together that we often forget to pause for a minute to take some pictures. This picture includes me, my daughter and granddaughter on a beautiful summer day at the cottage – our favourite place to be in the warm weather! I’m so thrilled that Marcy Milly SVG designed thegirls! cut file. It was exactly what I was looking for! This title lends itself to so many possibilities – sisters, reunions, weddings, sororities, girls night out, and many more – so many options!

I decided to use the Vicki Boutin Color Study paper, ephemera, and stickers for this layout. The bright bold colours remind me of beautiful summer days. I cut the title in Fushia cardstock and then offset the title 2 separate times to layer it in coordinating (orange and teal) cardstock. This also helps draw more attention to the title cut file. Once my picture was printed and matted I added fun foam to the back of the cut file to pop it up further and to create some dimension on the layout.

The rest of the layout came together quite quickly. Several embellishments came from the Vicki Boutin Color Study Journal Ephemera and Icon Ephemera packages. I also utilized a sticker (This is the Stuff That Matters) and the gold foil dots came from the 6 x 12 Sticker sheets that belong to the same collection. The date was added using teal glitter foam letter stickers from Thickers called Sunny.

As we start to see daylight in this pandemic, I hope the summer of 2021 is one of love and laughter for you. I can’t wait to hug so many important people in my life!! And don’t forget to grab pictures of your reunions and events that bring us back together. This is going to be a summer to celebrate!

Until next time, stay safe, stay well, and Happy Scrapping!

Family – Stitched Together by Love

We’ve always encouraged our children to follow their passion as they grew up. It’s so rewarding to see them do it, but so tough when that passion takes them far away from home! Our son Sean followed his passion into the military and has been posted in Edmonton for several years now. And how lucky for him, and us, that he was posted out west, because this is where he met his incredible fiance, Tanis!

Late last summer we traveled out to Alberta to visit with Sean and Tanis. It was our first opportunity to meet Tanis’ family and we had an incredible trip. We were so warmly welcomed by this family from the moment we arrived. From welcome flowers and cards to multiple gatherings, game nights and wonderful meals together, this family made us feel loved and special throughout our entire stay! We can’t thank them enough for making our visit so special from beginning to end. You know when you meet people and you just know you’re going to be good friends? It’s so rare and such a gift to treasure. And the very best part of this relationship was seeing first-hand how much this family loves our son and welcomes him into their lives. The picture in this layout was taken during our last get together on that trip, and it includes Tanis’ parents, Linda and Ted. I love how it represents both sets of parents as pillars in their lives. We all know how tough this life can be and how important it is to surround ourselves with people who love and support us.

A good part of this strong connection between us all is the things we have in common. Tanis’ Grandmother Donna, definitely has a soft spot for Sean, and so did my Mother! It was so tough losing my Mom several years ago, but how lucky for Sean to now have another Grandmother in his life that cares so deeply for him. One of the most striking similarities between these two Grandmothers is that they both are/were quilters. I can’t think of a better gift to receive than a homemade quilt. Each time you wrap it around you, it’s like getting a loving hug from the woman who dedicated hours, weeks and months to stitching the quilt just for you. It is the love of these women for their families, and their passion to quilt, that inspired me to create this page. My vision was to represent two families coming together by bringing two quilts together on one page.

The top quilt in this layout is a free cut file designed by the talented Paige Evans. It is called Patchwork and is found on the Scrapbook and Cards Today (SCT) website under Bonus Files – Spring 2021. SCT offers multiple free cut files with each new edition, so be sure to check them out! I cut this file from white cardstock and backed it with coordinating papers from Cocoa Vanilla Studio’s Happiness collection. The colours in this collection were a great fit for the colours in our family picture (and it was just luck that we coordinated so well that day!).

I also wanted another background that represented quilting and the Stitched Diamonds cut file from Confessions of a Paper Addict (COAPA) was just want I was looking for. I used 8 coordinating colours of DMC floss to stitch this foundation page (DMC #500, 502, 820, 825, 991, 992, 3844, 3846). As most of the bottom page would be covered by the top quilt, I only stitched the first 3 sections from the outside in.

Before securing the top quilt to the bottom foundation page, fun foam was adhered to the backside to provide further dimension and texture to the layout. I find this product ensures a smooth and secure look for years to come. Something you can’t achieve by using foam dots.

The title was created using cut file #154615 from Silhouette Design Store entitled family saying – flea market.studio by Doodlebug Design. I created and printed the add on – Stitched together by love – using Microsoft Office Word.

Our love for our children has brought us together and we are all so excited to see them begin to build a life together. While we can’t have Sean close to home, we are certainly blessed that he has a family out west that loves him as much as we do! We left that vacation with the feeling that our family had just doubled in size. We can’t wait to make another trip out west to spend time with this loving and caring family.

Wishing you all a Happy Victoria Day! Until next time, stay safe, stay well, and Happy Scrapping!

My Rose Garden

Thank goodness Spring has finally arrived in all its glory! Our gardens are beginning to grow and we can look forward to beautiful summer days ahead. These two beauties make me smile every day. They are my perpetual garden that just keeps blessing me day after day. The Bouquet of Roses cut file from Marcy and Milly SVG was a perfect fit for this recent photo. It is a 3 layer cut file and I found it very easy to assemble.

The pink blossoms in the photo and the peach in my granddaughter’s shirt were the inspiration for the colours in this layout. I chose the soft peach/pink combination background from the Vicki Boutin Ready-to-Use Mixed Media Paper pad entitled Enjoy Today. I love these papers, they have beautiful colour combinations and a lovely texture. They are also perfect for scrapbookers like me who remain a bit intimidated by the whole mixed media process! I matched the colours of the roses in the cut file to this pretty background paper.

To create some texture and dimension on this layout I cut the base leaf section of this cut file twice. The bottom level is sage coloured (formally the Green/Black paper) and came from the Carta Bella Flower Garden coordinating cardstock package. The top leaf level was cut from the backside of the 3×4 Journaling Cards paper found in the same collection. I liked the small flecks of white in this patterned paper. These papers were layered one over the other. To create the dimension, small foam squares were added between the leaf layers in the areas that fell outside of the centre roses.

As I create a layout I usually get all the elements ready first before committing to adhering them in place. This allows me to move things around and decide on the final positioning and determining if anything else should be added. I always find that the final layout is not exacting what I envisioned at the beginning. This process is something I love about creating, it allows me to continually grow and develop skills. When I laid out the cut file and photo on this beautiful background paper, I felt the edges of the layout were missing something. There was just too much white space on the borders for my liking. I settled on a stitched border to fill this void. I’ve stitched for many years and find it very relaxing and rewarding. It also provides another level of texture to the completed layout. To create this border I altered the Stitched Diamonds cut file from COAPA Cut Files. I removed all the cut lines from the centre of the file to leave the scalloped border. This scalloped border was stitched using DMC floss that coordinated with the background paper and roses. I used colours 605, 760, 893 and 895. I changed the colour for each singular scallop, so it did take a bit of time to complete the border. I feel this border helped pull the whole page together.

With the border completed the photo and cut file were added to the page. It was at this stage that I added the foam adhesive squares to the leaves. The final touches included adding the title and date using Thickers Happy Life foam letter stickers. These pale rose coloured stickers blended in beautifully.

I’m so glad you stopped by today and I hope I’ve inspired you to create with this gorgeous cut file! Until next time, stay safe, stay well, and Happy Scrapping!

You Are Some Bunny Special

Did you know the Easter Bunny is 6′ tall and that he has a kind and generous heart equally as large? I am very lucky to have a dear friend Gerry, who rented an Easter Bunny costume to spread some joy to young and old this past Easter. He offered to come and surprise our grandchildren and even brought the chocolate eggs to spread more cheer! We were very honoured to be on his list of visits this past Easter. Maddy and Owen couldn’t figure out who was in the costume. Owen asked me where he came from and I replied that I found him hopping around in my backyard. Owen quickly responded with “No Nana, he drove here – I can see his van in your driveway!”. That boy doesn’t miss a trick! Ben was quite taken with the Easter Bunny. After the visit was over, he kept asking his Mom if the Easter Bunny could come to Easter Dinner! Wouldn’t that be something to see!

Coordinating papers from 3 separate Doodlebug Designs collections were used to complete this layout; Springtime, Hello Spring and Easter Parade. Two cut files were used to create this fun page. The large title cut file comes from Cut to You and is called Some Bunny Special. You can find it here https://createdbygwen.com.au/product/some-bunny-special-title-cut-file/. I selected 5 coordinating patterned papers from the 3 collections listed above to back the title and add further whimsy to the layout.

The bunny cut file in the bottom left comes from Peartree Cutfiles and is called Floral Bunny Ears https://www.peartreecutfiles.co.uk/product/floral-bunny-ears/.

I only wanted to use the head and ears of this file and did not want the floral sections. To achieve this and minimize wasted paper, I positioned the cut file at the bottom of the white cardstock, leaving the floral portion outside the cutting area of the Silhouette mat. Hopefully, this tip will have you looking at some of your cut files a bit differently and get you thinking about how you can manipulate them to fit the vision of your project. The bunny ears were cut from white cardstock and backed with a soft textured white cardstock and coordinating pink patterned paper. This picture provides a closer look.

The banner in the top right of the layout was made by cutting 5 triangles from coordinating patterned papers. Each of these was backed with fun foam to add some dimension to the project.

The finishing touches on the layout included adding sticker hearts (between the bunny ears) and sticker arrows to the left of the word SPECIAL in the title. The photo was matted with 2 coordinating patterned papers. The journaling found in the bottom right was printed on white cardstock and cut to size. These strips were also backed with fun foam. The 3 hearts found at the end of the journaling come from the Rainbow Hearts Shape Sprinkles by Doodlebug Designs. The date was added using Doodlebug stickers called Sunshine.

It has been such a tough year with COVID, the ongoing restrictions, and multiple lockdowns. Thank you Gerry for providing a welcome diversion from our current situation. Your kindness and generosity were so deeply appreciated! This visit by the Easter Bunny was such a bright spot this Spring and a reminder of better times to come. Maybe next year the Easter Bunny will get to come to Easter Dinner! Until next time, stay safe, stay well, and Happy Scrapping!