Corn Maze

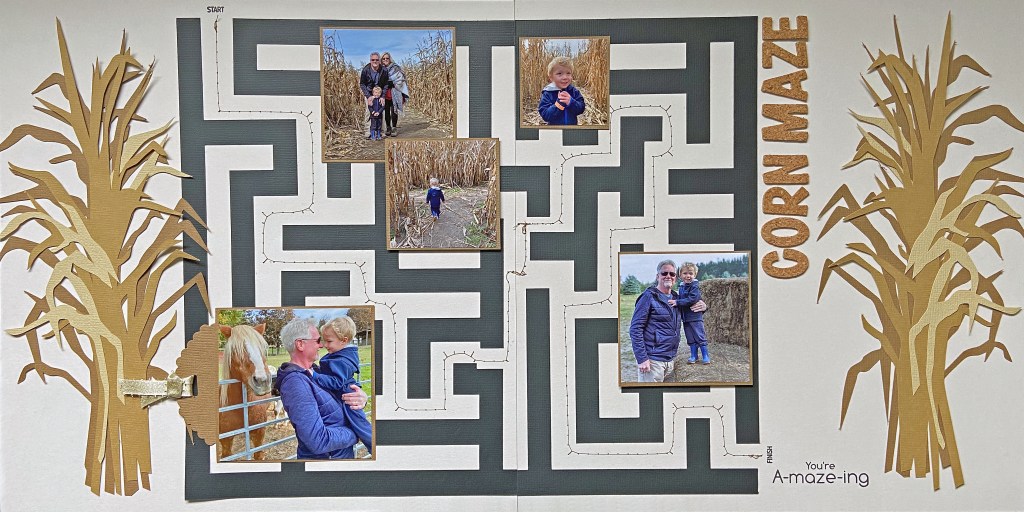
Last fall Lindsay, Bill and I had the opportunity to take Ben to the Apple Land Station Corn Maze. This outing was a big deal – Covid restrictions meant this sweet boy had missed out on many fun activities in his early years. It was a perfect autumn day to experience this with him, and Ben loved it! It didn’t take Ben long to figure out the maze, but he had fun pretending that he was confused and didn’t know the way back out. I love how this layout captures the sheer joy of being a child and the precious memories we shared that we will cherish for a lifetime.

To create this double-page layout I combined two cut files from the Silhouette Design Store. I started with the Fun Maze Game, Design ID #8489 and used my Silhouette design space to blow it up as large as possible to fit on this layout. The end result was a cut file approximately 11″ x 13 “. I then laid the maze on the white cardstock to determine the best positioning to cut it vertically. Once the maze was secured to the background of both pages, I used sticky notes to map out the path of the machine stitching to mimic physically walking through the maze. 

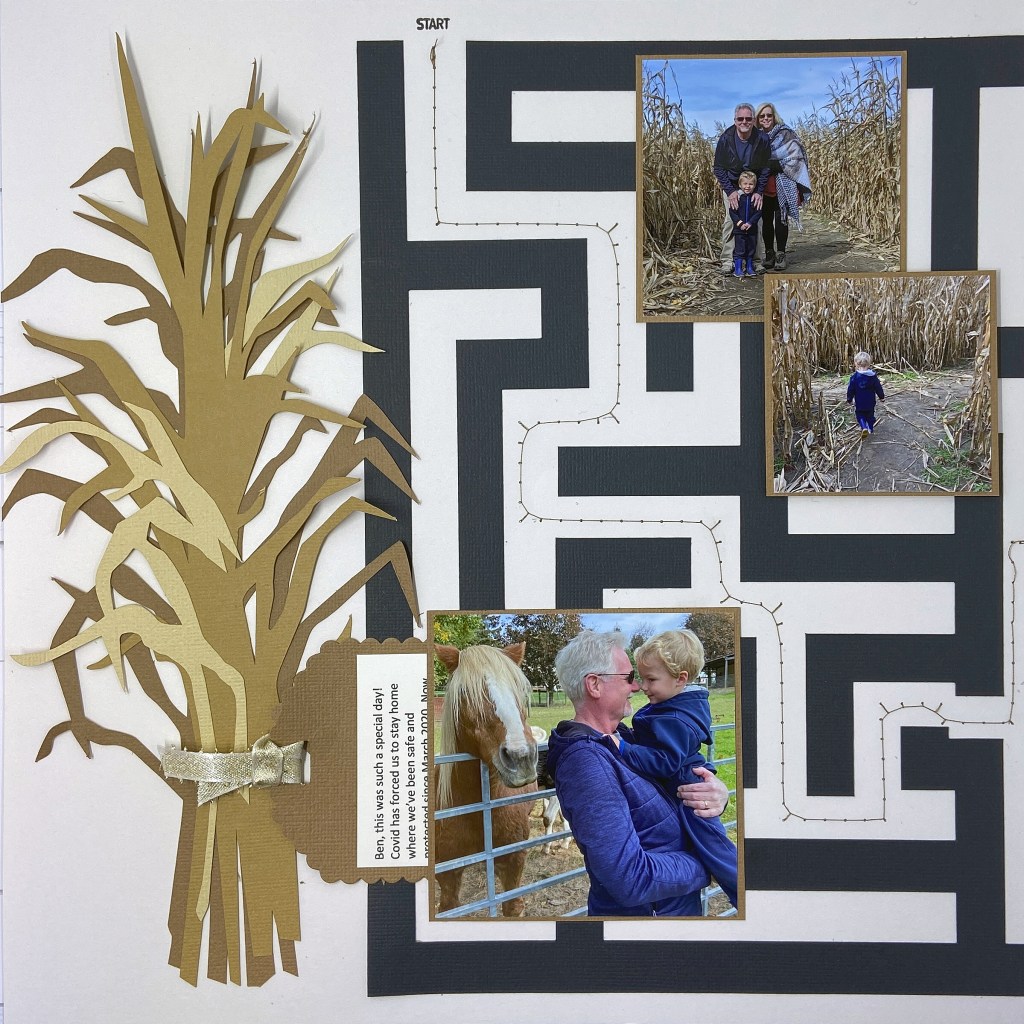
Next, I cut two corn stalks from three coordinating pieces of beige cardstock to create a frame for the layout. This cut file is called Corn Stalk and is Design ID #12866. Each completed corn stalk was firmly secured at the bottom, but the tops were left free to provide texture and the illusion of depth and movement. 

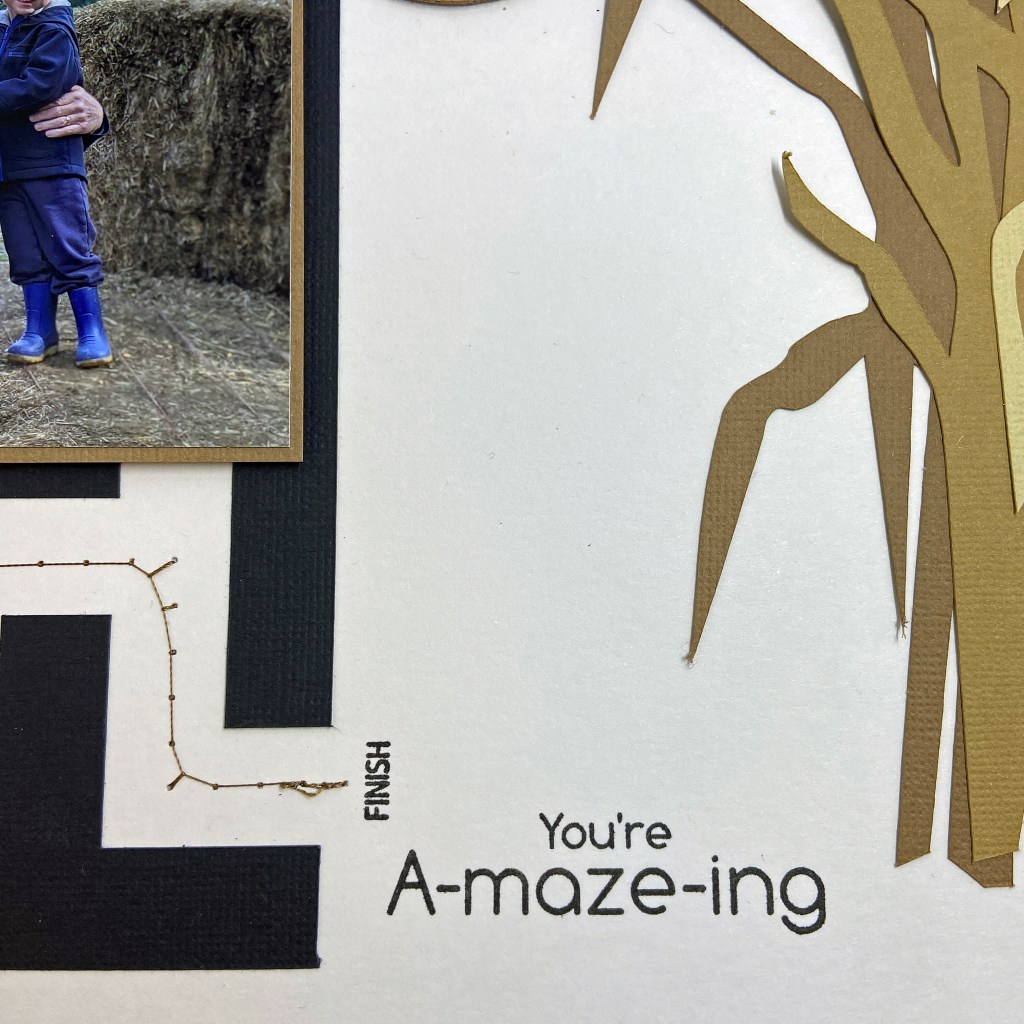
To put the finishing touches on this layout I used Cork Chipboard Thickers to add the Corn Maze title. I utilized my 12″ x 12″ Memory Misti to add some stamping to the design. Using an older My Favorite Things (MFT) stamp collection entitled You’re Amazing, I stamped the START, FINISH and the You’re A-maze-ing sub-title directly on the white cardstock. I had several pictures to add to this layout and still wanted to add some journalling for Ben to reflect on in the coming years. Because I didn’t want to distract from the overall design at this stage, I included hidden journaling by sliding a tag behind one of the pictures (pictured on the left-hand side of the double page). I used another MFT product entitled Scallop X-Stitch Tag to make this tag. A gold ribbon was secured to the top of the tag for easy access to the journaling card. 

These moments will be cherished for years to come. Fast forward to a year later, and this sweet boy and his family are now living in Austria. Rather than be sad about it, we’ll look for new ways to make memories when we are together!

Thanks for stopping by today, and until next time, stay safe, stay well, and Happy Scrapping!

Go Play Outside

I can’t wait to see grass again! We’re at a stage where winter truly begins to drag for me. So working on this layout was an easy way to feel surrounded with warmer vibes. I’m in love with this fun photo of Ben snapped last Fall. It just makes me smile every time I look at it!

I used two collections by Shimelle to create this layout. The base paper belongs to the Never Grow Up collection, and the green, blue and yellow grass paper, Forward Thinking, belongs to her Field Trip collection.

The first step in creating this layout was to create the layers of grass. I used spare pieces of paper to make templates for these two layers first. Creating a template will ensure you are happy with the end result before you cut your patterned paper. Once the hills were created, I used fringing scissors to cut the top edges of the paper to mimic blades of grass. When the fringed edges were complete, I used a paper piercer to create the stitching lines for the green chainlink border. This border was stitched using six strands of DMC 907 embroidery floss. Once the stitching was complete, the two sections were added to the layout. TIP: I like to use my 12″ x 12″ MISTI to help align page elements such as these. Simply remove the foam insert and place your page in the very bottom corner of the Misti to get a perfect alignment of your edges. When these layers were complete, the photo was tucked into them to provide an extension of the grass border.

I wanted to add further stitching to this layout and to enhance an overall whimsical feel. To achieve this, I stitched the border and sun rays of the sun found on the base patterned paper with DMC 726 embroidery floss. To help balance the layout, I cut five separate cloud patterns from embossed white cardstock using Design ID #11654 found in the Silhouette Design Store. Using white DMC floss, I stitched around the borders of each cloud before adhering them to the layout using fun foam.

The layout was completed by adding the two butterflies and the frog from the Never Grow Up ephemera package, and the Go Play Outside title from the coordinating Let’s Play Foam and Cardstock Phrase Stickers by Thickers. The butterfly on the far right has a few small pop dots underneath to give the illusion of flight. The frog was secured with fun foam for dimension, and two googly eyes were attached to add to the whimsical element.

I hope I’ve inspired you to create a whimsical layout of your own! Thanks for stopping by today. Until next time, stay safe, stay well and Happy Scrapping!

All of Me Loves All of You

Happy Valentine’s Day, friends! Today’s post comes to you in celebration of all things love and my three beautiful grandchildren who fill my heart to the top every single day! These three are so happy and full of joy it’s a pleasure to spend every moment with them. How lucky I am that all I have to do is walk across the street to see them!

The starting point for this layout was selecting two cut files from Peartree Cutfiles. The Snowflake Heart was an obvious choice for fitting with Valentines Day and the picture I chose. The title All of Me Loves All of You was the perfect fit for how I feel about my grandkids. It simply says it all! The foundation of the page is white textured Precision Cardstock from American Crafts. I opened both cut files in Silhouette software and sized them on the page to ensure I would have enough space to fit both. I slid the title off the cutting area to focus on the snowflake heart. Next, I traced the design and used the Release Compound Path function to allow direct access to all the design components. Finally, I removed the outside cutting line of the large heart before sending the file to cut. I did not want the cut file as a separate element but wanted it cut directly into the white cardstock.

I pulled beautiful Ali Edwards stamps from my stash to stamp around the base of the heart. I pulled from two of her collections for Technique Tuesday, Sweet Baby and Loving Words. My 12″ x 12″ Misti came in handy for this task. This wonderful tool allowed me to bend and wrap my stamps around the cut out design. Once the stamping was complete, I set about inking the blue hearts on the remaining background of the white cardstock. For this task, I used the Lots of Heart stencil from My Favorite Things (MFT). I liked the random whimsical look of this stencil, as it helped mimic falling snowflakes. I chose Tim Holtz’s Chipped Sapphire Distress Ink for the stenciled hearts. I liked the way this shade coordinated with the papers from Carta Bella’s Welcome Winter collection, which were chosen to complement my grandchildren’s snowsuits.

I then moved on to cutting and backing my title for the layout. I chose the Light Blue coordinating solid paper from the Welcome Winter line for the outline. I backfilled the word Loves with a finely dotted vellum from an old collection by Papertrey Ink called Sheer Basics. The completed cut file was then secured to the page before moving to the final stages.

I placed my photo on the upper right-hand side of the Snowflake Heart, behind the white cardstock. I then back-filled the entire background of the cut file with the Winter Wonderland patterned paper from the Welcome Winter collection pack. The remaining elements for this layout were a few chipboard accents from the same collection and a slew of die-cut snowflakes in various sizes and papers from coordinating vellum and solid patterned papers. The beautiful Snowfall Thinlits Dies belong to a set created by Sizzix for Stampin-Up! The final step was adding some enamel dots from the Welcome Winter collection to the large snowflake in the cut file.

This layout did take some time to complete, but I am so happy with the end result. Don’t be afraid to experiment and play while you create your scrapbook pages. It’s a fun way to complete a page, and to strengthen your paper crafting skills!

May your Valentine Day be filled with love and joy! Thanks for stopping by, and until next time, stay safe, stay well, and Happy Scrapping!