Change of Address

As 2023 draws to a close, it’s that time of year when we begin to take stock of our accomplishments. While the list can be long, few will stand out as a life event. This year has been full of life events for my son and his wife. And while these life events were all challenging in their own right, causing much discomfort and soul-searching, they all had a happy ending! This layout celebrates purchasing their first home – a real milestone in any couple’s relationship!

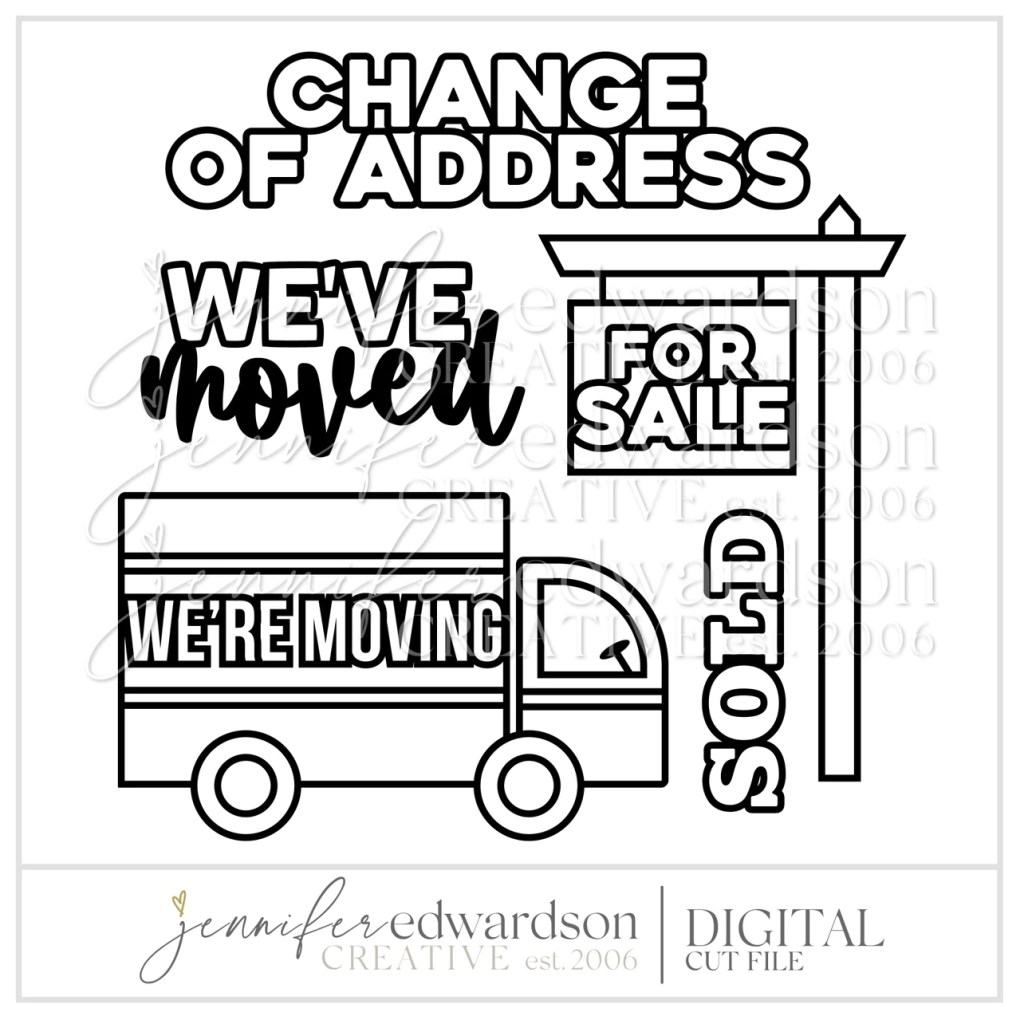
The cut files for this layout come from Jennifer Edwardson Creative. They are named Moving Cut File Bundle. I chose three cut files (For Sale, SOLD, and Change of Address) within this bundle to create this page. Most patterned papers and embellishments come from Carta Bella, primarily the Gather at Home collection. The Paired with Plaid patterned paper provided the background for this page.

I cut the For Sale sign from a soft grey cardstock. The white weather wood pattern paper was just the look I was seeking. Once created, I adhered it to the background paper using Scrapbook Adhesives Crafty Foam Tape. This dimension helped provide an illusion of movement in the hanging sign. I cut the letters for the SOLD sign using a coordinating patterned paper called Pitcher Perfect from the Gather at Home collection. The completed cut file was also adhered to the background using foam adhesive, enhancing the effect of resting on the top of the For Sale sign. The final cut file I used from this bundle was the Change of Address. I used a dark coordinating patterned paper in the Gather at Home collection to cut the letters. I adhered these letters to grey cardstock that matched the For Sale sign. 

In creating the left-hand side of this page, I used four coordinating patterned papers from the Gather at Home collection. They included Fresh Floral (top and bottom) and the back side of the following: 3×4 Journaling Cards,  4×4 Journaling Cards, and Time for Dinner. Each paper was cut 4″ in width and then randomly placed down the page at different lengths. I hand-stitched using two coordinating DMC embroidery flosses (black & 564) to ease the transition between papers. The two stickers in this section belong to Carta Bella’s Home Again collection. They were a perfect fit and matched with the Gather at Home collection. In completing the left-hand side of the page, I added the coordinating Home is Where Your Story Begins strip. This strip helps provide a soft transition to the main section of the layout.

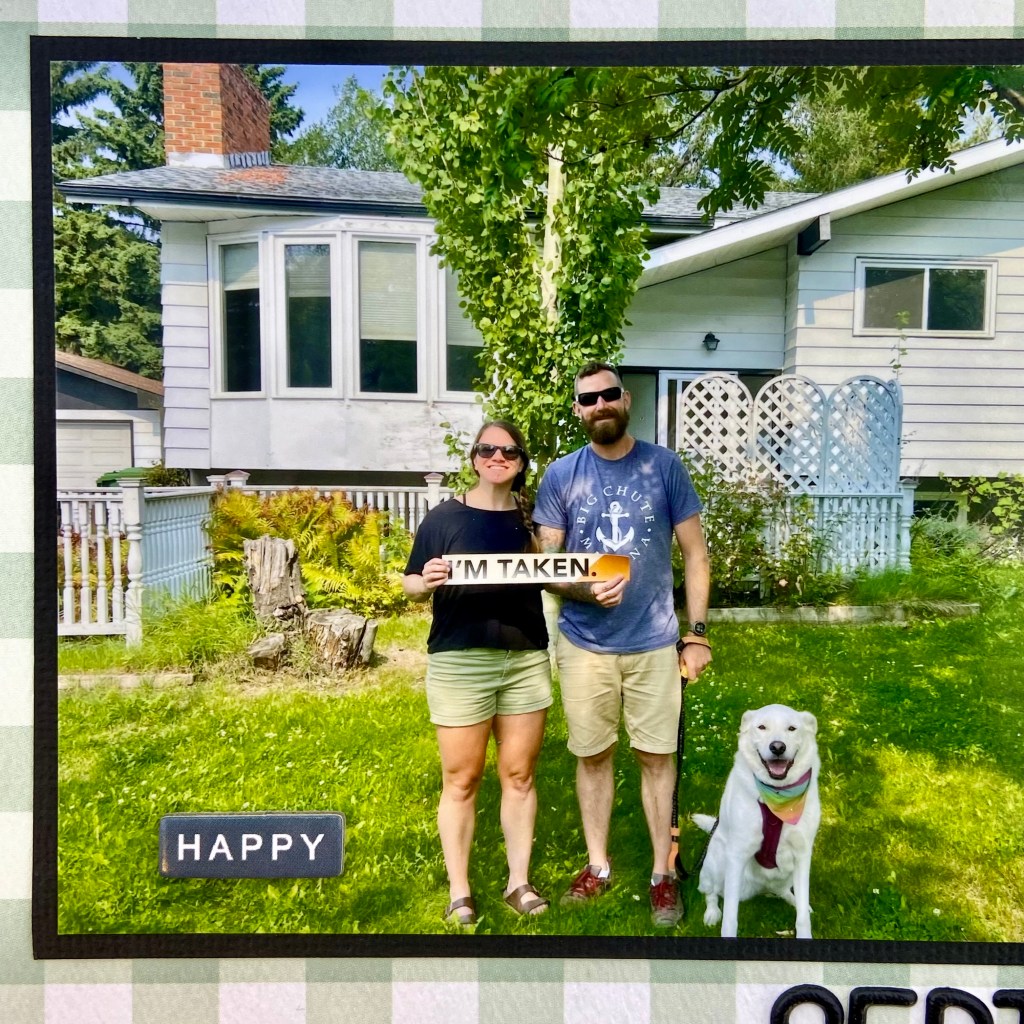
I adore this photo of Sean, Tanis and their dog Lillie. I don’t know about you, but I think the dog has the biggest smile in the picture! You can see and feel the excitement in each of them. I placed the word HAPPY from the coordinating Home Again Chipboard Accents on the photo. I used Doodlebug Designs Alphabet Soup Puffy Stickers to add the date. 

I am so glad to have this milestone documented for posterity. I know that as the years progress and they look back at this moment, they will marvel at all the changes they’ve made to their new home. Let the fun begin!

Thanks for joining me today. I hope I’ve nudged you to document this year’s accomplishments and milestones! Until next time, stay safe, stay well, and Happy Scrapping!

Roarsome

In late June, we travelled out west for our son’s wedding. My daughter and her family planned a few side trips while we were there, and Drumheller was their first destination. Drumheller, Alberta, is located northeast of Calgary. It is known as the dinosaur capital of the world, and it was a huge hit with our grandchildren!

I chose the Roarsome title from Peartree Cutfiles to showcase a picture from their trip. I loved the addition of the dinosaur on top and wanted to make it a bit whimsical as I designed the layout. The patterned papers in the title come from an older Carta Bella Paper Co collection aptly entitled Dinosaurs.

While I backed the words in the title, I chose to lift the pieces of the dinosaur by securing a piece of black fun foam underneath each piece to create dimension and the illusion of flight. I added green googly eyes to the dinosaur to enhance the whimsical feel of the layout. Once the title was complete, both the picture and title adhered to the fun background paper 12″ Life in Color Bricks. This background page also belongs to an older BoBunny collection called Life in Color.

The final elements of the layout came together quite quickly. The “vacay” puffy phrase and accent stickers came from a Vicki Boutin collection of Thickers called Loving This. The date and location of the picture were documented with Doodlebug Design Inc.’s teensy-type stickers.

And there you have it, a simple and whimsical page that focuses the attention on the picture and title. Thanks for stopping by today, and until next time, stay safe, stay well and Happy Scrapping!

All of Me Loves All of You

Happy Valentine’s Day, friends! Today’s post comes to you in celebration of all things love and my three beautiful grandchildren who fill my heart to the top every single day! These three are so happy and full of joy it’s a pleasure to spend every moment with them. How lucky I am that all I have to do is walk across the street to see them!

The starting point for this layout was selecting two cut files from Peartree Cutfiles. The Snowflake Heart was an obvious choice for fitting with Valentines Day and the picture I chose. The title All of Me Loves All of You was the perfect fit for how I feel about my grandkids. It simply says it all! The foundation of the page is white textured Precision Cardstock from American Crafts. I opened both cut files in Silhouette software and sized them on the page to ensure I would have enough space to fit both. I slid the title off the cutting area to focus on the snowflake heart. Next, I traced the design and used the Release Compound Path function to allow direct access to all the design components. Finally, I removed the outside cutting line of the large heart before sending the file to cut. I did not want the cut file as a separate element but wanted it cut directly into the white cardstock.

I pulled beautiful Ali Edwards stamps from my stash to stamp around the base of the heart. I pulled from two of her collections for Technique Tuesday, Sweet Baby and Loving Words. My 12″ x 12″ Misti came in handy for this task. This wonderful tool allowed me to bend and wrap my stamps around the cut out design. Once the stamping was complete, I set about inking the blue hearts on the remaining background of the white cardstock. For this task, I used the Lots of Heart stencil from My Favorite Things (MFT). I liked the random whimsical look of this stencil, as it helped mimic falling snowflakes. I chose Tim Holtz’s Chipped Sapphire Distress Ink for the stenciled hearts. I liked the way this shade coordinated with the papers from Carta Bella’s Welcome Winter collection, which were chosen to complement my grandchildren’s snowsuits.

I then moved on to cutting and backing my title for the layout. I chose the Light Blue coordinating solid paper from the Welcome Winter line for the outline. I backfilled the word Loves with a finely dotted vellum from an old collection by Papertrey Ink called Sheer Basics. The completed cut file was then secured to the page before moving to the final stages.

I placed my photo on the upper right-hand side of the Snowflake Heart, behind the white cardstock. I then back-filled the entire background of the cut file with the Winter Wonderland patterned paper from the Welcome Winter collection pack. The remaining elements for this layout were a few chipboard accents from the same collection and a slew of die-cut snowflakes in various sizes and papers from coordinating vellum and solid patterned papers. The beautiful Snowfall Thinlits Dies belong to a set created by Sizzix for Stampin-Up! The final step was adding some enamel dots from the Welcome Winter collection to the large snowflake in the cut file.

This layout did take some time to complete, but I am so happy with the end result. Don’t be afraid to experiment and play while you create your scrapbook pages. It’s a fun way to complete a page, and to strengthen your paper crafting skills!

May your Valentine Day be filled with love and joy! Thanks for stopping by, and until next time, stay safe, stay well, and Happy Scrapping!

Winter Moments

This layout makes me smile for so many reasons. Last winter, my grandson hated winter. Every time my daughter bundled him up and took him out, he’d stand there, stiff as a board and with the saddest face ever! I’m so pleased to say that this winter is a whole new ball game! Ben is in love with winter. He enjoys everything about getting outside to play in the snow. A new world of winter activities has opened up for this young man. This layout celebrates that feeling!

The Winter Market collection of patterned papers, stickers, ephemera and chipboard accents by Carta Bella was used to create this page. The design process for this layout started with the cut file, Winter Moments. It was an exclusive January Pearscription cut file from Peartree Cutfiles. The first step in preparing the cut file for this layout was backing the word Winter with a patterned paper from the Winter Market collection. Next, I carefully punched holes approximately every 1/4″ on the snowflake to prepare it for stitching. Because the arms of the snowflake were not very wide, I used a sharp needle and three strands of white DMC floss to complete the straight stitch. This step did take some time and patience! At this stage, I set the cut file aside to focus on the lower section of the layout.

I planned on ripping patterned paper to create hills to rest the photo. However, I settled on cutting the paper instead. I made a template of the hill shapes first and then traced the designs onto the patterned paper. Each hill was inked on the top edge to add dimension and then stitched with white DMC floss to represent snow. I used six strands of floss and a chain stitch to create a strong effect.

I was aiming for the illusion of looking over rolling hills in this layout. I placed fun foam between the top two layers to help achieve this effect. This also provided a convenient place to tuck the photo and some of the accents.

The next stage in completing this layout was to adhere the Winter Moments title to the layout. Given the layered hills at the bottom, I chose to pop up the title as well. I used double-sided adhesive foam to achieve this effect. I feel this provides better balance and weight to the overall layout. For the smaller letters in moments and the arms of the snowflake, I used Taylored Expressions Foam Sticky Strips.

The final stage in completing this layout was adding the ephemera and accent pieces. Coordinating blue and green sequins were glued to the tips of each snowflake. Taylored Expressions Bits & Pieces Snowflakes were arranged and glued to the dark background paper and picture. I used several Chipboard Accents from the Winter Market collection and tucked them in the rolling hills for a fun, playful effect. The snowman figure was a sticker from the paper collection pack. He was adhered to fun foam to provide the same depth as the chipboard accents. The blue HAPPY SNOW DAY! square came from the coordinating Frames & Tags ephemera pack.

I’m really tickled with how this layout turned out. Every stage was a delight to create and I hope Ben thinks it’s fun as well! Thanks for stopping by and until next time, stay safe, stay well, and Happy