Easter House Box

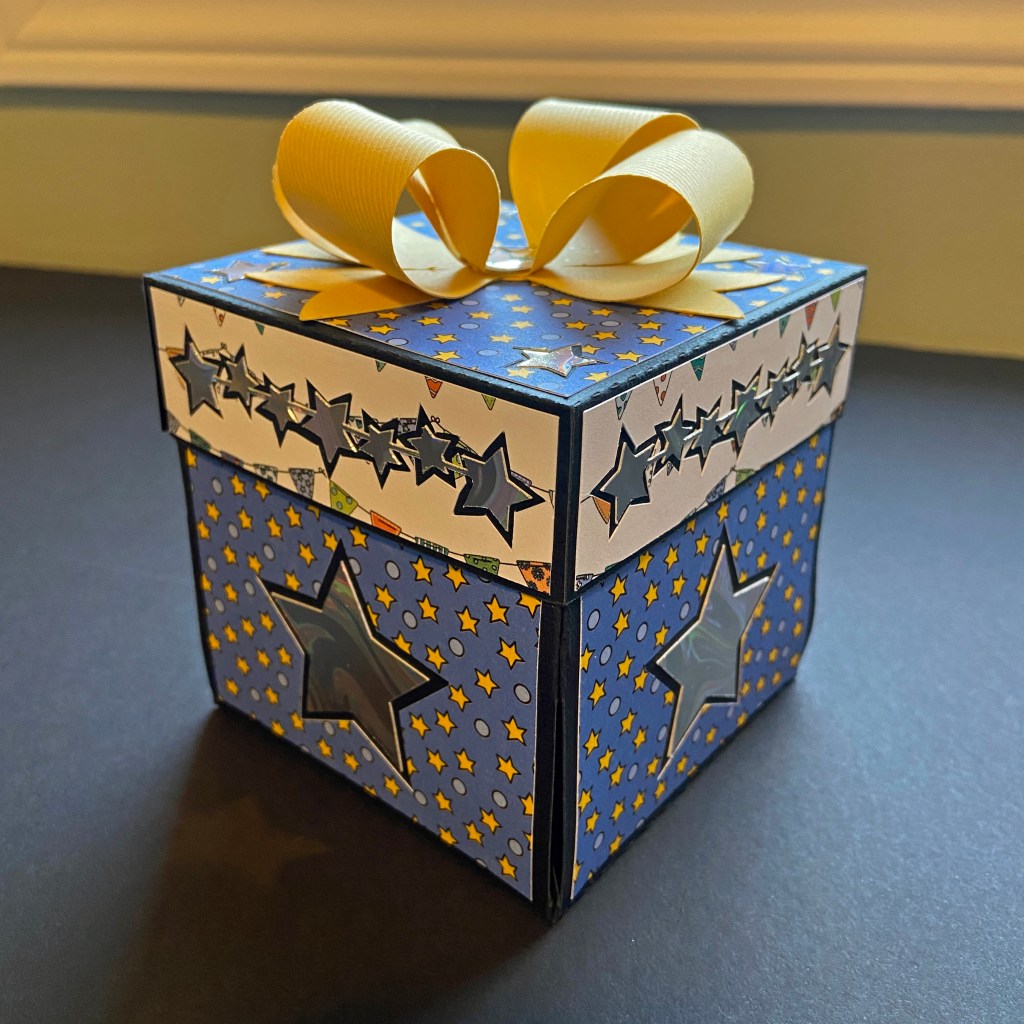
Giuly from Les Pensées en Papier has done it again! I recently made this Easter House Box for my grandchildren to enjoy this coming weekend. At first glance, you may think it’s just another explosion box – but look again, and you’ll see that it is much more than that! This incredible project is an explosion box and a game all rolled into one pretty package! https://www.etsy.com/ca/listing/976845153/easter-house-box-svg-easter-eggs-hunt?ref=shop_home_active_2&crt=1

Giuly put a very high level of thought, detail, and organization into this project. Her sample and instructions are all made from cardstock. You will find each of the cut files labeled by colour, making this a very simple project to cut and prepare for assembly. I chose to swap out some of the cardstock with patterned paper. This did slow my overall process down, but I feel the final result made it well worth the investment in time and preparation. I worked with Doodlebug Designs Inc., Hippity Hoppity paper pack, and the coordinating Spring Solid Assortment of cardstock. I also used 3 sheets of Bazzill’s Artesian Pool cardstock for the house base. Aside from the paper, the only other main supplies utilized were coordinating Spring Assortment Sprinkles, also from Doodlebug Designs Inc., and some small foam dots.

Each piece of the project fits beautifully in place. The supporting video is clear, and easy to follow, making the construction of this project seamless.

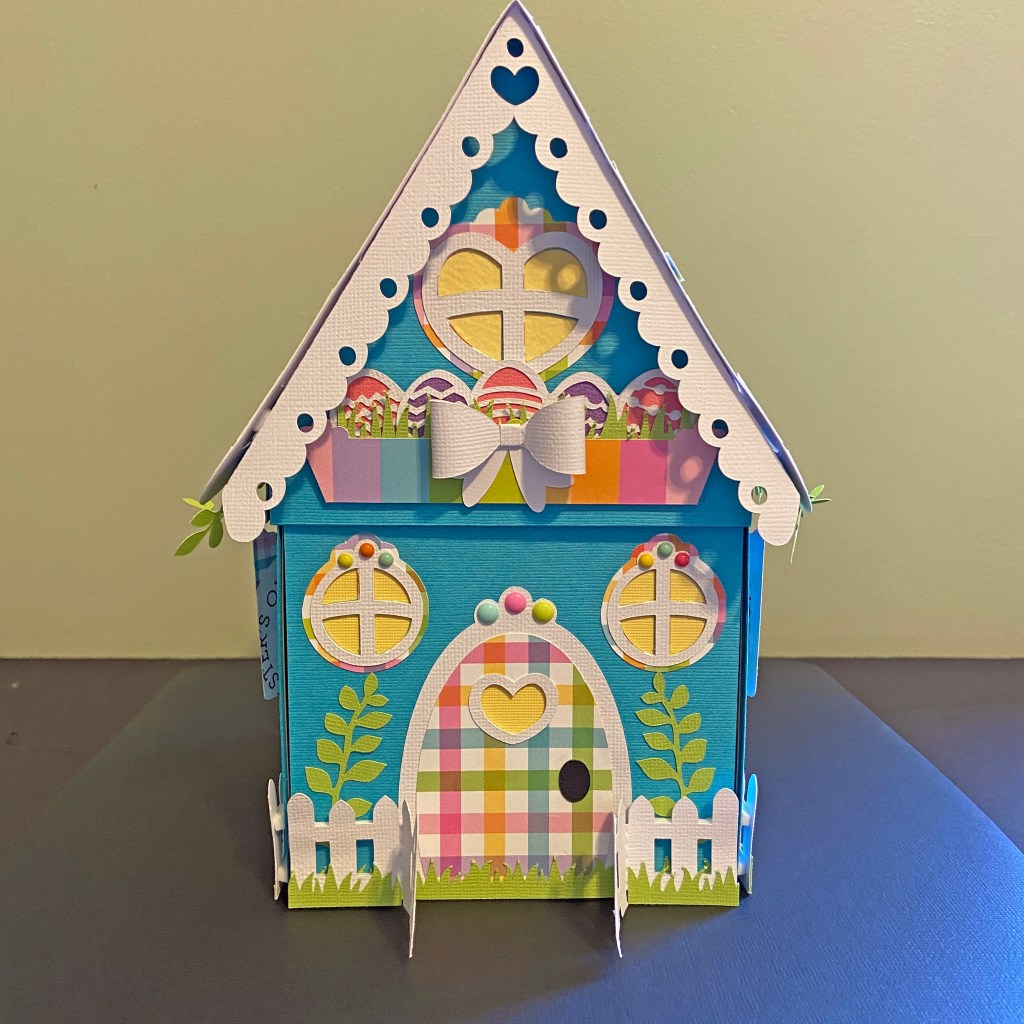
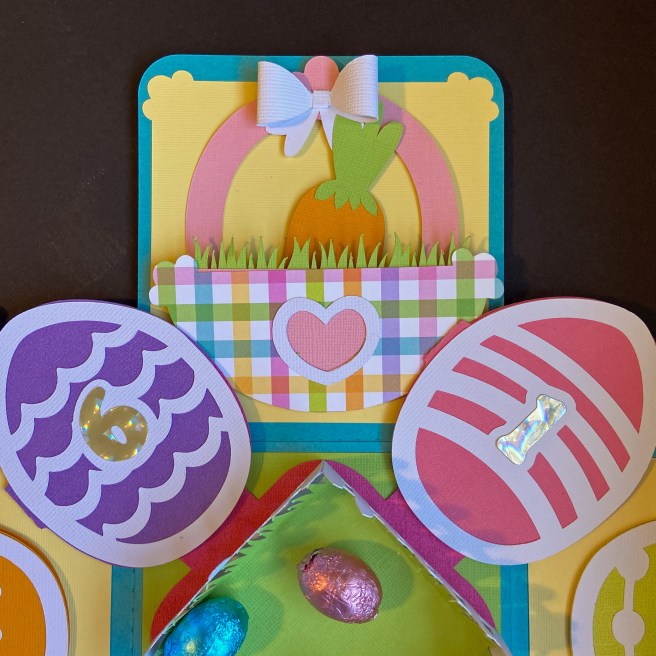
From start to finish the detail in this project is outstanding. The view of the front of the house highlights several of the intricate details put into this finished project. Not only do you have a layered door and windows, but you can also see the picket fence with grass, and the lovely window box above with more foliage and decorated Easter eggs. This detail follows through the entire house and inside the house as well.

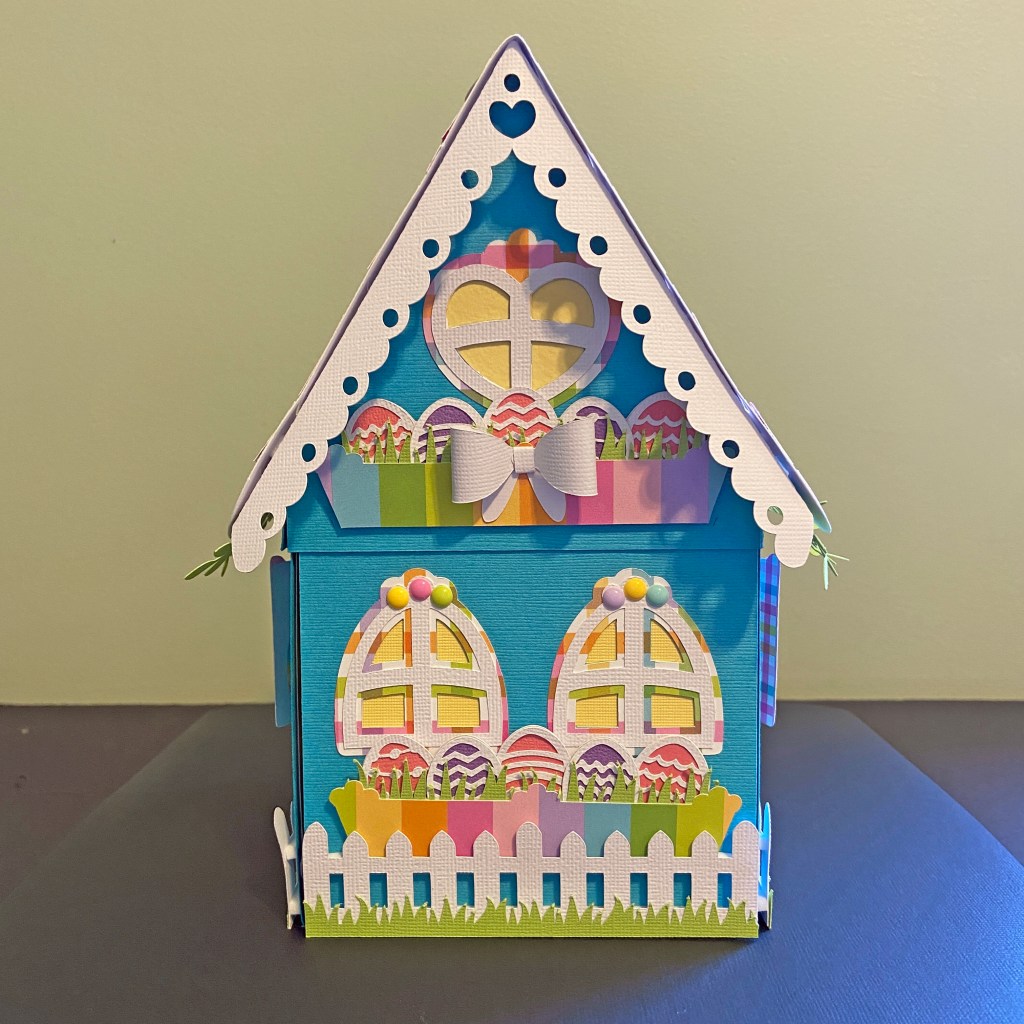
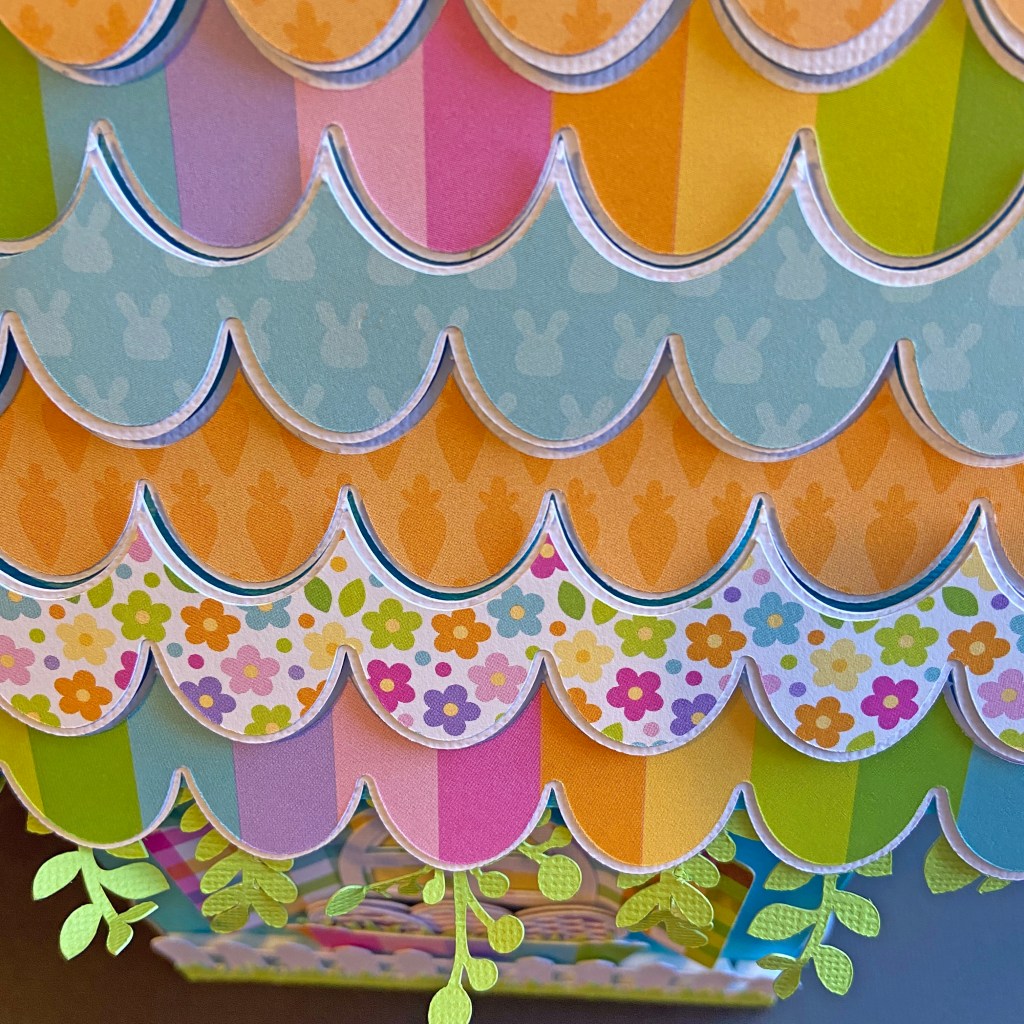
The roof of the house is equally detailed with a “thatched” roof, gingerbread gable, and ivy hanging from the edges. Small foam dots in strategic places add more texture to the thatched roof.

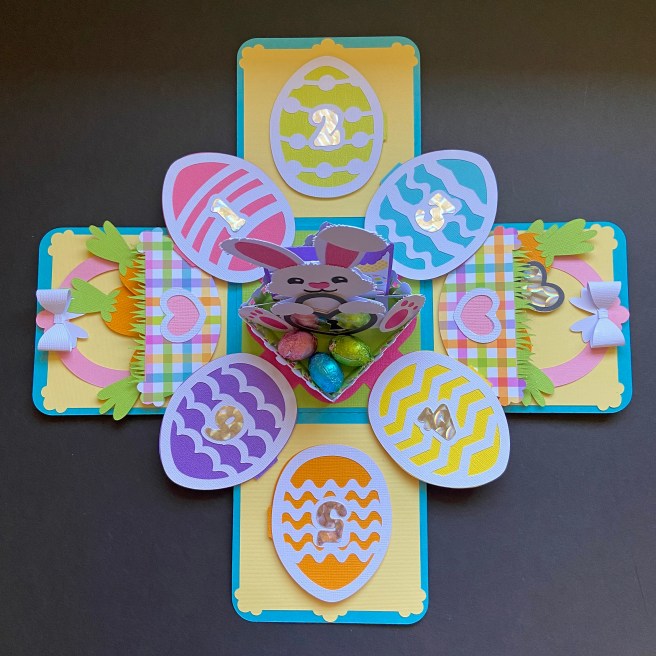
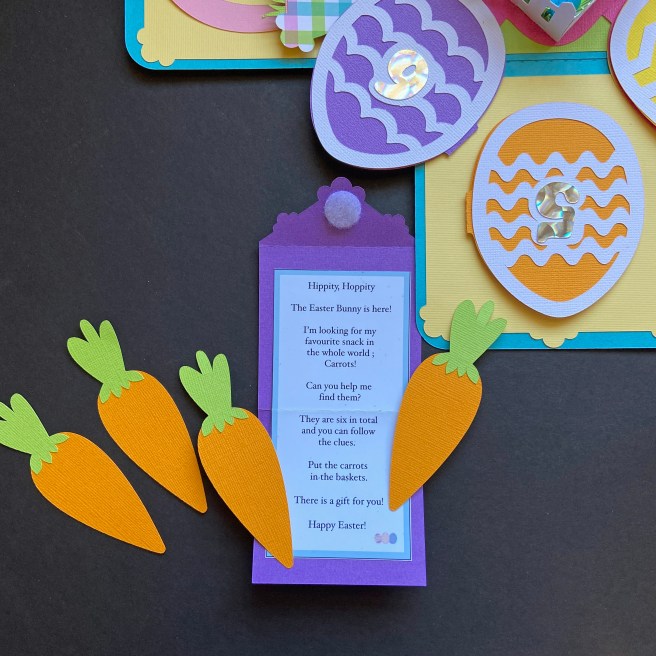
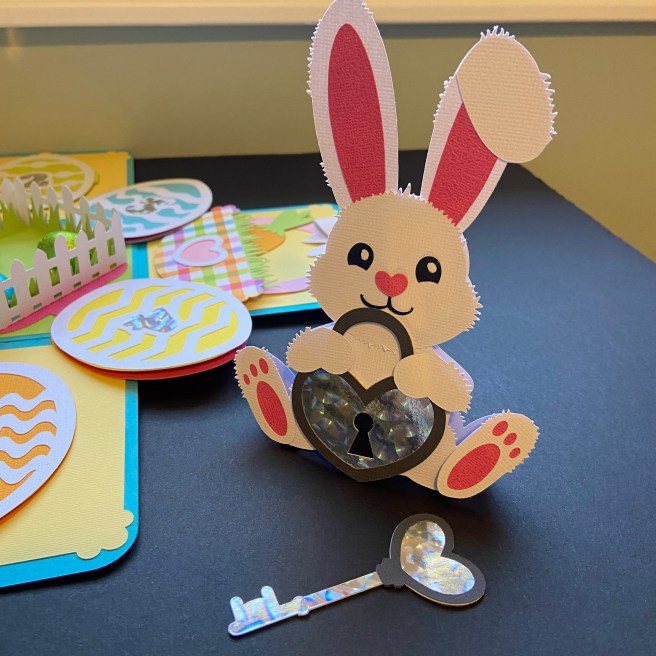
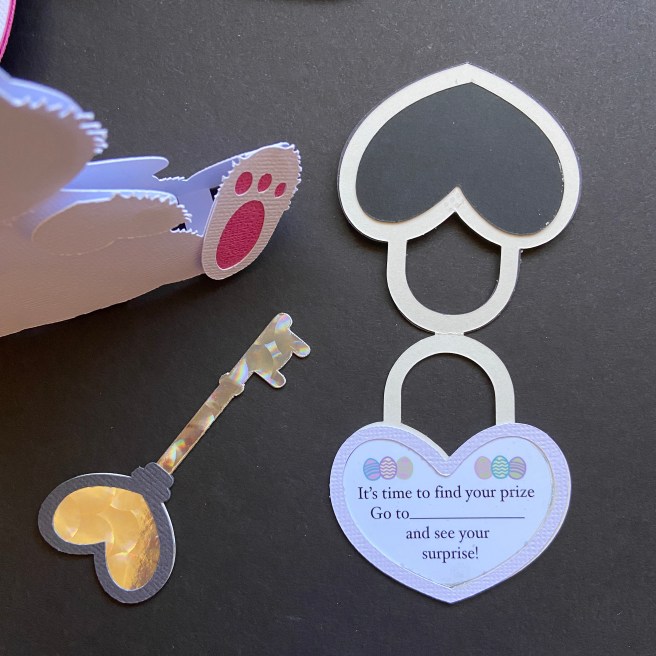
When the roof is lifted from the house, it reveals a hidden game. Inside the house lay 6 Easter eggs with hidden clues, the Easter Bunny, 2 Easter baskets, game instructions, and a lock and key. The game participants must work their way through 6 clues, gathering hidden carrots along the way. Once all 6 carrots are collected, they’ve won the key and can open the lock to discover where their surprises are hidden. Nine clues are included with the purchase of this project, making it easy to print and select the ones that best suit you. There is also a template to make your own clues if you wish to fully customize this part of the game.

I can’t wait to watch my grandchildren have fun with this! I highly recommend this project and know that you’ll be amazed at the thought and detail that went into designing it. Thanks for stopping by today, and I hope you’ve enjoyed my take on the Easter House Box. Wishing you all a lovely Easter Weekend! Until next time, stay safe, well, and Happy Scrapping!

Big Comfy Couch

Isn’t it funny, that as adults we are always hoping we might just squeeze in a nap or two when the weekend comes, yet children are the exact opposite? They like to keep going, and going until they drop! Our youngest grandson Ben is at that tender age when he’s almost ready to completely give up the afternoon nap. He’ll go for days without one, and then his body gets the best of him and he’s down whether he likes it or not!

My daughter captured this beautiful photo of Ben in early February. He was playing in the den after lunch on a cold winter day. The fireplace was warming the room and the big comfy couch beckoned Ben to take a rest. He looks so relaxed and comfortable in this photo, it certainly looks ideal for a wonderful afternoon nap.

The star background paper for this layout came from Echo Park Paper Company’s Little Dreamer Boy paper collection pack. The specific paper was the back side of the Planes Palooza paper. When I saw this photo I knew right away I wanted to crop and enlarge it. I think the big photo helps draw you into the mood of the photo and layout. My March 2021 Pearscription with Peartree Cutfiles provided the perfect cut files to complement this photo and document this moment. I choose 2 of the 3 cut files that came with the Wish cut file. You can find Peartree Cutfiles here https://www.peartreecutfiles.co.uk/, but know that the file used is an exclusive file that came with the March Pearscription. I highly recommend the Pearscription, the files are just wonderful!

The stars on the cut files were backed with silver and gold glitter cardstock and the clouds were backed with vellum for a light and airy feel. I also found some acrylic shapes in my scrapbooking stash from Shimelle. They fit in perfectly and also complemented the light and airy feel I was looking for. I usually look for ways of adding a title in an unusual way to a layout. The large 12′ x 6″ photo provided the perfect opportunity to place a title. With the photo occupying centre stage on the layout, I wanted something subdued for the title. Pinkfresh Studio’s Mimi Puffy Alpha Stickers in grey were exactly what I needed to achieve this effect. Here are a few closeups of this project.

Thanks for stopping by today, and if I’ve enticed you to take a quick Sunday afternoon nap, don’t worry, it will be our little secret! Until next time, stay safe, well and Happy Scrapping!

Star Explosion Box

I’m back with another wonderful project from Les Pensées en Papier called the Star Explosion Box. This project was made for my grandson Owen, who turned 8 yesterday! We did our best to make this a special birthday for Owen – his second year in a row without a “kids” party. I’m glad to say, he had a lovely birthday, and I was touched when he asked me if I made him a special box for his birthday.

As with all of Giuly’s amazing projects, the purchase of this project will provide you will a full supply list and all the necessary cut files for both Cricut and Silhouette users. It is also supported by a clear, easy to follow YouTube video https://www.youtube.com/watch?v=Bm59Kwl_iH8. If you feel the previous Tower Explosion Box might be a bit intimidating to start with, I highly recommend the Star Explosion Box as a first project. It will introduce you to concepts you will utilize in other projects by LPPSVP.

To complete this project I used 4 sheets of 12″ x 12″ black Precision Cardstock from American Crafts, the Birthday Boy Wishes paper collection pack by Becky Fleck from Photoplay Paper, and 1 sheet of 12″ x 12″ coordinating cardstock to create the bows on the top of the boxes. The paper pack includes twelve double-sided papers and a full coordinating element sticker sheet. I used three of the patterned papers and approximately 1/2 of the sticker sheet to decorate the project. To create the fun stars found in the corner of each explosion level, I used Lawn Fundamentals Metallic Cardstock in “Holographic 2.0” by lawn fawn. Glossy Accents by Ranger Ink was used to construct and attach the bows seen in this project. I have always found it a reliable, strong bond for projects like this.

The bottom layer of this project creates a large box that conceals all the other hidden layers, or explosions. The following pictures provide examples of the detail found in the large box.

Once the lid is removed three explosion levels and a small independent box is revealed.

The small box in the centre is concealing a little surprise for Owen. I’ve been reading Harry Potter to both Owen and Maddie for years now. I found a small Lego figure that fit perfectly inside this small box. When the small box was opened it revealed “Ron Weasley”. Owen was thrilled to add this little surprise to his Lego collection!

I hope I’ve encouraged you to try an Explosion Box. Les Pensées en Papier has so many options to choose from https://www.etsy.com/shop/LesPenseesenPapier. They are as much fun to make, as they are to give! Until next time, stay safe, well and Happy Scrapping!

Oh So Special

What greater gift in life, than to love, and be loved! It’s what gets us up in the morning and keeps us going throughout the day, even on the toughest days, weeks, or months of our lives. This layout features my son, Sean, and his beautiful fiance Tanis. They know first hand how love can be exhilarating, and heartbreaking. Sean is committed to his military career, which means there are days, weeks and often months when he is away from the love of his life. He was on deployment overseas January – July 2020, right when Covid hit the world. I can’t imagine how tough it was for this incredible, and loving couple to be separated at a time of worldwide crisis.

Sean and Tanis met after he returned from his first deployment in 2017 (and boy, are we glad they did!). Tanis is a huge pet lover, and she had a cat, Stella, and a dog, Lillie when they met. Sean had to win over more than Tanis in this relationship! As you can see from the pictures in the layout, he had no trouble doing so. Lillie is a gentle, loving animal, and I think she loves Sean now as much as she loves Tanis! She is a mix of Siberian Husky/Malamute and Maremma Sheepdog. Tanis shared “She liked him right away, but when we first started dating, every time we hugged she would stand beside us and whine or groan or grumble, and when we walked she would always try to walk between us. That’s the Maremma in her, guarding me, but Sean won her over with treats, hugs and chasing her in the backyard and the arena; she learned the sound of his car and loses her mind when she hears it up the street. One time, he drove by us while we were walking back to his apartment, so she (and in turn, I) chased his car back because she was so excited. Now she guards both of us and whines, groans and grumbles when we’re not in the same room together.” Lillie is such a big part of their lives, she needed to be part of their formal engagement photos. While I’ve scrapped several of the engagement photos already, I wanted to make sure that Lillie had her spotlight as well. This layout helped me achieve this.

Before I provide details on the products used in this project, I would like to give Tessa Wright (@tw829) credit for the beautiful engagement photos you see on the layout. Tessa is a talented photographer, and Sean and Tanis have lots of beautiful engagement photos from their photo session. I love how she ensured Lillie was well represented on this special occasion!

The papers and embellishments for this layout come from the Storyteller line by Vicki Boutin. This included patterned papers (background papers, and backing for the cut files), stickers and Gold Foil Chipboard Stickers from the coordinating chipboard sheets, Tell Your Story, by Thickers. As I planned this layout, I knew I wanted a grid pattern that would allow me to use multiple cut files. Each of the green square sections that make up the grid measure 5″ x 5″. I distressed the edges of the paper squares to give them more dimension and definition on the blue patterned paper used as the background. Here are some closeups showing the background papers.

There are 4 cut files used in this layout, and they were each sized to fit within the green squares. They all come from Peartree Cutfiles https://www.peartreecutfiles.co.uk/, however, a couple of these files (Love and String of Hearts), are exclusive files from my Peartree monthly subscription https://www.peartreecutfiles.co.uk/pearscription/. The monthly subscription is an excellent value and you’ll receive 5 exclusive cut files that will never be available in the shop. Additionally, you also receive the free cut file of the month, for a total of 6 cut files. The Oh So Special cut file was the free cut file of the month in February, you can now purchase it in the shop. The fourth file used is called Shelf of Hearts and is also available for purchase in the shop. Each of the cut files was backed with patterned papers from Vicki’s Storyteller collection. Here are pictures of the cut files used.

I wish Sean and Tanis a lifetime of happiness together! Thanks for joining me again, stay safe, well and Happy Scrapping!

Love

In February, I started subscribing to monthly digital cut files from Peartree Cutfiles, called a Pearscription, https://www.peartreecutfiles.co.uk/pearscription/. I used one of the five exclusive February files to complete this layout. All the files were unique and beautiful, but this Trio of Hearts cut file immediately grabbed my attention. It didn’t take me long to figure out what I’d like to do with it. Three hearts – three grandchildren – it seemed a perfect match!

I had two specific plans in place when I started this layout; 1) I wanted to break open the Cocoa Vanilla Studio Daydream collection I’ve had for a while, and 2) I wanted to stitch the cut file, rather than cut it out. I recently viewed an excellent video tutorial by Belinda James that teaches you how to turn a digital cut file into a stitching file on your Silhouette machine (Creating stitching templates with your Silhouette). The video was easy to follow, you can find it here: https://www.youtube.com/watch?v=Fht1LT2dxko&t=635s. It does take some practice to learn the spacing that’s right for you, but truly worth the effort. I would suggest that you do a practice cut the first time round to see if you like the spacing. In my first attempt, I found the spacing between stitching holes too close for my liking. The settings were easily adjusted to give the spacing I desired.

Once I had the stitching file completed, I spent time matching DMC floss to the colours found in the Daydream collection. I planned on using the Garden Variety sheet for the border, so this specific paper is what I used to match my colours too (DMC #351, 352, 353, 522, 743, 932, 3051, 3053, 3820). As I prepared to stitch, it became apparent that the stitching file looked quite complicated to the naked eye (like a hard puzzle) in the areas where the flower clusters lay. So before I started any stitching, I went back to my Silhouette Cameo 4 and used a Sketch Pen in light grey to trace out the cut file. I used this sketch as a template (similar to any stitching project) and coloured the file using markers that matched the colours in my final design. This coloured template helped speed up the overall process when it came time to stitch. Here are some photos of the stitching process for this project.

And the final and completed cut file, fully stitched. I love how pretty and delicate it turned out.

Once the stitching was completed, I planned on adding a straight 1/2″ border to the page with the Garden Variety patterned paper. However, at this juncture, I decided it would look better if I kept some of the flowers in the border intact. This involved some careful measuring and fussy cutting. I liked the look of some of these beautiful flowers spilling over from the border. I also dug into the Daydream Die Cut Ephemera pack and found 3 die cuts that were the perfect fit and shape of flowers that I had fussy cut and included in the border. I adhered these to the respective spots on the border with double-sided foam adhesive to provide some additional dimension to the layout. This required some trimming of the die cuts when they spilt over the edge of the page.

I wanted to add photos to the inside of each heart, but as you can see from the heart shapes, a traditionally sized photo just wouldn’t do the trick. To achieve the photo sizes in the completed layout, I started with a piece of acetate. The first step was to place the acetate over each heart section and use a marker to trace out the area and size for each completed photo. These acetate patterns were cut out and measured to help determine the photo size I should print to achieve this result. Once the photos were printed and ready to go, I simply placed the acetate over top of the photo and traced the shape directly onto the photo for easy alignment and trimming. To give you an idea of how I achieved it, here’s a picture of the layout with the acetate templates in place.

Once the photos were in place, I added small words and phrases from the Daydream Accessory Stickers sheet that came with the full paper pack of this collection. These stickers were centred and adhered within each heart in the white space above each stitched flower cluster. Here’s a close-up of the largest completed heart.

The title for this layout came from a set of Pinkfresh puffy phrase stickers belonging to the joyful day collection. The word love was the perfect size and colour to complement the layout and also express how I feel about these 3 beauties. The final step to completing this layout was adding a few random flowers found in the Daydream Die Cut Ephemera pack to help balance out the remaining white spaces of the layout.

This layout stretched some of my skills to new levels, and I love that this hobby continually provides this opportunity. I hope I’ve inspired you to try something new yourself. Thanks for joining me, stay safe, well, and Happy Scrapping!

Fall

I had fun creating this Fall layout for Owen. The picture was taken at the cottage on Thanksgiving weekend 2020, and the weather was perfect for lots of playtime outside! Fun Fact: I have many, many pictures of Owen’s Mom and Uncle around this very tree, as they grew up, so this shot was extra special to me.

The foundation of the page came from the Leaf Pile patterned paper from the Glorious Autumn Kit paper pack by Reminisce. It was a perfect match for the wonderful colour we have on display each Fall in Muskoka. The title for the page is a cut file from Peartree Cutfiles called Fall Tags. You can find it here: https://www.peartreecutfiles.co.uk/product/fall-tags/.

I have some wonderful Fall shaker elements that matched the patterned paper perfectly, and this inspired me to make the tags into individual shaker boxes. The first step was to cut the Fall Tags cut file out twice – one for the top and one as a base for the bottom. I then very carefully punched small holes in one of the cut files to prepare it for hand stitching. I carefully stitched the full cut file using 5 separate colours of DMC floss to match the colours in the patterned paper (DMC 221, 921, 742, 3021, 347). Because the cut file had delicate borders, I only used 3 strands of each colour to stitch around the edges. Once the stitching was completed, I backed the leaves, mushrooms, and pumpkin, that can be seen around each letter. The following picture will help you see the detail of the completed top level.

To create the shaker pockets, I utilized the negative cutouts from the letters of the cut file as a guide and traced each onto a piece of acetate twice (one for the top and one for the bottom of each shaker pocket). I wanted the patterned base paper to show through the completed shaker tags, so the second piece of acetate was necessary to achieve this. The acetate letters were cut slightly larger than the tracing marks to ensure they completed covered each letter and securely held the shaker contents. Once the acetate was in place on the stitched title, I used Foam Sticky Strips from taylored expressions and carefully placed the strips around all edges of each tag and the banner at the top. Before removing the backing of the foam strips, I placed the Fall Shaker Elements in each letter. After the Shaker Elements were added, I removed the backing from the Foam Sticky Strips. I won’t lie, this was a very tricky and tedious step, and it required lots of patience, as the shaker elements kept moving around and liked to stick to the foam – but I feel the effort was worth the result! Once the backing was removed, I placed the second layer of letter acetate cutouts over the letters to secure everything nice and firm and to allow me to lift the cut file without losing any shaker elements. I chose to then adhere everything to the additional cardstock cutout of the cut file. This provided more stability to the overall completed cutout. I also adhered the small stitched centre to the letter A to complete the overall title. Here’s a couple more closeups to show you the completed shaker title.

Once the title was completed, the layout came together quite quickly. I adhered the photo and title first and then added several falling leaves to complement the patterned paper. These included No. 6 Forever Flowers from Prima Marketing Inc., which have been in my stash for years, and a few wooden diecut leaves. Finally, the two wooden slices were added to the bottom left of the picture.

I hope I’ve encouraged you to try a shaker pocket title on a future layout! Thanks for visiting, stay safe and Happy Scrapping!

Valentine’s Day 2021!

While I’m not the type of girl who looks for roses or gifts on Valentine’s Day, I certainly love to show my family how much they mean to me on this special day. This year especially, I look forward to the positive distraction the day will bring! I love to make Valentine cards for my family, and this year I was inspired by the very talented Zsoka Marko who posted a video using a Paige Evan’s cut file. I love interactive cards, and this was the perfect fit for my 3 grandchildren. You can find Zsoka’s video here: https://www.youtube.com/watch?v=_RO1hIrGCpo&t=384s.

Each of these cards was made with Paige Evan’s Folding Heart Mini Album cut file, Design ID #300594, found in the Silhouette Design Store. I cut one single heart and 2 of the folding hearts to make each card. There is space for 4 heart photos within each card, providing a great opportunity to personalize each one. To achieve the heart-shaped photos, I traced the cut single heart onto a piece of clear acetate to create a template that was positioned and traced directly onto my chosen photos. I simply cut the photos a bit smaller than the tracing lines to fit them in the appropriate spots. Liquid glue was used to secure all the cut file pieces together, and a tape runner was used for securing the pictures in place. Ribbons were selected from my stash to coordinate with each paper collection. When the folding hearts were fully completed, I used double-sided adhesive sheets, cut to fit, to ensure a good stronghold to the front of the card. These cards measure 6″ tall by 5 ” wide. To complete the front of each card, I dug into my Doodlebug Design Inc. stash again and pulled two coordinating paper frills in bubblegum, blue jean, and limeade to complement the completed hearts.

Madison’s card was created using the Lovebugs collection of papers and stickers from Doodlebug Designs Inc.

Owen’s card was completed using the Legendary collection of papers and stickers from Cocoa Vanilla Studio.

Benjamin’s card was completed using the Boys Rule collection of papers and stickers from Cocoa Vanilla Studio.

I can’t wait to give my grandchildren these personalize cards on Sunday! I hope you all find special ways to enjoy Valentine’s Day this year, and to show your love to those who mean so much to you!

Stay well, stay healthy and Happy Scrapping!

Frosty

And now for something on the lighter side! Our youngest grandson Ben, is just approaching 2 & 1/2 years of age. He really loves the outdoors….but not in winter!!

Every time our daughter puts him in his snowsuit, and takes him outdoors, he literally just stands there. We live directly across the street, so we get the advantage of seeing them outside. While our daughter will shovel the drive, and the two oldest play in the snow, Ben just keeps standing there….. He can’t be enticed to play in the snow with his siblings, he is so unimpressed with this cold white stuff. He walks and acts like his Mother just put him in a straight jacket. It really is pretty comical from the warm interior of my living room! This picture was taken in early January when we had perfect snow for making snowballs and snowmen. Lindsay took Ben out to build a snowman – but again – no interest – didn’t want to leave the driveway. Lindsay diligently built Ben a snowman with arms and a carrot nose, and still – nothing doing – he simply couldn’t be enticed to come see it. Thankfully, she patiently carried him over to grab a photo. You can see from his face, he was still unimpressed and would rather have been inside with his cars. Oh Ben, you do make us giggle!

I used two cut files from Peartree Cutfiles to make this page. The “Build a Snowman” and “Frosty” files to be exact. Both cut files were cut on my Silhouette using a fine silver glittery cardstock. You will find all of the Peartree Cutfiles here: www.peartreecutfiles.co.uk/

The patterned paper for this layout was a mix of two Photoplay collections. The solid grey cardstock came from the Christmas Cheer “Solids Plus” collection pack, and the red and black lumberjack paper, that backs the Frosty title, came from the “O Canada” collection pack. I choose the red and black lumberjack paper because it matched the fabric of Ben’s hat, and I chose the grey cardstock for two reasons; it was a grey overcast day, and it fit the mood of my grandson!

Before I assembled the page, I flicked diluted white paint over the grey cardstock to mimic the look of a snowfall. Constructing the snowman was super simple, as I only needed the nose and arms to replicate the snowman in the picture. I completed the layout with hand journaling to give context to the picture. I felt it important to give Ben some understanding as to why I scrapped this particular moment, when he looks back on it in the years to come.

I hope you are also finding fun ways to be creative and pass the time during these COVID lockdowns. I wish you good health and Happy Scrapping!