Go Play Outside

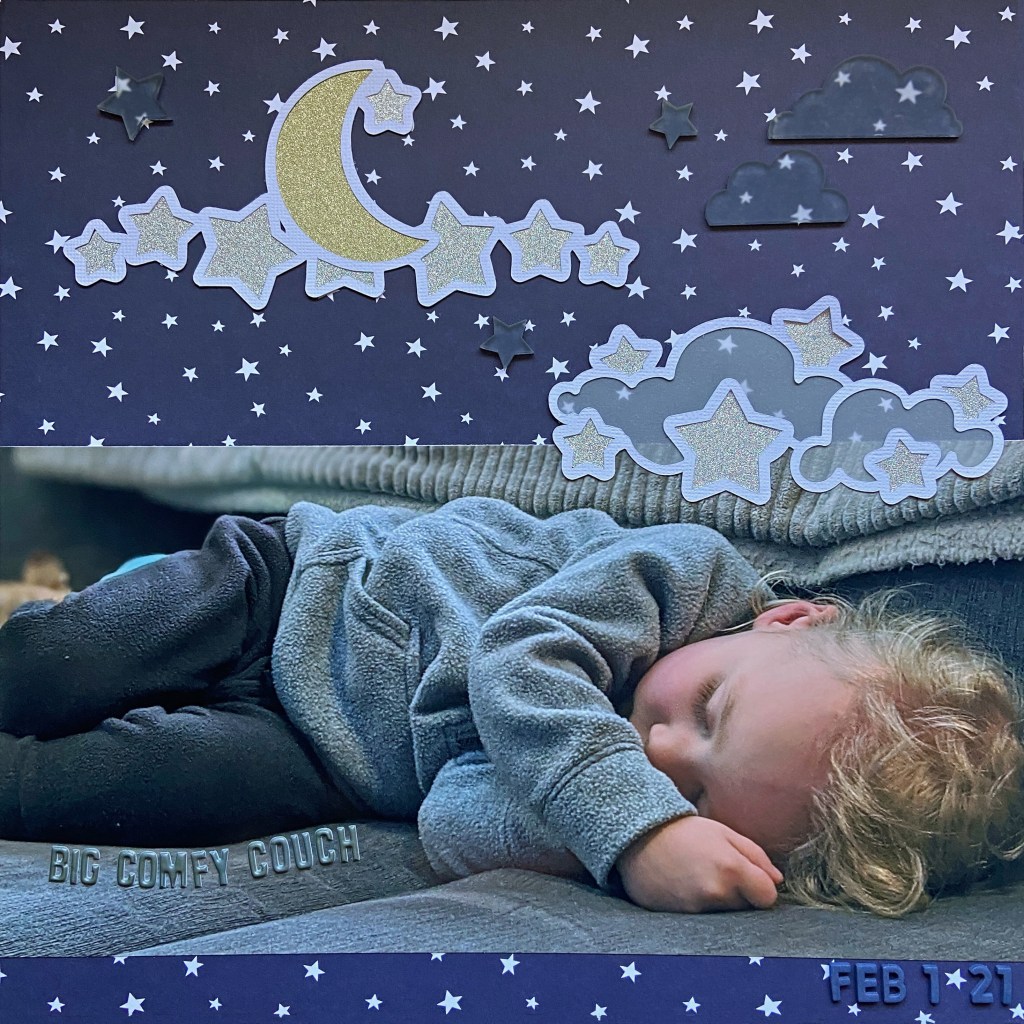
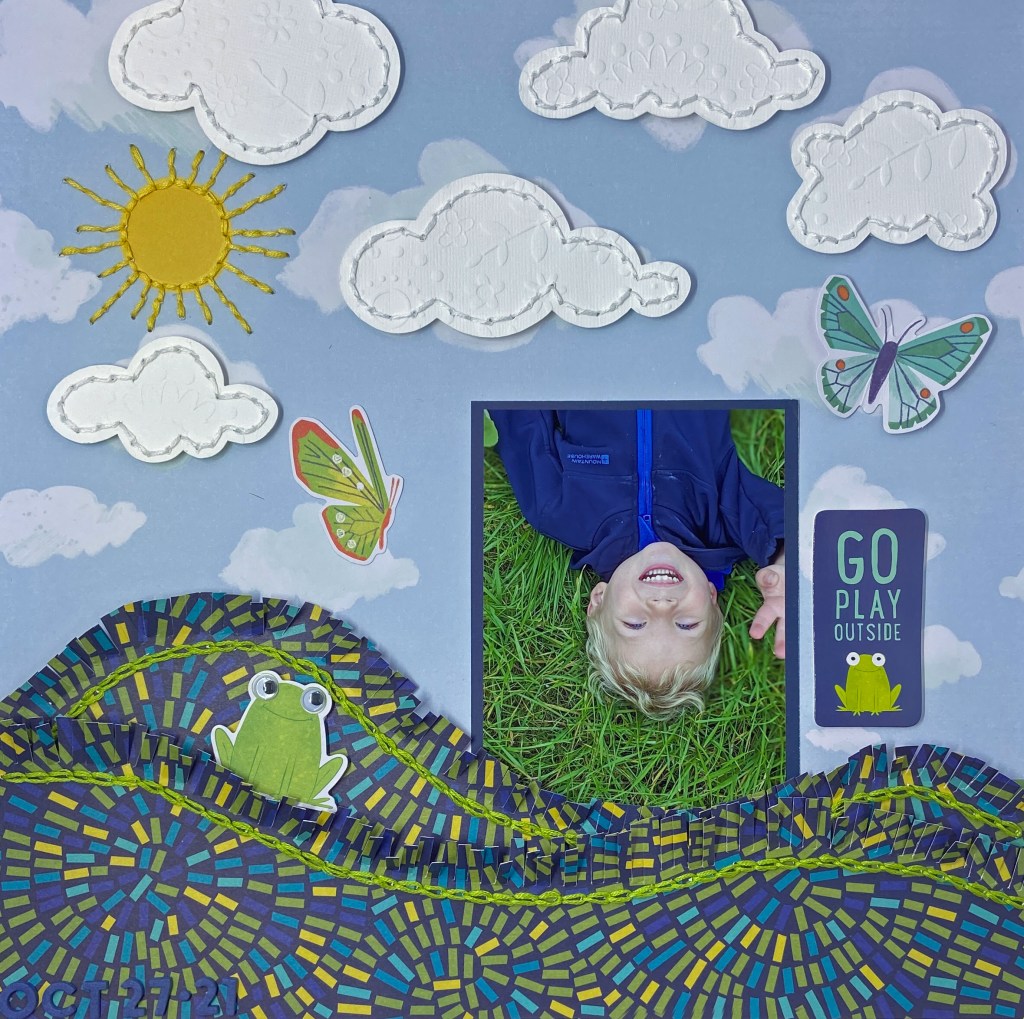
I can’t wait to see grass again! We’re at a stage where winter truly begins to drag for me. So working on this layout was an easy way to feel surrounded with warmer vibes. I’m in love with this fun photo of Ben snapped last Fall. It just makes me smile every time I look at it!

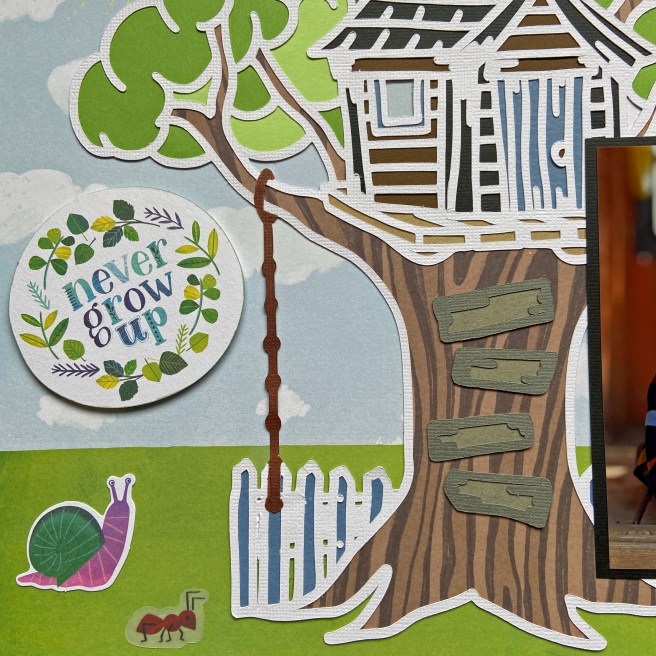
I used two collections by Shimelle to create this layout. The base paper belongs to the Never Grow Up collection, and the green, blue and yellow grass paper, Forward Thinking, belongs to her Field Trip collection.

The first step in creating this layout was to create the layers of grass. I used spare pieces of paper to make templates for these two layers first. Creating a template will ensure you are happy with the end result before you cut your patterned paper. Once the hills were created, I used fringing scissors to cut the top edges of the paper to mimic blades of grass. When the fringed edges were complete, I used a paper piercer to create the stitching lines for the green chainlink border. This border was stitched using six strands of DMC 907 embroidery floss. Once the stitching was complete, the two sections were added to the layout. TIP: I like to use my 12″ x 12″ MISTI to help align page elements such as these. Simply remove the foam insert and place your page in the very bottom corner of the Misti to get a perfect alignment of your edges. When these layers were complete, the photo was tucked into them to provide an extension of the grass border.

I wanted to add further stitching to this layout and to enhance an overall whimsical feel. To achieve this, I stitched the border and sun rays of the sun found on the base patterned paper with DMC 726 embroidery floss. To help balance the layout, I cut five separate cloud patterns from embossed white cardstock using Design ID #11654 found in the Silhouette Design Store. Using white DMC floss, I stitched around the borders of each cloud before adhering them to the layout using fun foam.

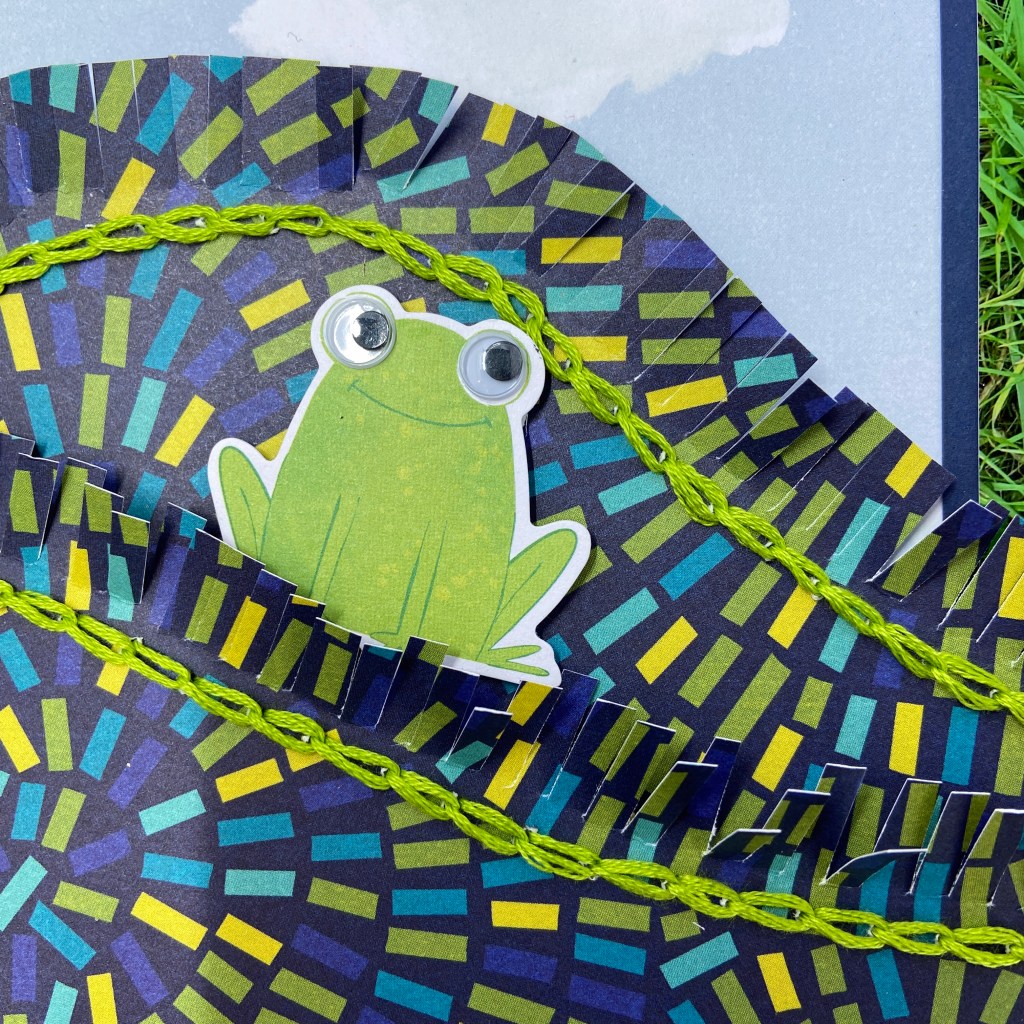
The layout was completed by adding the two butterflies and the frog from the Never Grow Up ephemera package, and the Go Play Outside title from the coordinating Let’s Play Foam and Cardstock Phrase Stickers by Thickers. The butterfly on the far right has a few small pop dots underneath to give the illusion of flight. The frog was secured with fun foam for dimension, and two googly eyes were attached to add to the whimsical element.

I hope I’ve inspired you to create a whimsical layout of your own! Thanks for stopping by today. Until next time, stay safe, stay well and Happy Scrapping!

Great Idea

Do you remember the game Twister? Did you ever think of playing it with shaving cream….on a water trampoline? Well, these crazy cousins thought it would be a lot of fun, and they were right! These beauties, and several more, got together on a perfect summer day in Muskoka to celebrate family and friendship. The pictures speak for themselves, a great time was had by all!

My second Design Team layout for Marcy Milly SVG is designed around the Great Idea cut file. When I first saw this cut file, so many ideas and possibilities went through my head. I love the light bulbs in this title and knew instantly that I could turn them into shaker boxes. As I pondered different ideas I was drawn back to this fun day in July 2018 when these cousins got together for some fun. Of all the games they played that day, the Shaving Cream Twister, on top of a floating trampoline, was the best!

My process to create this layout began in Silhouette Studio where I imported the Great Idea cut file and the photos I planned on using. By resizing these elements in the software program first, I can create a page map to complete the layout before anything is cut or printed. Once I settled on the design of the page, the selected pictures were printed and put aside while I focused on the cut file.

I chose colours for the title that matched the coloured circles on the Twister mat – red, blue, yellow and green. The offset tool in Silhouette was used to cut and back these letters. To create the light bulb shaker boxes, the knife tool in Silhouette Studio was used to separate the light bulb from each of the words. I also used this tool to cut away the filament to ensure the inside shaker had more room for sequins and movement. Once completed, this allowed me to cut 5 more copies of each light bulb from black cardstock without having to cut the full title out multiple times. These multiple layers of bulbs created the pockets required to turn the bulbs into shaker elements. I then traced the bulb section onto clear transparency film and cut two copies for each bulb. The transparency sections were glued to the bottom and top levels. The bottom parts of the bulbs were backed with shiny silver cardstock on the top light bulbs only. Next, all layers of the bulbs – except the tops – were glued together to create the pockets to hold the gold sequin mix. Once the gold sequin mix was in place, the top and final layer was glued in place. Here are some closeups of the completed light bulbs.

The background paper for this layout is called Box of Crayons from Shimelle. The bold repetitive circles were a perfect fit for the game Twister. To play up the whimsy of this layout, I expanded on the title using small white Thickers to complete the “It seemed like a GREAT IDEA at the time!” phrase. A large circular die was used from Lawn Fawn’s Large Stitched Circle Stackables to create a space for hand journaling. All of the cardstock embellishments came from the Hello Friend – Silver Holographic Chipboard Stickers that coordinate with the Vicki Boutin StoryTeller collection. The small colourful directional arrows complemented the spinner board within the Twister game. The hello Summer sticker came from a collection with the same name by Lori Whitlock and was added to the top right of the large photo. The sticker helps draw your eyes towards the action in the picture.

Are you tempted to pull out that old Twister game now?! Thanks for stopping by to share the fun today, and be sure to stop by MarcyMillySVG to pick up this fun cut file. I’d love to see what you do with it! Until next time, stay safe, stay well, and Happy Scrapping!

Never Grow Up

We have been blessed with beautiful spring weather for the last couple of weeks. It’s such a relief to be able to get out and enjoy the outdoors – especially since we’re under our third “Stay at Home” order. Our youngest grandson Ben is now two and a half. Every day is a new day of discoveries for him. He loves being outdoors and he and his siblings have a wonderful treehouse in their backyard. My daughter managed to get Ben to slow down long enough to capture this beautiful photo of him in the upper level of their treehouse.

The perfect cut file to complement this picture was the Tree House cut file from Peartree Cutfiles. You can find it here https://www.peartreecutfiles.co.uk/product/tree-house/

While it does take some time and patience to back this large cut file, it was worth all the effort. I used patterned papers for the background and the tree trunk from Shimelle’s Never Grow Up paper line. I also used a Copic marker to colour the rope ladder found to the left of the tree trunk. When I’m working on a cut file this large, I use the fill option in the Silhouette Studio software to map out the colours first. This ensures I don’t miss any of the pieces as I cut the backing, and also speeds things up overall.

I wanted this cut file to take centre stage on the layout, so I kept the embellishments to a minimum. The Never Grow Up title, get OUTSIDE banner, snail and vellum ant all came from a coordinating ephemera package from the Never Grow Up line. I adhered some fun foam to the back of the Never Grow Up title, to provide a bit of dimension and texture to the layout. The two little layered butterflies belong to the Flower Wild Free collection by Prima Marketing Inc. The date was added using Doodlebug Design Inc‘s, my type stickers.

Thanks for stopping in today, I hope I’ve inspired you to get outside to enjoy the spring weather! Until next time, stay safe, stay well, and Happy Scrapping!

Big Comfy Couch

Isn’t it funny, that as adults we are always hoping we might just squeeze in a nap or two when the weekend comes, yet children are the exact opposite? They like to keep going, and going until they drop! Our youngest grandson Ben is at that tender age when he’s almost ready to completely give up the afternoon nap. He’ll go for days without one, and then his body gets the best of him and he’s down whether he likes it or not!

My daughter captured this beautiful photo of Ben in early February. He was playing in the den after lunch on a cold winter day. The fireplace was warming the room and the big comfy couch beckoned Ben to take a rest. He looks so relaxed and comfortable in this photo, it certainly looks ideal for a wonderful afternoon nap.

The star background paper for this layout came from Echo Park Paper Company’s Little Dreamer Boy paper collection pack. The specific paper was the back side of the Planes Palooza paper. When I saw this photo I knew right away I wanted to crop and enlarge it. I think the big photo helps draw you into the mood of the photo and layout. My March 2021 Pearscription with Peartree Cutfiles provided the perfect cut files to complement this photo and document this moment. I choose 2 of the 3 cut files that came with the Wish cut file. You can find Peartree Cutfiles here https://www.peartreecutfiles.co.uk/, but know that the file used is an exclusive file that came with the March Pearscription. I highly recommend the Pearscription, the files are just wonderful!

The stars on the cut files were backed with silver and gold glitter cardstock and the clouds were backed with vellum for a light and airy feel. I also found some acrylic shapes in my scrapbooking stash from Shimelle. They fit in perfectly and also complemented the light and airy feel I was looking for. I usually look for ways of adding a title in an unusual way to a layout. The large 12′ x 6″ photo provided the perfect opportunity to place a title. With the photo occupying centre stage on the layout, I wanted something subdued for the title. Pinkfresh Studio’s Mimi Puffy Alpha Stickers in grey were exactly what I needed to achieve this effect. Here are a few closeups of this project.

Thanks for stopping by today, and if I’ve enticed you to take a quick Sunday afternoon nap, don’t worry, it will be our little secret! Until next time, stay safe, well and Happy Scrapping!