Canada – It’s My DNA

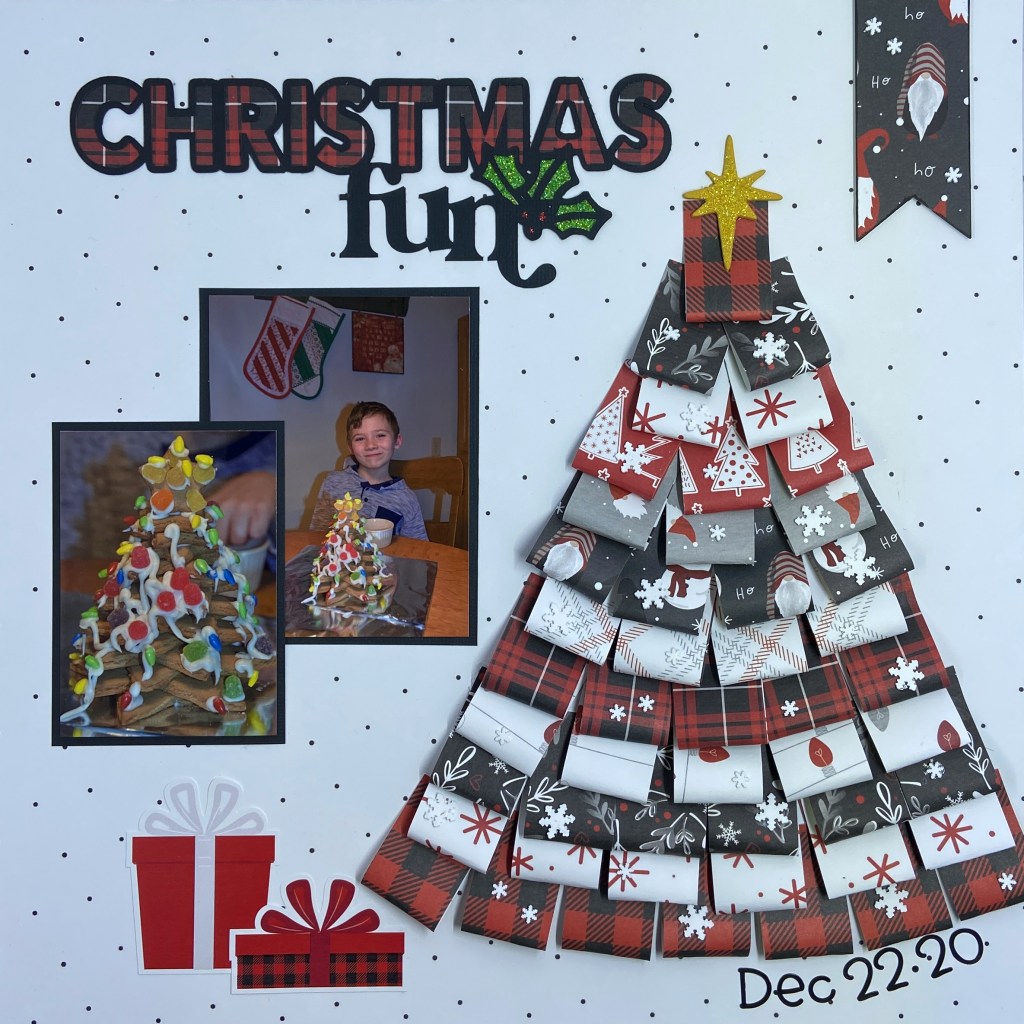
Happy Canada Day! I had fun documenting this fun picture from July 1, 2024. Taken at their home in Austria, my three grandchildren proudly display their Canadian heritage last July 1. I’m excited to share that they are moving back to Canada later this week! They have enjoyed many adventures in Europe over the last three years and come home with worldly experiences that will support them as they continue their education. I was excited and proud to have this layout published in the 2025 Summer edition of Creative Scrapbooker Magazine. You will find this design on page 49.

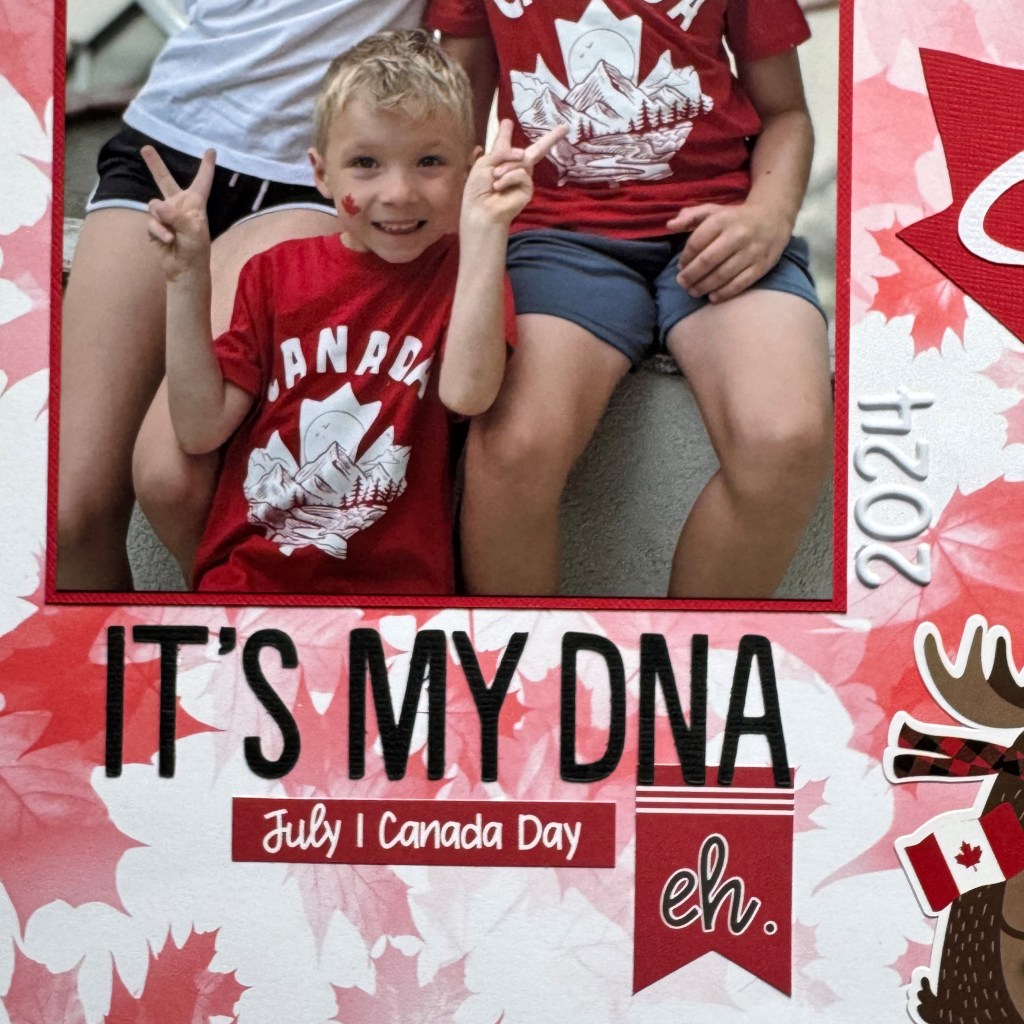
This layout came together very quickly using only a few items from my scrapbooking stash. I utilized two cut files from the Silhouette Design Store. First, I cut the red maple leaf and Canada title using cut file #11539. I scaled the wording to fit within the maple leaf. Second, I utilized the wording for the subtitle “It’s My DNA” from the “Canada, it’s my DNA” cut file, ID #356180. These two cut files, combined, provided the exact title I was looking for.

The maple leaf background paper has been in my stash for well over ten years. I am unsure of the manufacturer for it, but I am very pleased that I hung onto it. All the stickers and cardstock die cuts on the layout came from Photoplay’s O Canada collection. Some were adhered with pop dots to provide texture and additional whimsy to the design. I added the year the photo was taken next to the image using Doodlebug Designs white Alphabet Soup puffy stickers.

And that’s a wrap on this simple but fun layout. To all my fellow Canadians, I wish you a wonderful Canada Day as we proudly display our red and white today! Here’s to our great nation, and our talented citizens, past, present and future!

Thanks for joining me. Until next time, stay safe, stay well, and Happy Scrapping!

Rollercoaster

Who’s in for a good roller coaster ride this summer? While visiting our family in Austria, we took another trip to the Prater, Vienna’s renowned amusement park. Emperor Joseph II opened the park to the public in 1766. It has been serving up smiles ever since! Our 10-year-old grandson somehow convinced his Mom to ride this wicked (lying down) roller coaster. I’m the one safely on the ground, filming for prosperity! This picture captures them as they pause before being loaded into a corkscrew lift to start their ride.

The paper selected for this layout is from Webster’s Pages and it is called Dream in Color – Drifting. It fits beautifully with my design when I rotate it upside down. I chose Peartree Cutfiles Rollercoaster cut file to document this fun event. I wanted my layout to provide the illusion of a roller coaster. To achieve this effect, I took several steps. 

First, the cut file was cut out in black to help the title stand out. Next, the letters of the title were cut in blue to match the sky in the photo. The third step included cutting the file once again in red to imitate the red steel girders of the actual roller coaster. The cut file was cut once again in yellow to mimic the yellow rails the roller coaster cars travelled on. Once all 4 colours were cut, I carefully cut the elements away that I didn’t need and glued each section into place to recreate the coaster my family was riding.

To further the illusion of the actual roller coaster, I used Taylored Expressions Black Foam Sticky Strips to back the cut file and provide dimension. Each sticky strip was cut in half lengthwise and then carefully adhered to the back of the cut file to achieve this look. While somewhat tricky and time-consuming, I am very happy with the result.

The sticker phrases and journalling box came from an older Echo Park paper collection called hello Summer. The large colour-coordinated FUN sticker is from Photoplay’s Those Summer Days paper collection. The final design element was adding brightly coloured stars in the sky. These stars are Puffy Stickers from Cocoa Vanilla Studio’s No Limits collection.

I may not be a roller coaster enthusiast myself, but I certainly had a blast documenting this ride for my family. My grandson is very excited this layout will be included in one of his scrapbooks!

Have I convinced you to get out to the amusement park this summer? Be sure to take every opportunity to enjoy this glorious summer and all the opportunities it offers! Until next time, stay safe, stay well, and Happy Scrapping!

’twas the Night Before Christmas

I couldn’t resist scrapbooking one more Christmas page. This picture is just far too cute to leave until next season! There’s nothing quite like the build-up to Santa’s big arrival for children. Christmas Eve was so special this year. The smiling faces of my grandchildren in this picture says it all – it was a wonderfully joyous evening! It was the first year our youngest grandchild Ben understood the concept of Santa Claus. He was very excited and, when asked what he asked Santa for this year, he’d always say “a Hammer!”.

I created this layout using three separate cut files from Peartree Cutfiles. The Snowflake Background cut file was cut from white cardstock to fill the entire page. I layered it directly on top of a piece of Twill cardstock from Bazzill.

Black cardstock was used to cut the outline of the title, ’twas The Night Before Christmas. I used coordinating patterned papers from Photoplay Paper‘s Christmas Cheer collection to fill the cutout letters. I chose to backfill the word “Christmas” and used Talyored ExpressionsFoam Sticky Strips to adhere to the word “Night”. The result provided texture and dimension to the upper section of the layout.

The third cut file used is called Stockings. I downsized the file considerably to fit my project. Doing so made backing the presents a bit tricky, but not impossible. Before cutting this file, I completed a mock-up in Silhouette Studio to ensure I would be happy with the sizing. Glitter paper backfills each of the presents and holly in this garland.

The final touches on the layout included adding some strategically placed holographic snowflakes and a couple of stickers from the Christmas Cheer patterned paper collection. The stickers were dusted with baby powder to remove the sticky side and then glued to some fun foam for dimension. The holographic snowflakes were attached using small white brads.

I couldn’t be happier with the results of this layout. It is the first time I’ve utilized three cut files on one page. Thanks for stopping by today, and until next time, stay safe, stay well and Happy Scrapping!

Get Lost in a Good Book

For as long as I can remember, I have loved reading. For me, the best part of reading is the ability to let your imagination paint the picture from the written word. I’ve yet to meet a movie that did a book proper justice. Reading and scrapbooking have a lot in common. Both hobbies take me away from the stress found in everyday life. I read before going to sleep every night, even when the light annoys my husband! It’s part of my nighttime ritual that helps me relax, unwind and put the troubles of the world aside.

For several years now, I’ve made a list of each book I’ve read within a calendar year. January 1st, I take a picture of all the books I’ve read throughout the previous year. I’ve always had grand plans of scrapbooking the photo, and this year those plans became a reality. I dug into my stash of patterned paper for this layout and used the 12″ Noel Joy paper by BoBunny for the foundation of the page. I’ve always loved the antique books on this patterned paper.

I chose the Get Lost in a Good Book cut file from Peartree Cutfiles to document my reading list from 2020.

I began by cutting the file in black cardstock and then backed the words with a gorgeous patterned paper by Bazzill Basics Paper called Antique Script. I love how the title stacks on top of a book. Because some of the books I read in 2020 were quite old copies, it is hard to see their titles in the picture. I wanted to include the book titles in this layout and decided on creating a little book from the book base in the cut file.

I started by cutting a duplicate book cover to mimic the front and back covers. Next, I cut multiple “pages” from heavy vellum to fill the book. I used these vellum pages to record the names of each book found in the picture. Using vellum tape, I adhered these pages together on the left-hand side and secured the second book cover to the top to complete the book. The result is a 3D embellishment that mimics a book.

To help balance the weight of the newly created book on the right-hand side of the layout, I mounted the picture on fun foam before adhering it to the background paper. I found coordinating stickers from the Photoplay Holiday Cheer paper pack to create the subtitle 2020 Reading List. The final touch was adding the three chipboard stars found around the picture. These stars also came from a very old paper collection in my scrapbook stash – My Mind’s Eye, Vintage Christmas.

And that’s a wrap on my first layout for 2022! I appreciate you stopping by and hope I’ve enticed you to look at cut files in new and different ways.

Until next time, stay safe, stay well, and Happy Scrapping!

Christmas Fun

It’s hard to believe that we’re only nine days away from Christmas! I love watching my grandchildren get excited about the end of school and the break at Christmas. They love to be involved in the preparations and anticipation of Christmas day. Last year, Owen made a beautiful gingerbread tree to help decorate the dining room. He did a great job and had so much fun decorating it. It was such a special memory that it deserved a unique page in his scrapbook!

I was looking for an excuse to try the recent trend of paper folding, and this project presented the perfect opportunity. To create this gorgeous tree, I cut strips of paper 3″ long by 1″ wide in each of the coordinating patterned papers from Photoplay’s Kringle & Co collection pack. Each strip was folded in half, lengthwise, and adhered with strong double-sided tape. Then they were secured to the background using the same double-sided tape. I ran a bone folder over each section at the top to ensure a good stronghold.

I embellished the tree with a variety of Bits & Pieces Snowflakes from Taylored Expressions. The star at the top came from an older collection of Basic Grey‘s chipboard pieces. It was painted yellow and embellished with gold glitter. The banner in the top right-hand corner was created using a die-cut from Your Next Stamp from the Fishtale/Banner set. I use this set quite often and the versatility it provides. The paper banner was adhered to fun foam for dimension and also embellished with a few of the snowflakes as found on the Christmas tree.

The Christmas Fun title comes from Peartree Cutfiles and includes a second option called Holiday Fun. Once again, it is a wonderfully versatile cut file that can be used for many layouts over the years. Once the cut file was resized to fit my project, it was backed with the back-side of the Snow is Falling patterned paper from the Kringle & Co paper collection.

To complete the layout I used a couple of the present stickers found in the main Kringle & Co paper pack and adhered them to the bottom left of the Christmas tree. I added the date using doodlebug design inc‘s black teensy type number stickers.

Creating the Christmas tree was a time-consuming part of this layout. However, it was well worth the perseverance, I am thrilled with the result! Once it was completed, the rest of the layout came together quite quickly. What new skill will you add to your scrapbooking toolkit this coming year?

Thanks for checking in today, and until next time, stay safe, stay well, and Happy Scrapping!