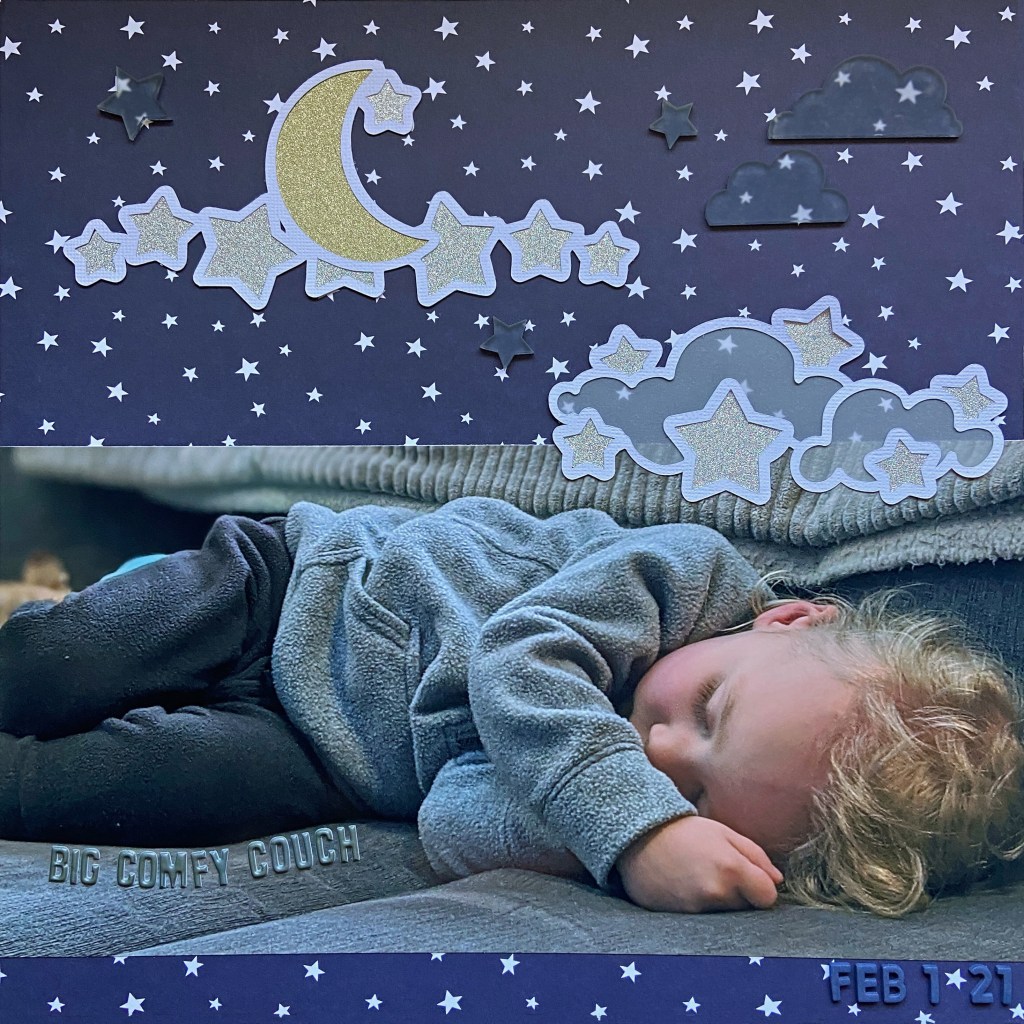
Isn’t it funny, that as adults we are always hoping we might just squeeze in a nap or two when the weekend comes, yet children are the exact opposite? They like to keep going, and going until they drop! Our youngest grandson Ben is at that tender age when he’s almost ready to completely give up the afternoon nap. He’ll go for days without one, and then his body gets the best of him and he’s down whether he likes it or not!
My daughter captured this beautiful photo of Ben in early February. He was playing in the den after lunch on a cold winter day. The fireplace was warming the room and the big comfy couch beckoned Ben to take a rest. He looks so relaxed and comfortable in this photo, it certainly looks ideal for a wonderful afternoon nap.
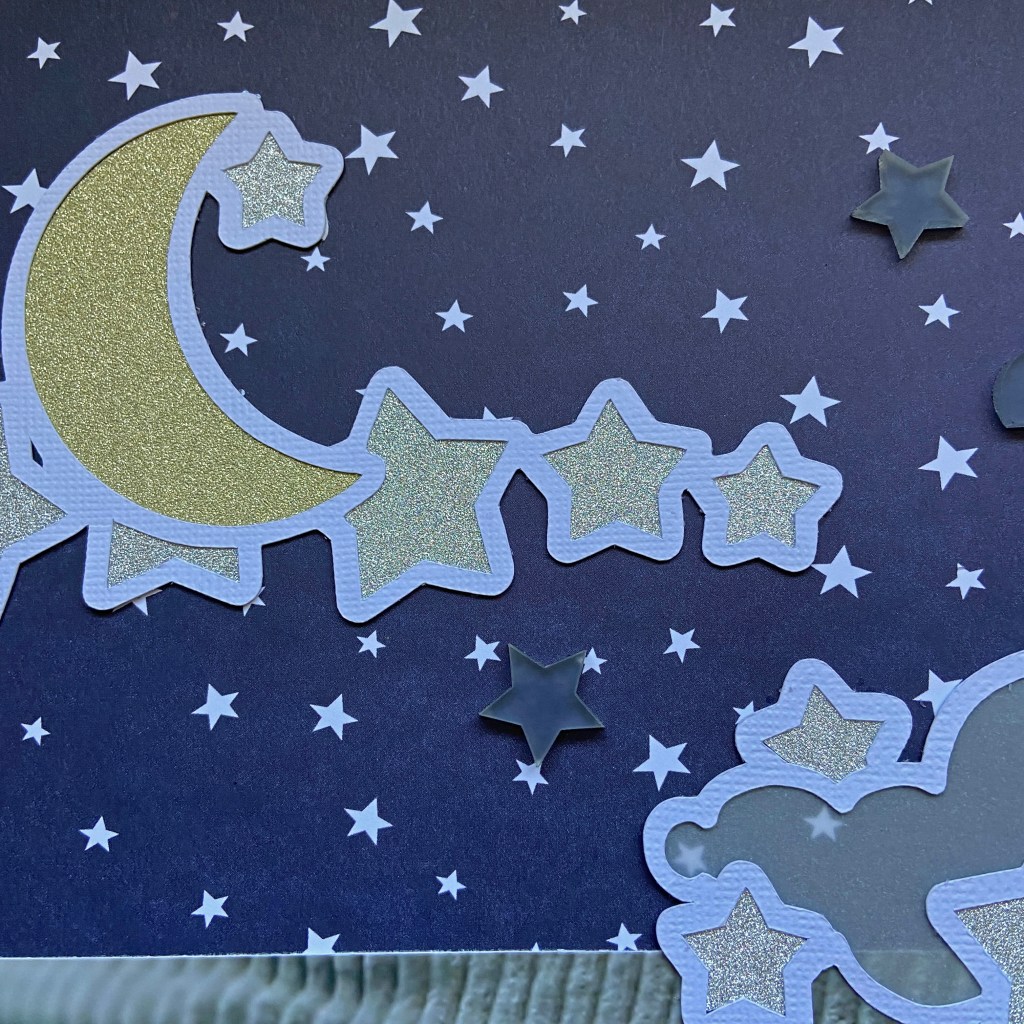
The star background paper for this layout came from Echo Park Paper Company’s Little Dreamer Boy paper collection pack. The specific paper was the back side of the Planes Palooza paper. When I saw this photo I knew right away I wanted to crop and enlarge it. I think the big photo helps draw you into the mood of the photo and layout. My March 2021 Pearscription with Peartree Cutfiles provided the perfect cut files to complement this photo and document this moment. I choose 2 of the 3 cut files that came with the Wish cut file. You can find Peartree Cutfiles here https://www.peartreecutfiles.co.uk/, but know that the file used is an exclusive file that came with the March Pearscription. I highly recommend the Pearscription, the files are just wonderful!
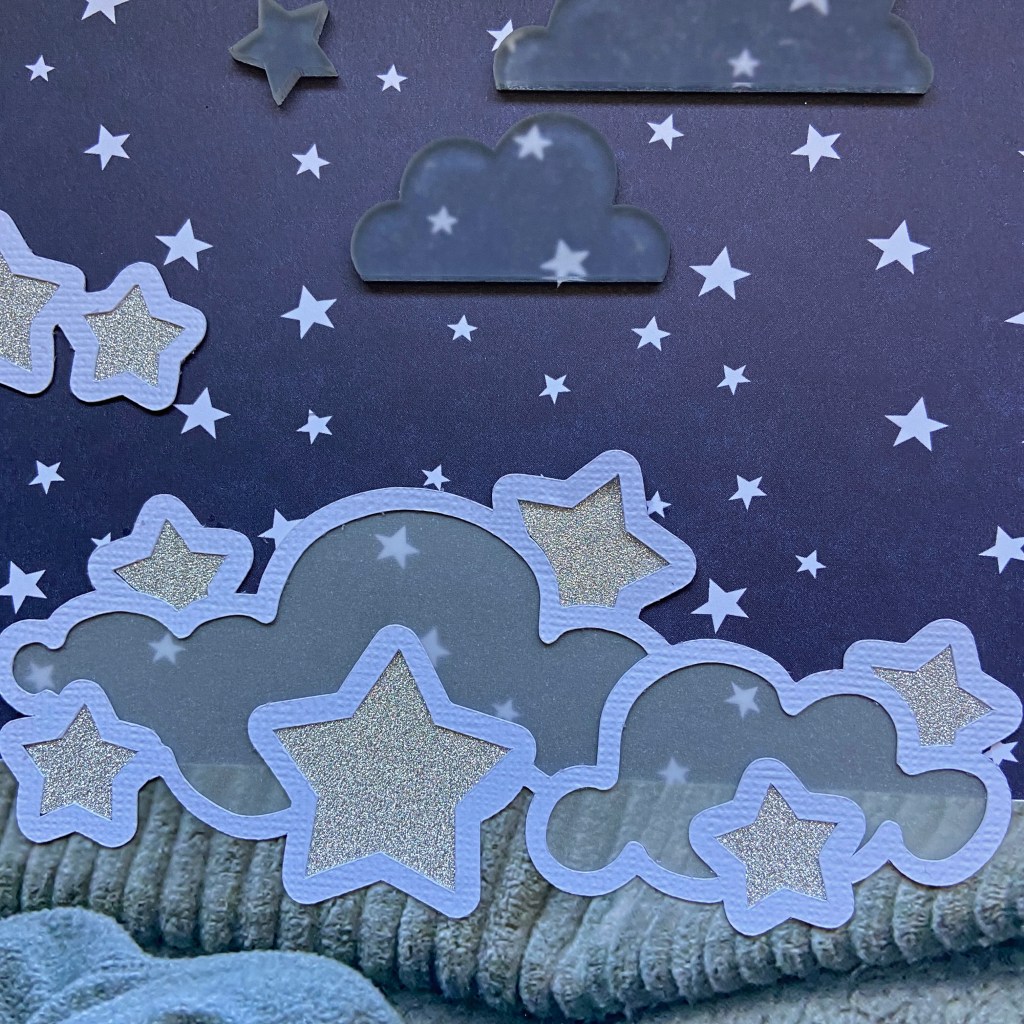
The stars on the cut files were backed with silver and gold glitter cardstock and the clouds were backed with vellum for a light and airy feel. I also found some acrylic shapes in my scrapbooking stash from Shimelle. They fit in perfectly and also complemented the light and airy feel I was looking for. I usually look for ways of adding a title in an unusual way to a layout. The large 12′ x 6″ photo provided the perfect opportunity to place a title. With the photo occupying centre stage on the layout, I wanted something subdued for the title. Pinkfresh Studio’s Mimi Puffy Alpha Stickers in grey were exactly what I needed to achieve this effect. Here are a few closeups of this project.
Thanks for stopping by today, and if I’ve enticed you to take a quick Sunday afternoon nap, don’t worry, it will be our little secret! Until next time, stay safe, well and Happy Scrapping!
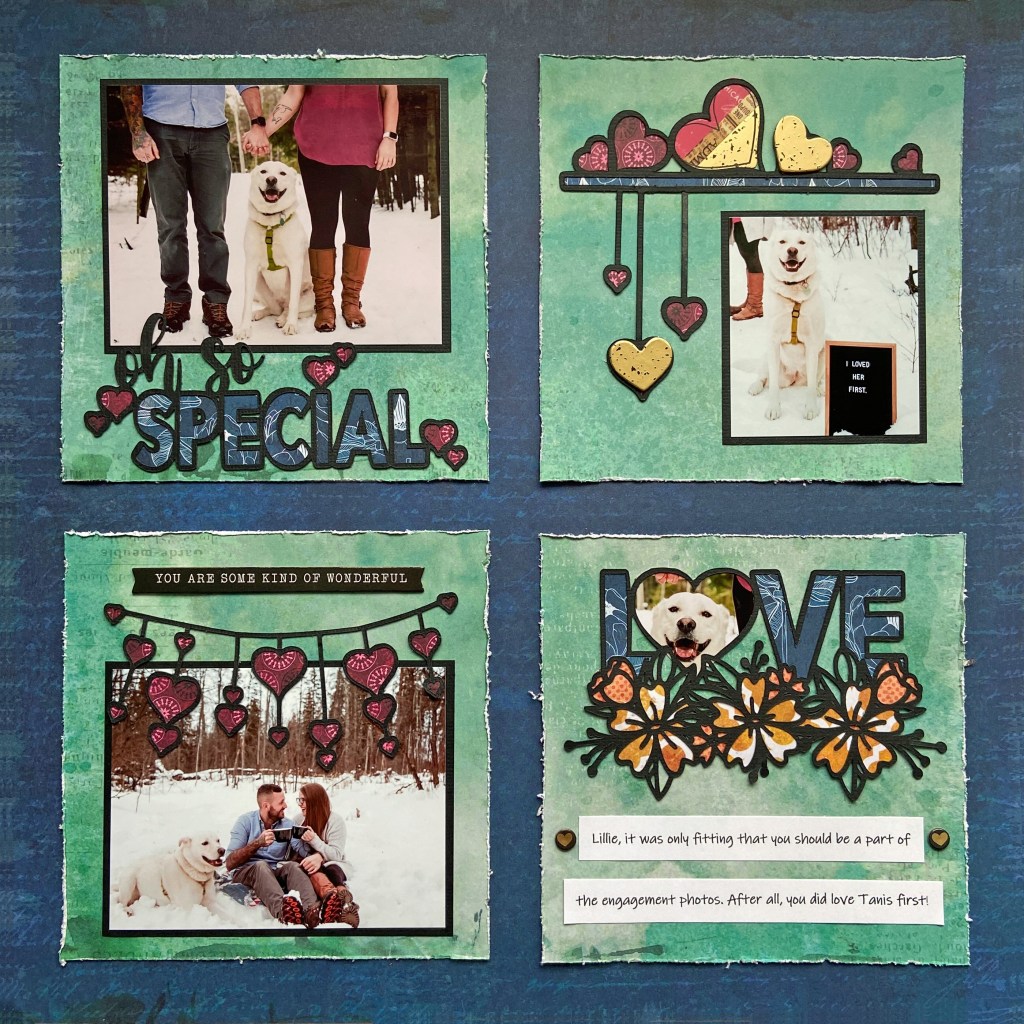
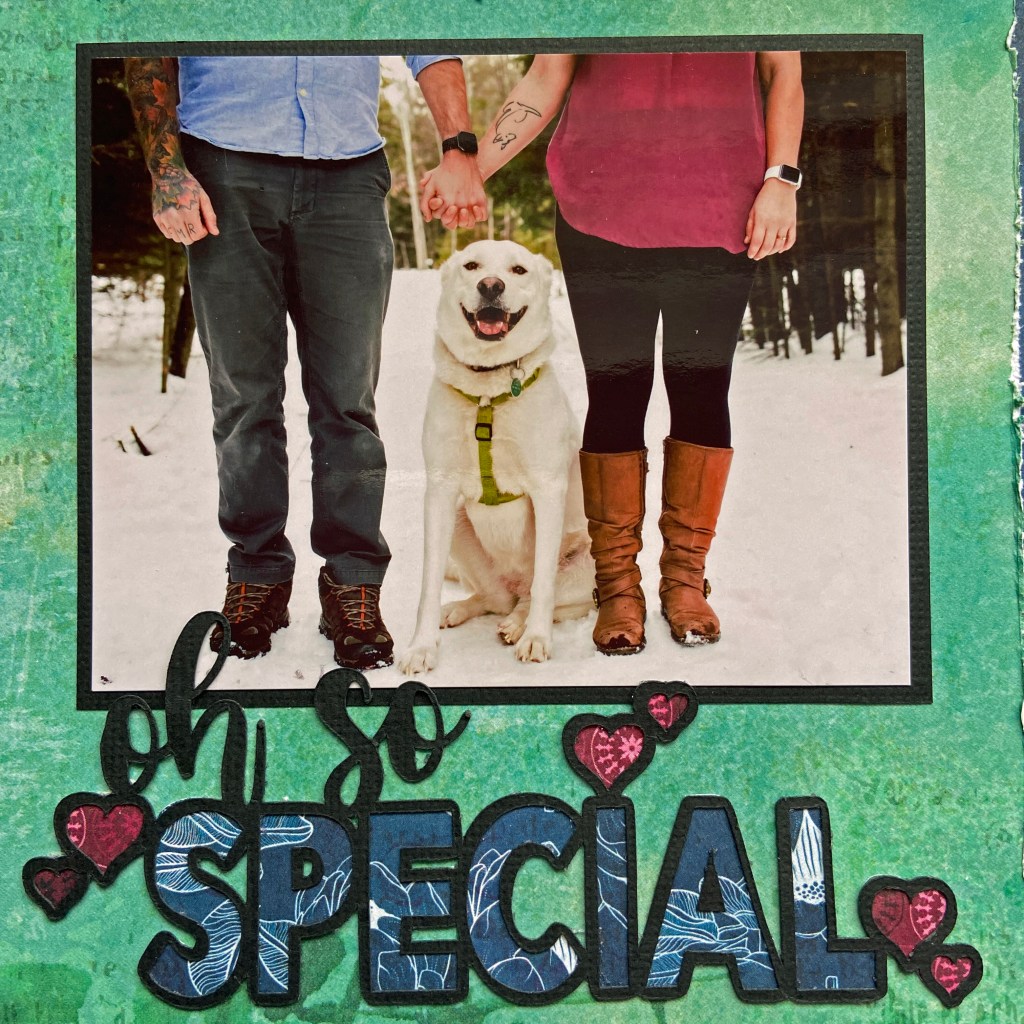
What greater gift in life, than to love, and be loved! It’s what gets us up in the morning and keeps us going throughout the day, even on the toughest days, weeks, or months of our lives. This layout features my son, Sean, and his beautiful fiance Tanis. They know first hand how love can be exhilarating, and heartbreaking. Sean is committed to his military career, which means there are days, weeks and often months when he is away from the love of his life. He was on deployment overseas January – July 2020, right when Covid hit the world. I can’t imagine how tough it was for this incredible, and loving couple to be separated at a time of worldwide crisis.
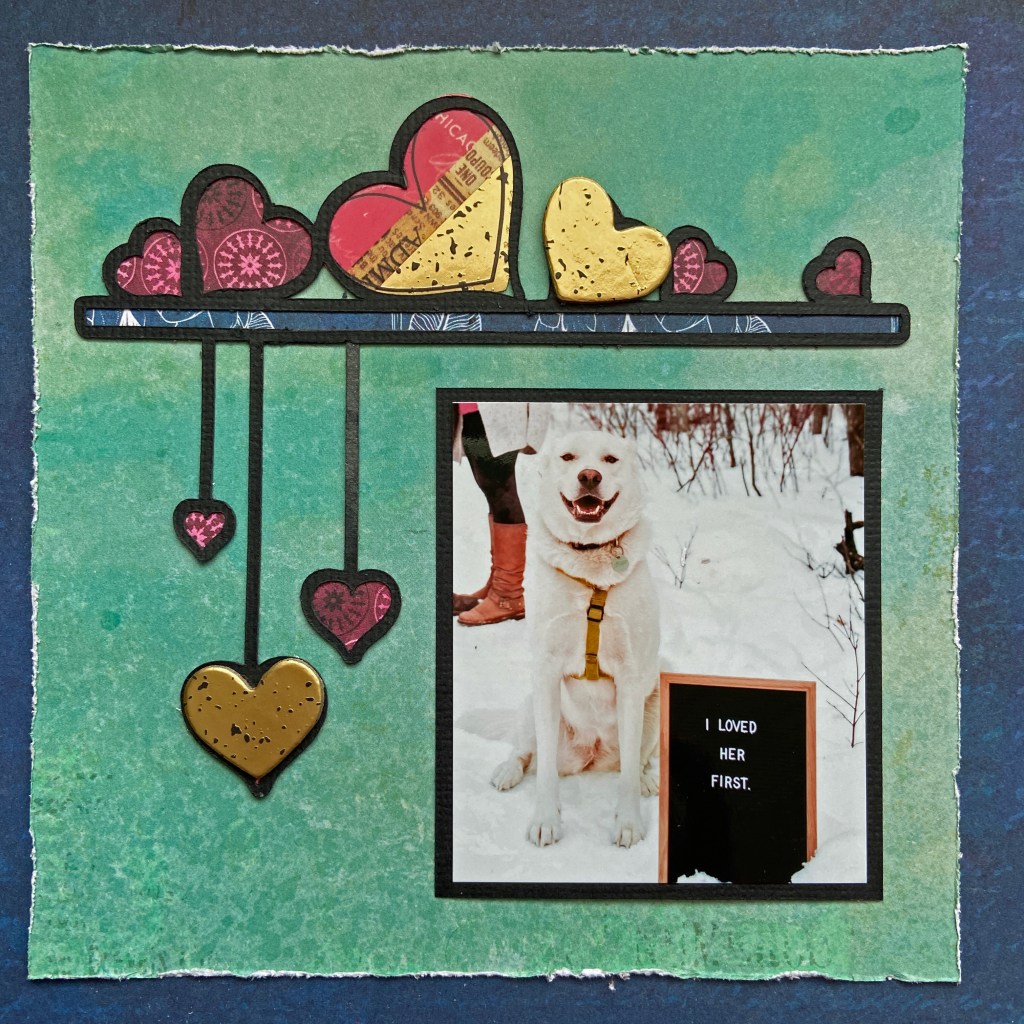
Sean and Tanis met after he returned from his first deployment in 2017 (and boy, are we glad they did!). Tanis is a huge pet lover, and she had a cat, Stella, and a dog, Lillie when they met. Sean had to win over more than Tanis in this relationship! As you can see from the pictures in the layout, he had no trouble doing so. Lillie is a gentle, loving animal, and I think she loves Sean now as much as she loves Tanis! She is a mix of Siberian Husky/Malamute and Maremma Sheepdog. Tanis shared “She liked him right away, but when we first started dating, every time we hugged she would stand beside us and whine or groan or grumble, and when we walked she would always try to walk between us. That’s the Maremma in her, guarding me, but Sean won her over with treats, hugs and chasing her in the backyard and the arena; she learned the sound of his car and loses her mind when she hears it up the street. One time, he drove by us while we were walking back to his apartment, so she (and in turn, I) chased his car back because she was so excited. Now she guards both of us and whines, groans and grumbles when we’re not in the same room together.” Lillie is such a big part of their lives, she needed to be part of their formal engagement photos. While I’ve scrapped several of the engagement photos already, I wanted to make sure that Lillie had her spotlight as well. This layout helped me achieve this.
Before I provide details on the products used in this project, I would like to give Tessa Wright (@tw829) credit for the beautiful engagement photos you see on the layout. Tessa is a talented photographer, and Sean and Tanis have lots of beautiful engagement photos from their photo session. I love how she ensured Lillie was well represented on this special occasion!
The papers and embellishments for this layout come from the Storyteller line by Vicki Boutin. This included patterned papers (background papers, and backing for the cut files), stickers and Gold Foil Chipboard Stickers from the coordinating chipboard sheets, Tell Your Story, by Thickers. As I planned this layout, I knew I wanted a grid pattern that would allow me to use multiple cut files. Each of the green square sections that make up the grid measure 5″ x 5″. I distressed the edges of the paper squares to give them more dimension and definition on the blue patterned paper used as the background. Here are some closeups showing the background papers.
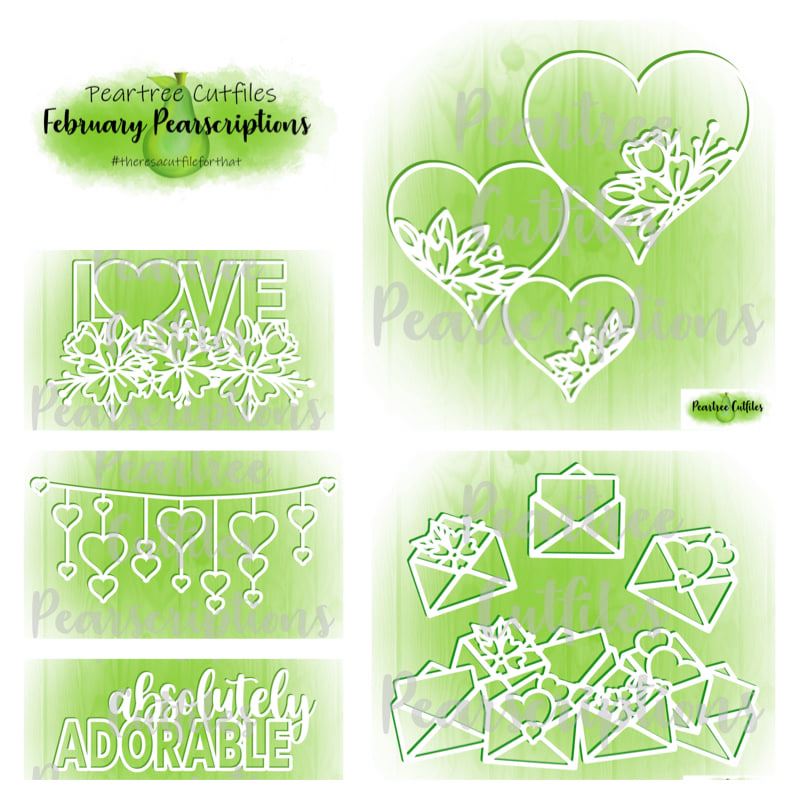
There are 4 cut files used in this layout, and they were each sized to fit within the green squares. They all come from Peartree Cutfiles https://www.peartreecutfiles.co.uk/, however, a couple of these files (Love and String of Hearts), are exclusive files from my Peartree monthly subscription https://www.peartreecutfiles.co.uk/pearscription/. The monthly subscription is an excellent value and you’ll receive 5 exclusive cut files that will never be available in the shop. Additionally, you also receive the free cut file of the month, for a total of 6 cut files. The Oh So Special cut file was the free cut file of the month in February, you can now purchase it in the shop. The fourth file used is called Shelf of Hearts and is also available for purchase in the shop. Each of the cut files was backed with patterned papers from Vicki’s Storyteller collection. Here are pictures of the cut files used.
I wish Sean and Tanis a lifetime of happiness together! Thanks for joining me again, stay safe, well and Happy Scrapping!
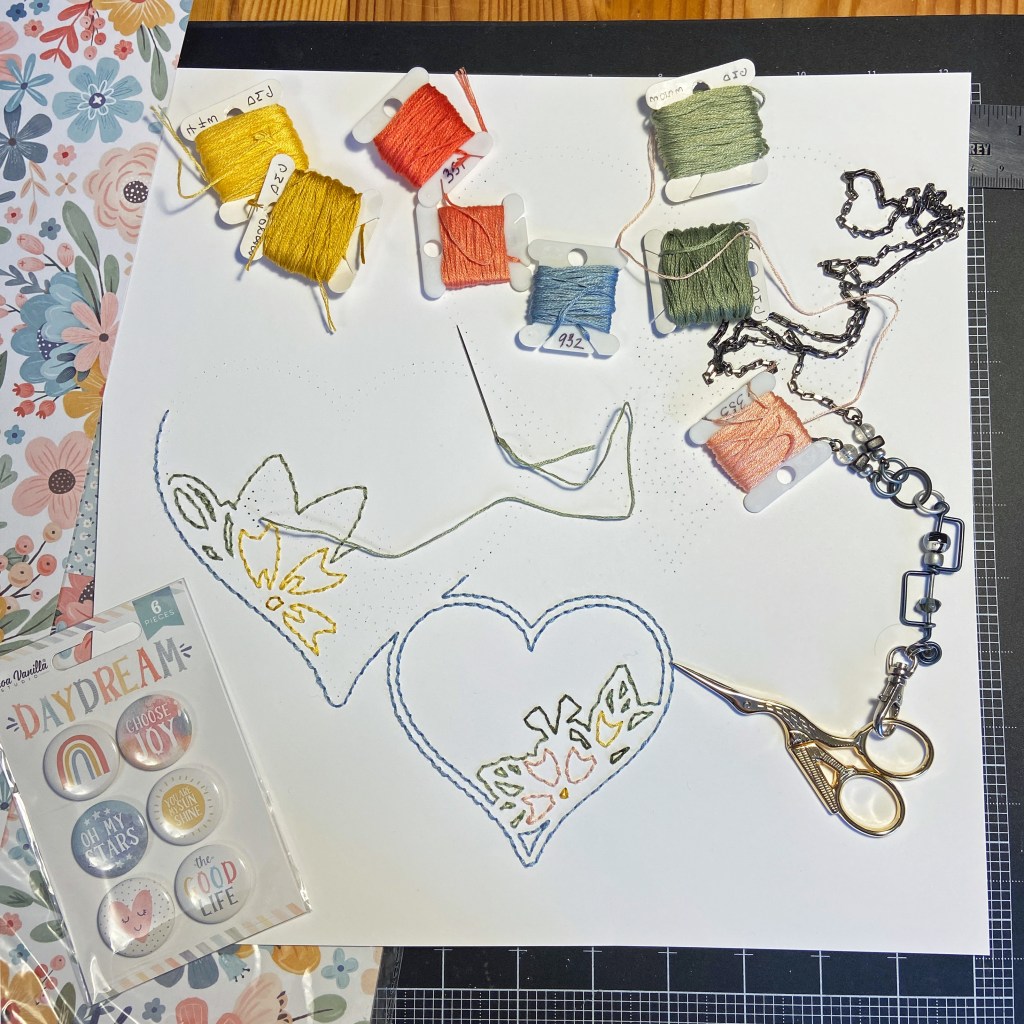
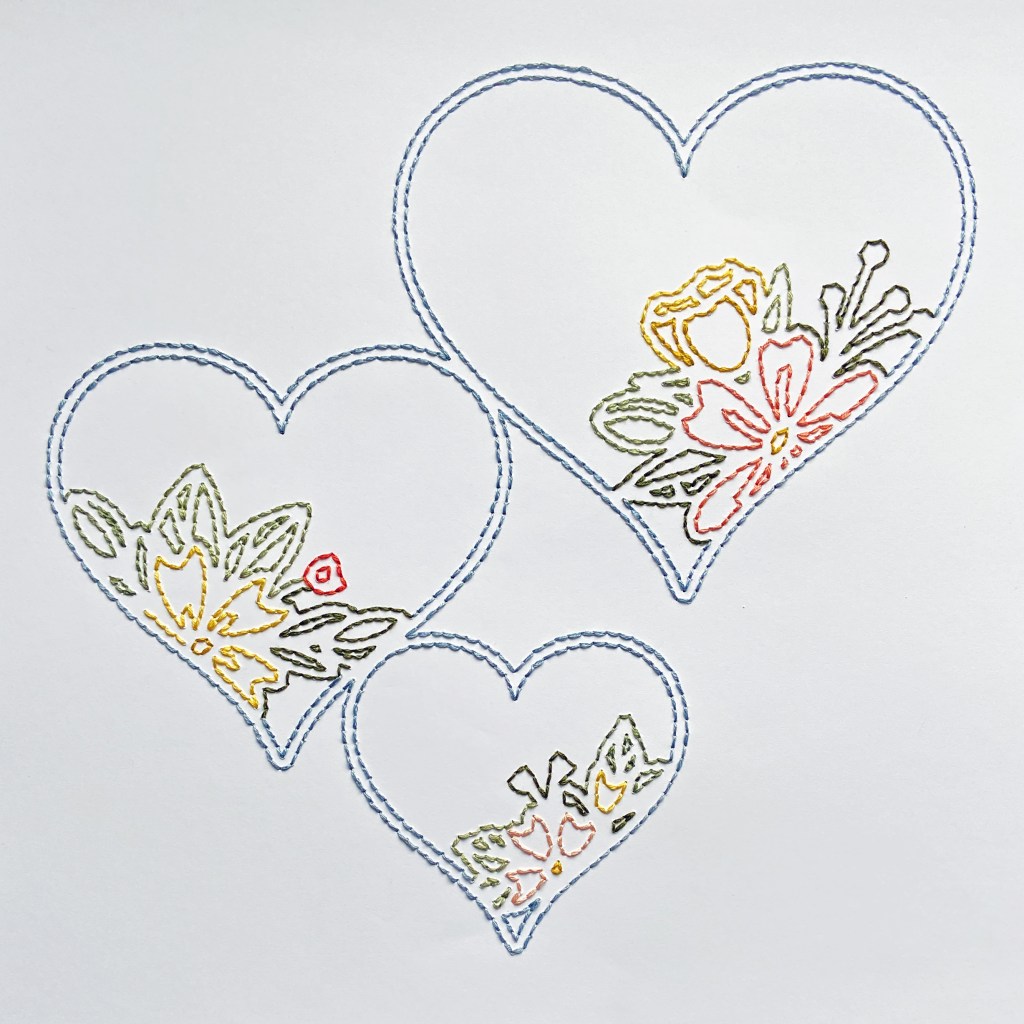
In February, I started subscribing to monthly digital cut files from Peartree Cutfiles, called a Pearscription, https://www.peartreecutfiles.co.uk/pearscription/. I used one of the five exclusive February files to complete this layout. All the files were unique and beautiful, but this Trio of Hearts cut file immediately grabbed my attention. It didn’t take me long to figure out what I’d like to do with it. Three hearts – three grandchildren – it seemed a perfect match!
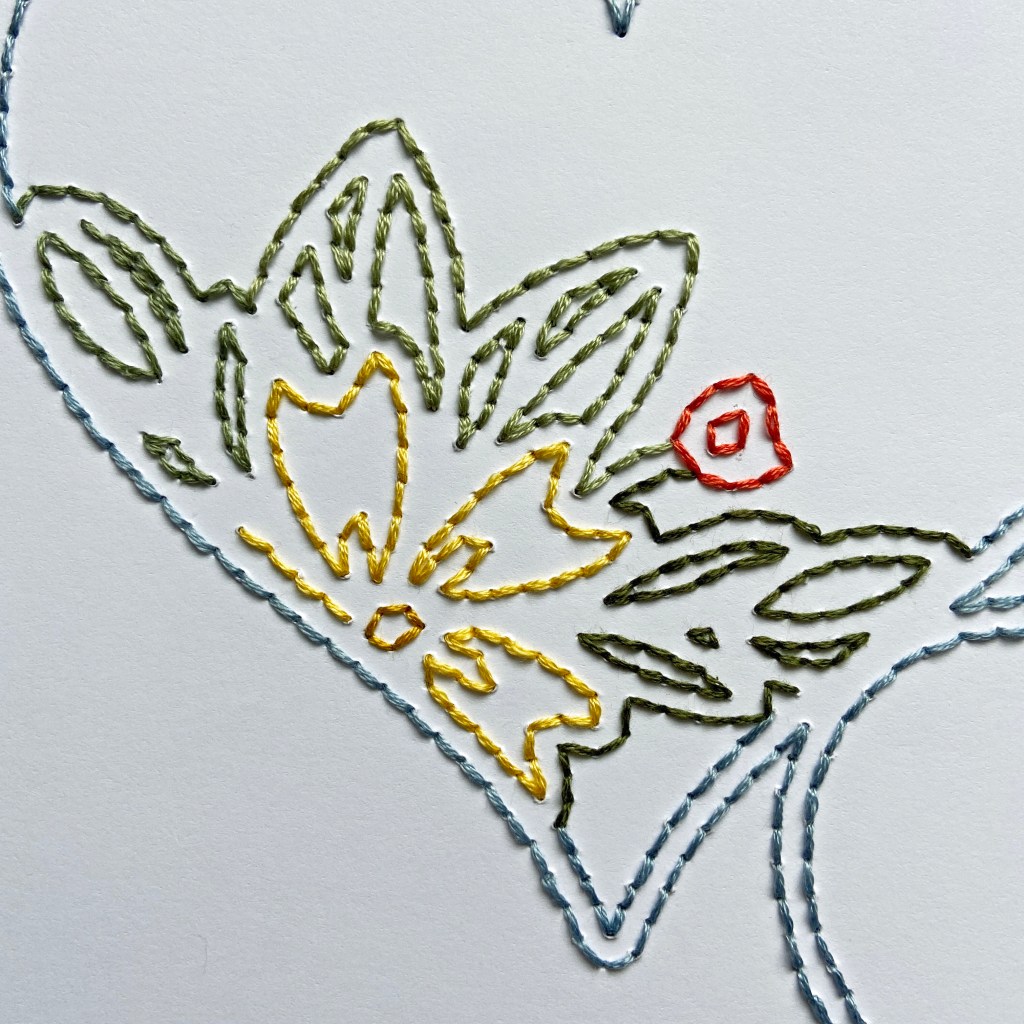
I had two specific plans in place when I started this layout; 1) I wanted to break open the Cocoa Vanilla Studio Daydreamcollection I’ve had for a while, and 2) I wanted to stitch the cut file, rather than cut it out. I recently viewed an excellent video tutorial by Belinda James that teaches you how to turn a digital cut file into a stitching file on your Silhouette machine (Creating stitching templates with your Silhouette). The video was easy to follow, you can find it here: https://www.youtube.com/watch?v=Fht1LT2dxko&t=635s. It does take some practice to learn the spacing that’s right for you, but truly worth the effort. I would suggest that you do a practice cut the first time round to see if you like the spacing. In my first attempt, I found the spacing between stitching holes too close for my liking. The settings were easily adjusted to give the spacing I desired.
Once I had the stitching file completed, I spent time matching DMC floss to the colours found in the Daydream collection. I planned on using the Garden Variety sheet for the border, so this specific paper is what I used to match my colours too (DMC #351, 352, 353, 522, 743, 932, 3051, 3053, 3820). As I prepared to stitch, it became apparent that the stitching file looked quite complicated to the naked eye (like a hard puzzle) in the areas where the flower clusters lay. So before I started any stitching, I went back to my Silhouette Cameo 4 and used a Sketch Pen in light grey to trace out the cut file. I used this sketch as a template (similar to any stitching project) and coloured the file using markers that matched the colours in my final design. This coloured template helped speed up the overall process when it came time to stitch. Here are some photos of the stitching process for this project.
And the final and completed cut file, fully stitched. I love how pretty and delicate it turned out.
Once the stitching was completed, I planned on adding a straight 1/2″ border to the page with the Garden Variety patterned paper. However, at this juncture, I decided it would look better if I kept some of the flowers in the border intact. This involved some careful measuring and fussy cutting. I liked the look of some of these beautiful flowers spilling over from the border. I also dug into the Daydream Die Cut Ephemera pack and found 3 die cuts that were the perfect fit and shape of flowers that I had fussy cut and included in the border. I adhered these to the respective spots on the border with double-sided foam adhesive to provide some additional dimension to the layout. This required some trimming of the die cuts when they spilt over the edge of the page.
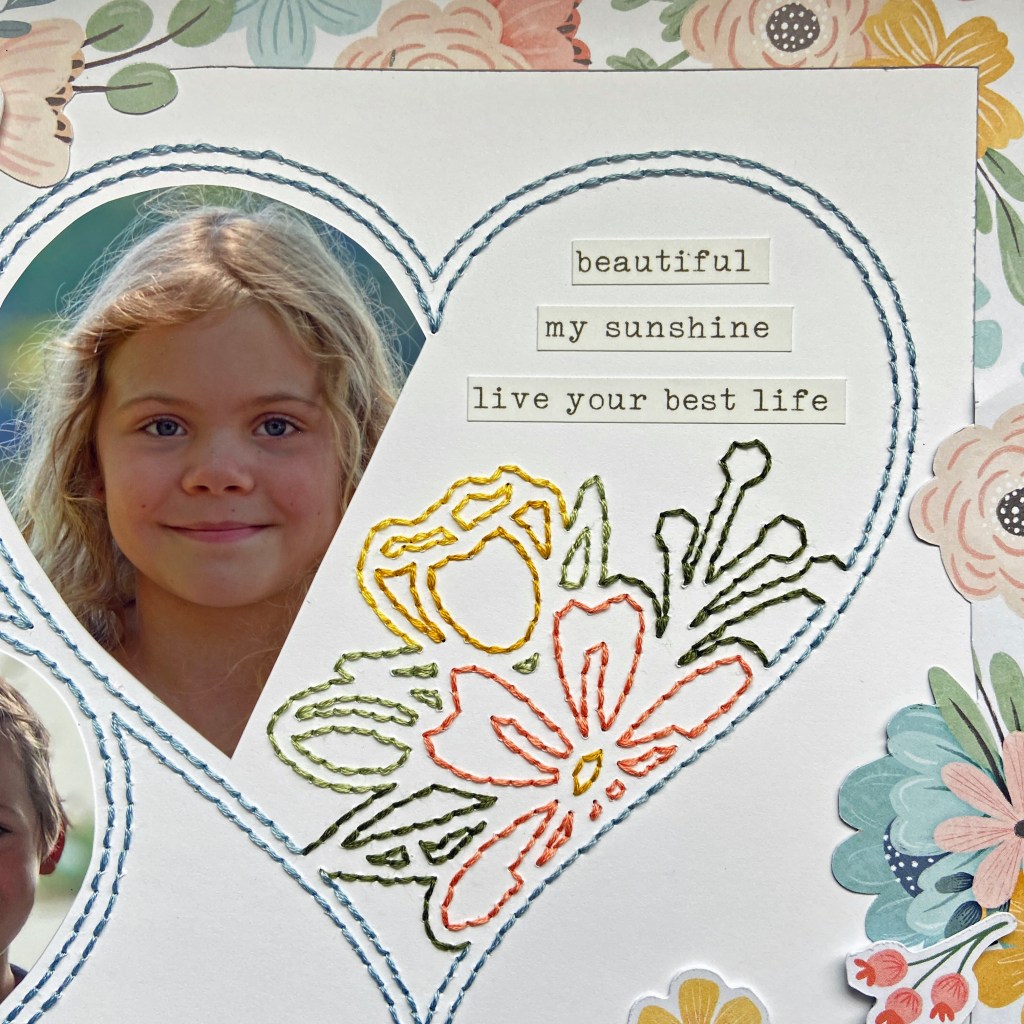
I wanted to add photos to the inside of each heart, but as you can see from the heart shapes, a traditionally sized photo just wouldn’t do the trick. To achieve the photo sizes in the completed layout, I started with a piece of acetate. The first step was to place the acetate over each heart section and use a marker to trace out the area and size for each completed photo. These acetate patterns were cut out and measured to help determine the photo size I should print to achieve this result. Once the photos were printed and ready to go, I simply placed the acetate over top of the photo and traced the shape directly onto the photo for easy alignment and trimming. To give you an idea of how I achieved it, here’s a picture of the layout with the acetate templates in place.
Once the photos were in place, I added small words and phrases from the Daydream Accessory Stickers sheet that came with the full paper pack of this collection. These stickers were centred and adhered within each heart in the white space above each stitched flower cluster. Here’s a close-up of the largest completed heart.
The title for this layout came from a set of Pinkfresh puffy phrase stickers belonging to the joyful day collection. The word love was the perfect size and colour to complement the layout and also express how I feel about these 3 beauties. The final step to completing this layout was adding a few random flowers found in the Daydream Die Cut Ephemera pack to help balance out the remaining white spaces of the layout.
This layout stretched some of my skills to new levels, and I love that this hobby continually provides this opportunity. I hope I’ve inspired you to try something new yourself. Thanks for joining me, stay safe, well, and Happy Scrapping!
I had fun creating this Fall layout for Owen. The picture was taken at the cottage on Thanksgiving weekend 2020, and the weather was perfect for lots of playtime outside! Fun Fact: I have many, many pictures of Owen’s Mom and Uncle around this very tree, as they grew up, so this shot was extra special to me.
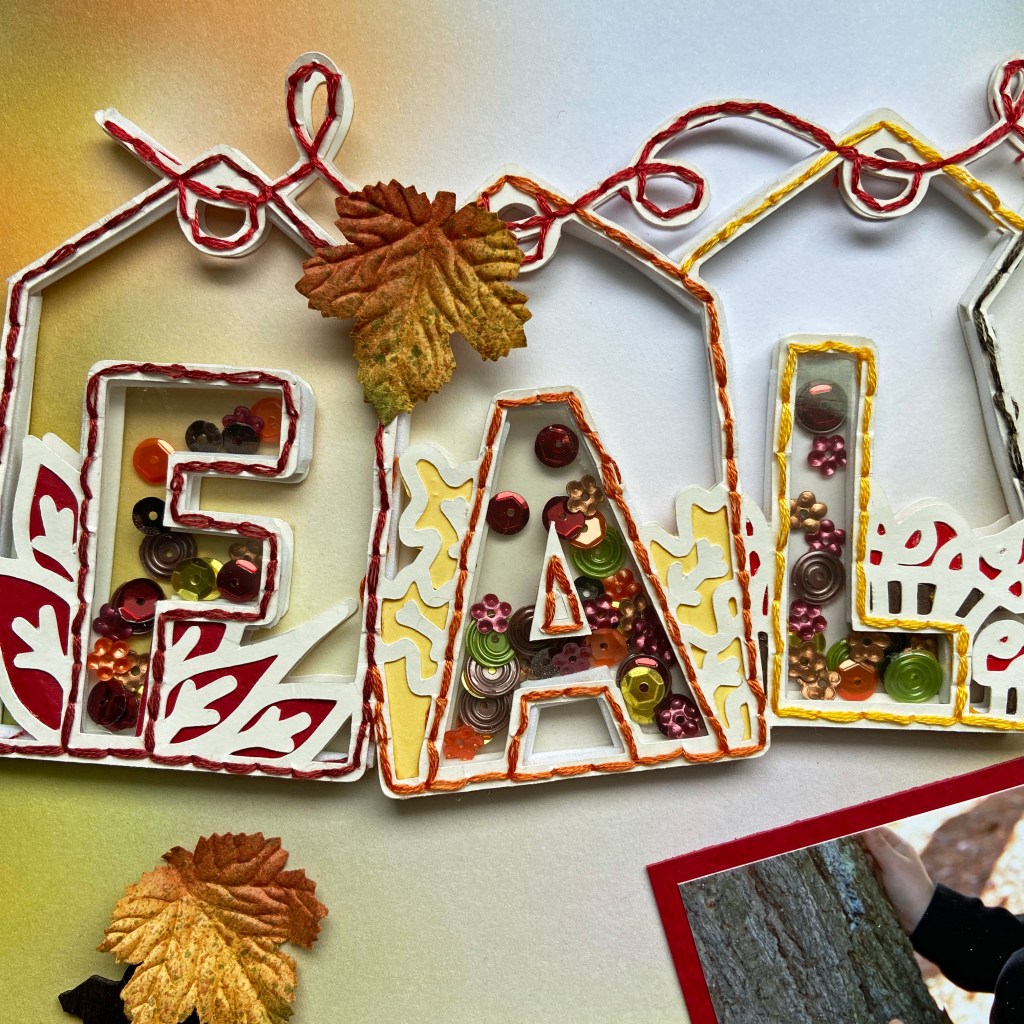
The foundation of the page came from the Leaf Pile patterned paper from the Glorious Autumn Kit paper pack by Reminisce. It was a perfect match for the wonderful colour we have on display each Fall in Muskoka. The title for the page is a cut file from Peartree Cutfiles called Fall Tags. You can find it here: https://www.peartreecutfiles.co.uk/product/fall-tags/.
I have some wonderful Fall shaker elements that matched the patterned paper perfectly, and this inspired me to make the tags into individual shaker boxes. The first step was to cut the Fall Tags cut file out twice – one for the top and one as a base for the bottom. I then very carefully punched small holes in one of the cut files to prepare it for hand stitching. I carefully stitched the full cut file using 5 separate colours of DMC floss to match the colours in the patterned paper (DMC 221, 921, 742, 3021, 347). Because the cut file had delicate borders, I only used 3 strands of each colour to stitch around the edges. Once the stitching was completed, I backed the leaves, mushrooms, and pumpkin, that can be seen around each letter. The following picture will help you see the detail of the completed top level.
To create the shaker pockets, I utilized the negative cutouts from the letters of the cut file as a guide and traced each onto a piece of acetate twice (one for the top and one for the bottom of each shaker pocket). I wanted the patterned base paper to show through the completed shaker tags, so the second piece of acetate was necessary to achieve this. The acetate letters were cut slightly larger than the tracing marks to ensure they completed covered each letter and securely held the shaker contents. Once the acetate was in place on the stitched title, I used Foam Sticky Strips from taylored expressions and carefully placed the strips around all edges of each tag and the banner at the top. Before removing the backing of the foam strips, I placed the Fall Shaker Elements in each letter. After the Shaker Elements were added, I removed the backing from the Foam Sticky Strips. I won’t lie, this was a very tricky and tedious step, and it required lots of patience, as the shaker elements kept moving around and liked to stick to the foam – but I feel the effort was worth the result! Once the backing was removed, I placed the second layer of letter acetate cutouts over the letters to secure everything nice and firm and to allow me to lift the cut file without losing any shaker elements. I chose to then adhere everything to the additional cardstock cutout of the cut file. This provided more stability to the overall completed cutout. I also adhered the small stitched centre to the letter A to complete the overall title. Here’s a couple more closeups to show you the completed shaker title.
Once the title was completed, the layout came together quite quickly. I adhered the photo and title first and then added several falling leaves to complement the patterned paper. These included No. 6 Forever Flowers from Prima Marketing Inc., which have been in my stash for years, and a few wooden diecut leaves. Finally, the two wooden slices were added to the bottom left of the picture.
I hope I’ve encouraged you to try a shaker pocket title on a future layout! Thanks for visiting, stay safe and Happy Scrapping!
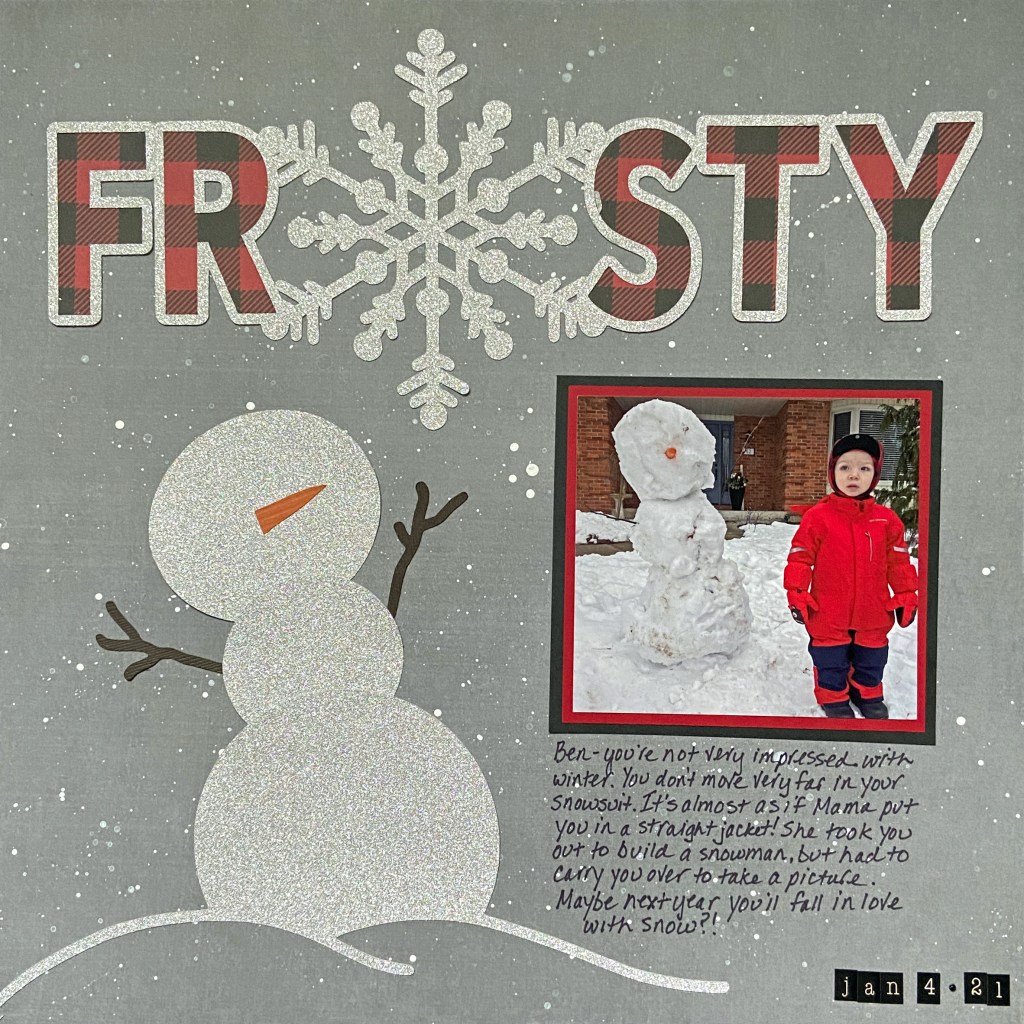
And now for something on the lighter side! Our youngest grandson Ben, is just approaching 2 & 1/2 years of age. He really loves the outdoors….but not in winter!!
Every time our daughter puts him in his snowsuit, and takes him outdoors, he literally just stands there. We live directly across the street, so we get the advantage of seeing them outside. While our daughter will shovel the drive, and the two oldest play in the snow, Ben just keeps standing there….. He can’t be enticed to play in the snow with his siblings, he is so unimpressed with this cold white stuff. He walks and acts like his Mother just put him in a straight jacket. It really is pretty comical from the warm interior of my living room! This picture was taken in early January when we had perfect snow for making snowballs and snowmen. Lindsay took Ben out to build a snowman – but again – no interest – didn’t want to leave the driveway. Lindsay diligently built Ben a snowman with arms and a carrot nose, and still – nothing doing – he simply couldn’t be enticed to come see it. Thankfully, she patiently carried him over to grab a photo. You can see from his face, he was still unimpressed and would rather have been inside with his cars. Oh Ben, you do make us giggle!
I used two cut files from Peartree Cutfiles to make this page. The “Build a Snowman” and “Frosty” files to be exact. Both cut files were cut on my Silhouette using a fine silver glittery cardstock. You will find all of the Peartree Cutfiles here: www.peartreecutfiles.co.uk/
The patterned paper for this layout was a mix of two Photoplay collections. The solid grey cardstock came from the Christmas Cheer “Solids Plus” collection pack, and the red and black lumberjack paper, that backs the Frosty title, came from the “O Canada” collection pack. I choose the red and black lumberjack paper because it matched the fabric of Ben’s hat, and I chose the grey cardstock for two reasons; it was a grey overcast day, and it fit the mood of my grandson!
Before I assembled the page, I flicked diluted white paint over the grey cardstock to mimic the look of a snowfall. Constructing the snowman was super simple, as I only needed the nose and arms to replicate the snowman in the picture. I completed the layout with hand journaling to give context to the picture. I felt it important to give Ben some understanding as to why I scrapped this particular moment, when he looks back on it in the years to come.
I hope you are also finding fun ways to be creative and pass the time during these COVID lockdowns. I wish you good health and Happy Scrapping!
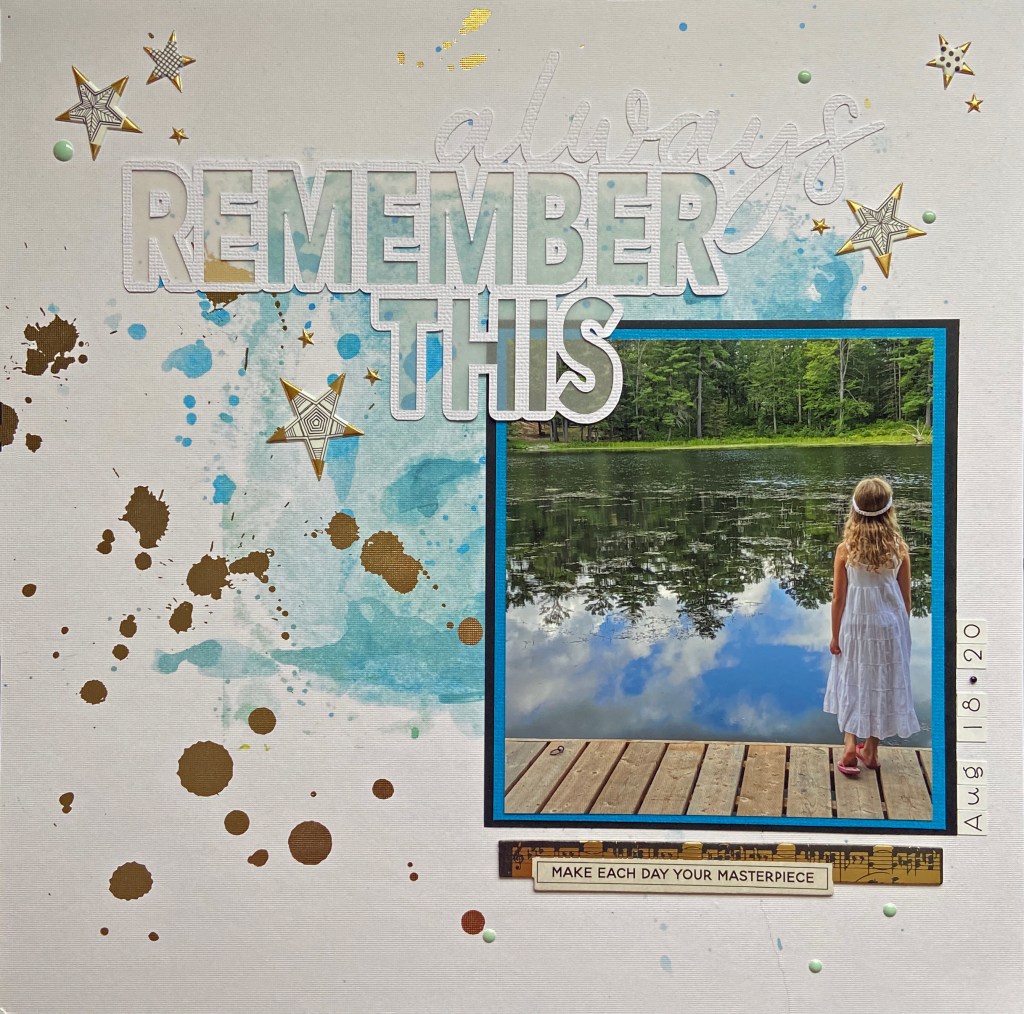
Here’s a throwback to summer on this cold blustery January day! My daughter captured this beautiful moment last summer of her daughter. Maddy was singing on the back dock surrounded by the beauty and tranquility of nature in all its glory. I just love the reflection in the water and the colours in this photo. Just looking at this picture takes me right back to that time and special place.
Mixed media is very intimidating to me, so you can imagine how excited I am to have a pre-made mixed media background to work with! The background paper was a perfect fit for this picture, and it came ready made in the beautiful blues and gold. It is from Vicki Boutin’s Ready-to-Use Mixed Media Paper pad. The stars (Puffy Stickers) and gold foil chipboard phrase belong to her StoryTELLER collection. You can find more on Vicki and her products here: vickiboutin.com.
The title, Always Remember This, came from Peartree Cutfiles. I wanted the title to compliment the feel of the picture and the beautiful paper. To achieve this, I backed the open letters with vellum to allow the colours in the background to pop through and to assist in keeping the overall balance of the layout. You can find the cut file here: peartreecutfiles.co.uk/product/always-remember-this/
To complete the layout, a few small enamel dots were added for extra dimension, and the date was applied with teensy type doodlebug design inc. stickers.
I hope this layout has brought you some much needed warmth and memories of warmer days. Spring is only 50 days away, and better weather is on its way. I wish you all good health and Happy Scrapping!
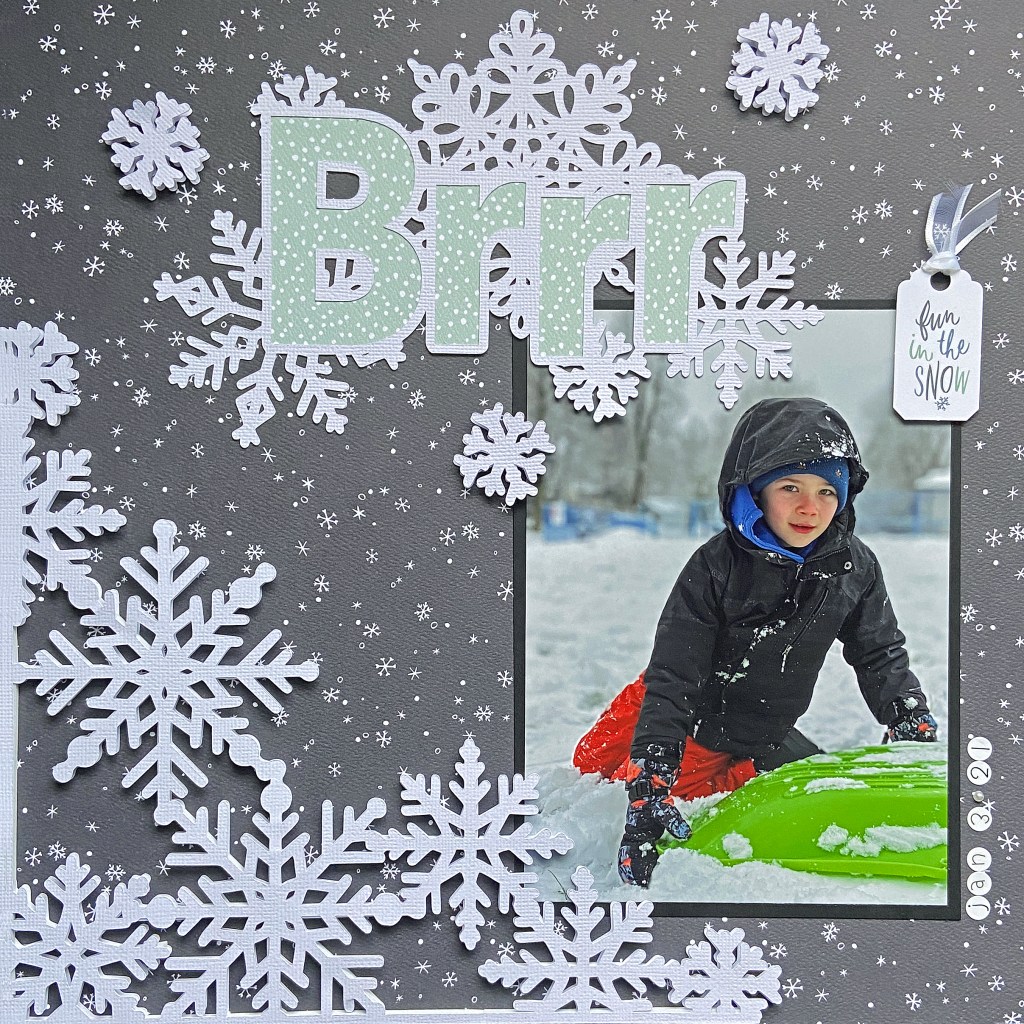
Here we are in a new year, with new possibilities and hopes for a brighter future for all of us! In my neck of the woods, we are still in lockdown – we’re to call it a “Stay Home” directive. Call it what you will, we are in for a long winter for sure. So what’s a girl to do to relieve the monotony and distract herself from the long, cold days ahead? You got it – SCRAPBOOK! I’ve always found this hobby extremely therapeutic, so I plan on scrapping a lot in the coming months.
I’ve been having fun this year playing with Peartree Cut Files (https://www.peartreecutfiles.co.uk/all-products/shop/). This is the first of several layouts I plan on sharing. For this layout I utilized two of their files – the Brrr title cut file and the Snowflake Corner cut file.
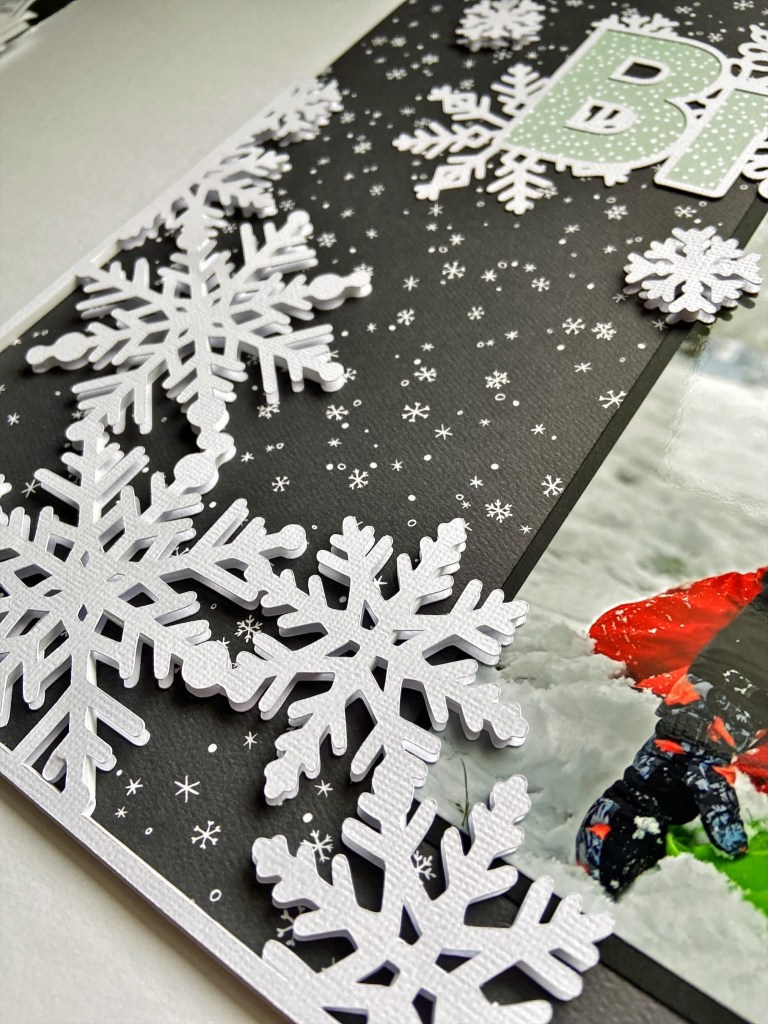
When I was designing this page, I really wanted the snowflake corners to mimic a snowbank. To achieve this look, I cut the file twice from AC white cardstock. Using Foam Sticky Strips from Taylored Expressions, I carefully backed one of the files to create the dimension I was looking for. The photo below illustrates this. These strips worked wonderfully, and they were easy to use. I’ll be stocking up on more in the future!
Here’s an additional shot to help demonstrate the layered Snowflake Corner border once completed.
I cut additional snowflakes from the Brrr title cut file to allow for more dimension in the upper portion of the layout and to help provide more overall balance. Again, I put the Foam Sticky Strips to good use on the backs of these snowflakes.
The patterned papers and tag used in this page come from Carta Bella’s Winter Market collection and their coordinating Frames & Tags embellishment kit. The background patterned paper is the “I Love Winter” page, and the main Brrr title was backed with the backside of the 3 x 4 Journaling Cards paper.
I’m delighted with how this page turned out. Sometimes, the simple things in life can be the most rewarding.
Thanks for checking out my blog – I wish you all good health and Happy Scrapping!