Happy Halloween!

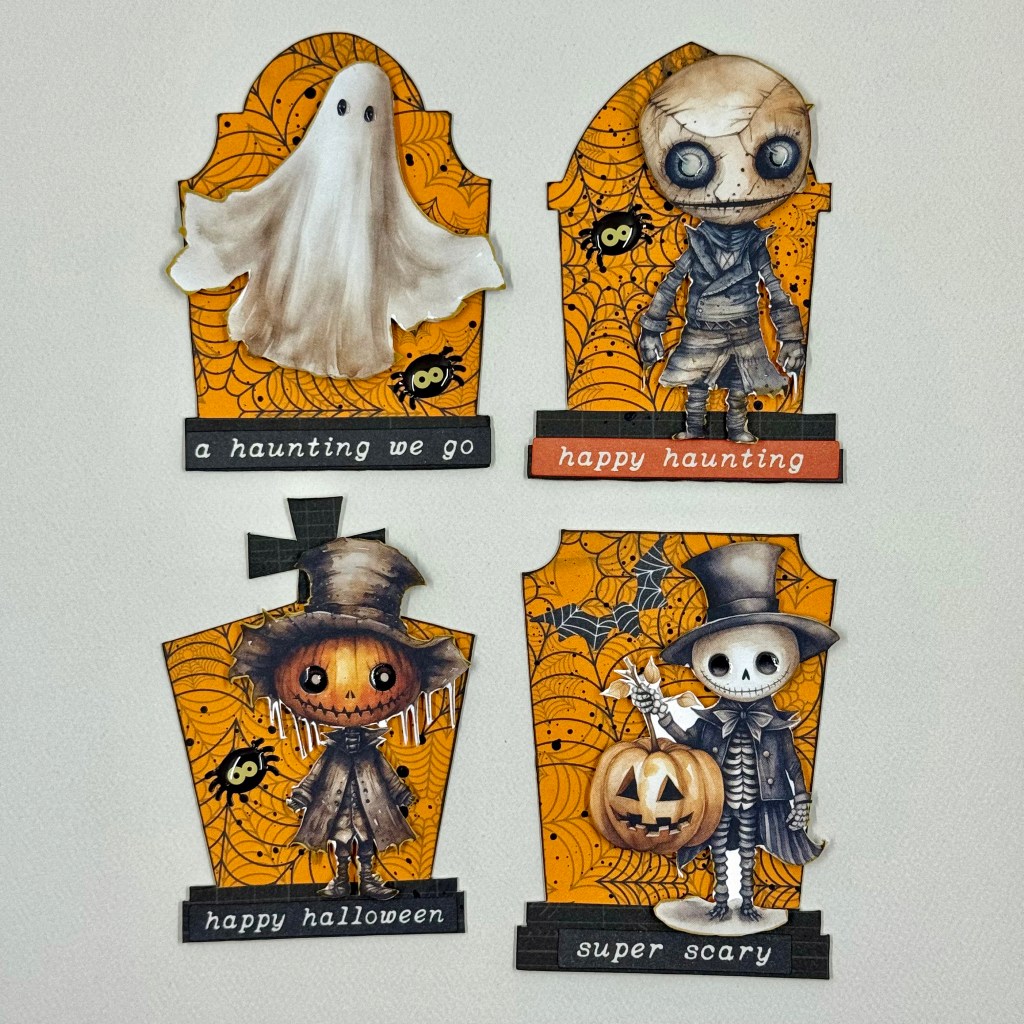
It’s time to get spooky, my friends! This Fall, I participated in an ATC (Artist Trading Card) swap with my VIP friends through Creative Scrapbooking Magazine. ATCs are out of my comfort zone, and this is only my second swap. But I was really inspired by the Halloween swap and had a blast designing these cute little cards. For those who haven’t made an ATC before, each miniature card measures 2 & 1/2″ by 3 & 1/2 inches. Such a small canvas to create on!

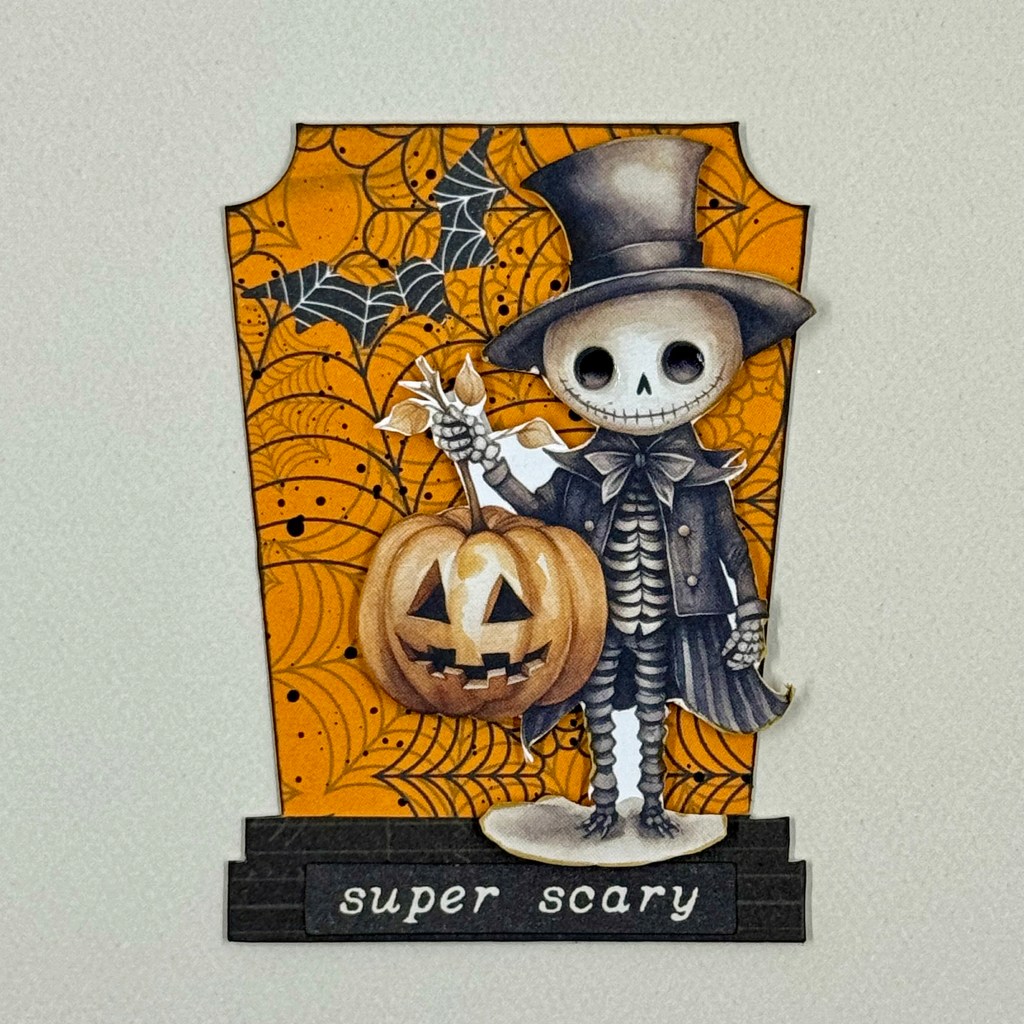
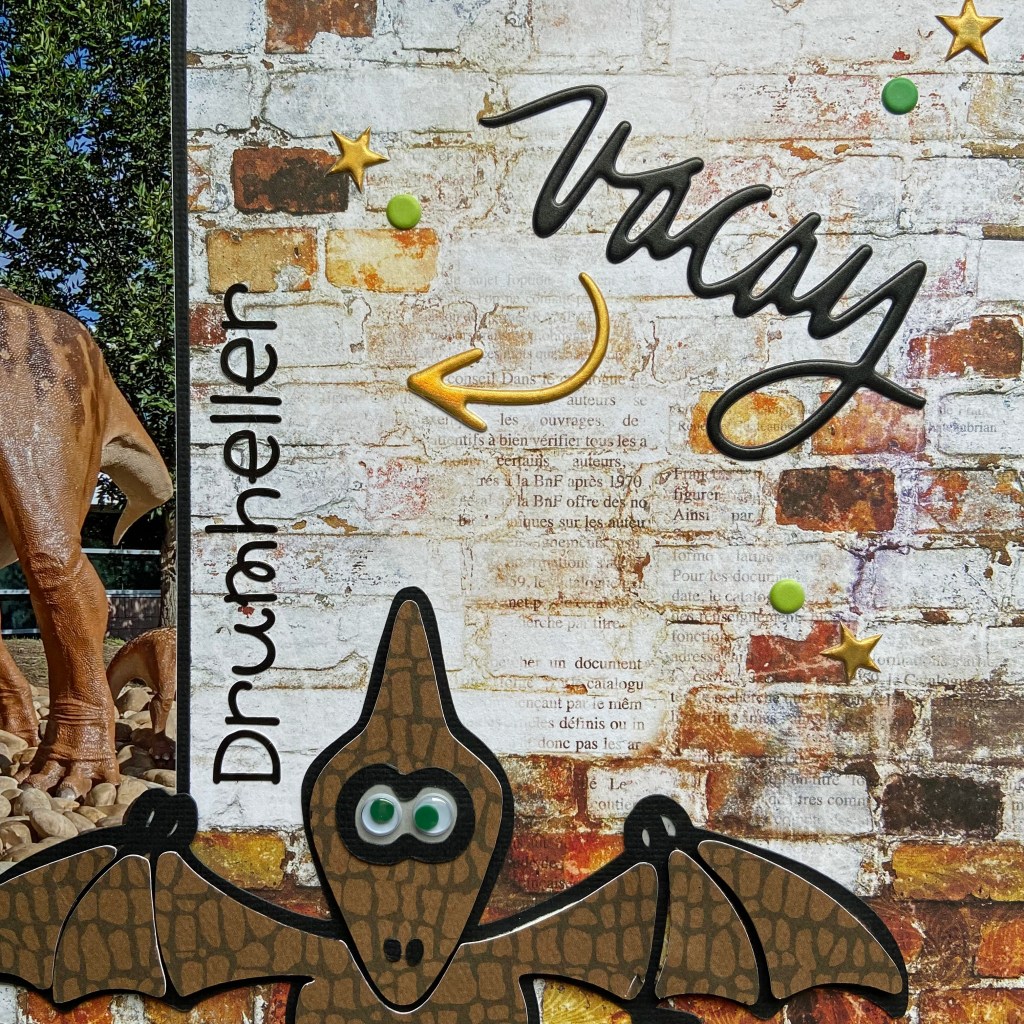
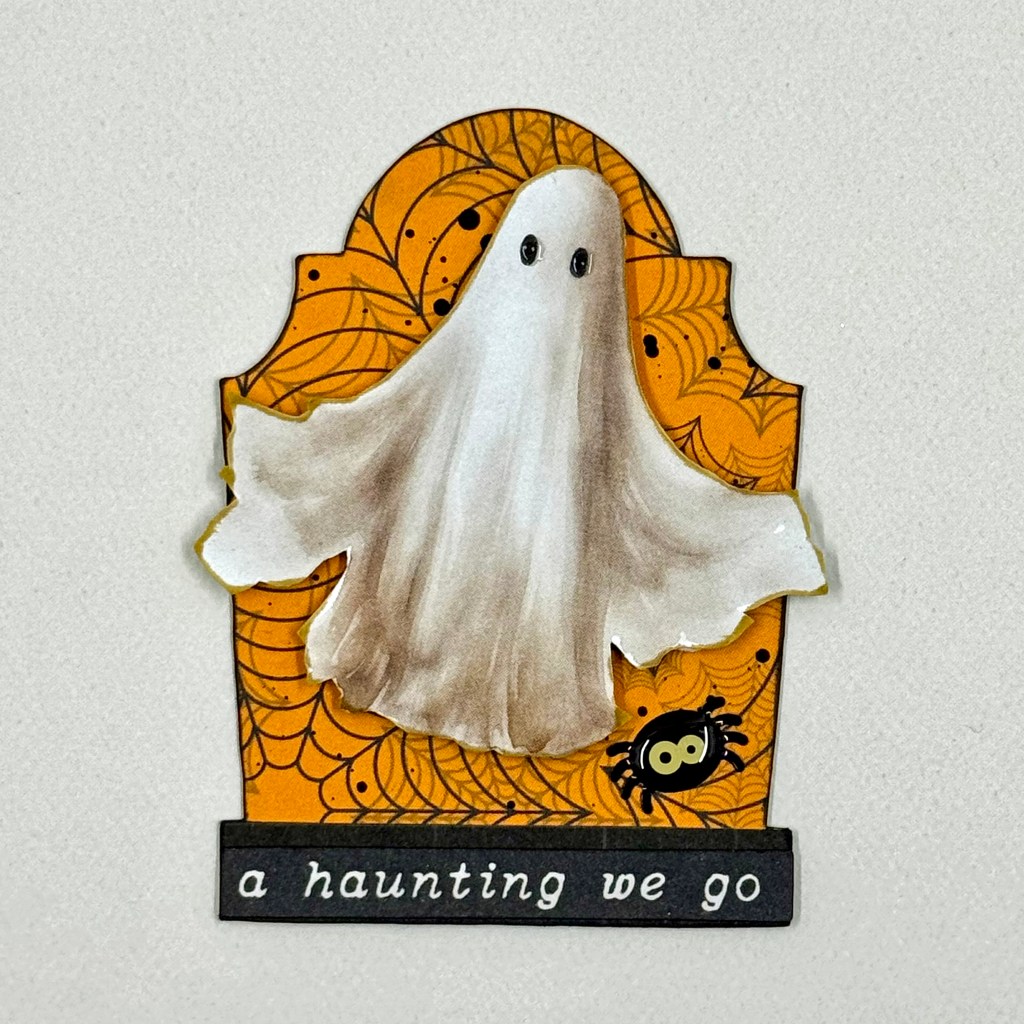
Here’s how they came together. I started by fussy-cutting four Halloween images from the Mintay Papers Halloween Book. It is full of whimsical images for creating cards, scrapbook pages, and many other creative projects. Each image was inked around the edges to add a distressed look. I wanted something different for the cards’ backgrounds and searched the Silhouette Design Store for an alternative. I decided that tombstones would be the perfect backdrop. I chose four separate designs for this purpose. Three of the backdrops came from Jillibean Soup – Halloween Tombstone (1 Design ID #384738, 2 Design ID #384737 & 3 Design ID #384739), and the last came from Lilium Pixel SVG – Days Til Halloween Tombstone (Design ID #386333). I resized each cut file to fit the ATC size requirements and cut them twice from BoBunny’s Fright Delight collection (12″ Fright Delight Spiders), and Doubledot Designs (12″ Licorice Journal). I trimmed the black tombstones away from the base of the cut file to mimic a stone foundation for each tombstone. Each stone base was adhered to the bottom of its respective tombstone.

Before assembling my cards, I splattered some black paint on the tombstones to further the distressed look. Once these backgrounds were dry, each image was adhered to a tombstone using Scrapbook Adhesives 3D Foam Squares.

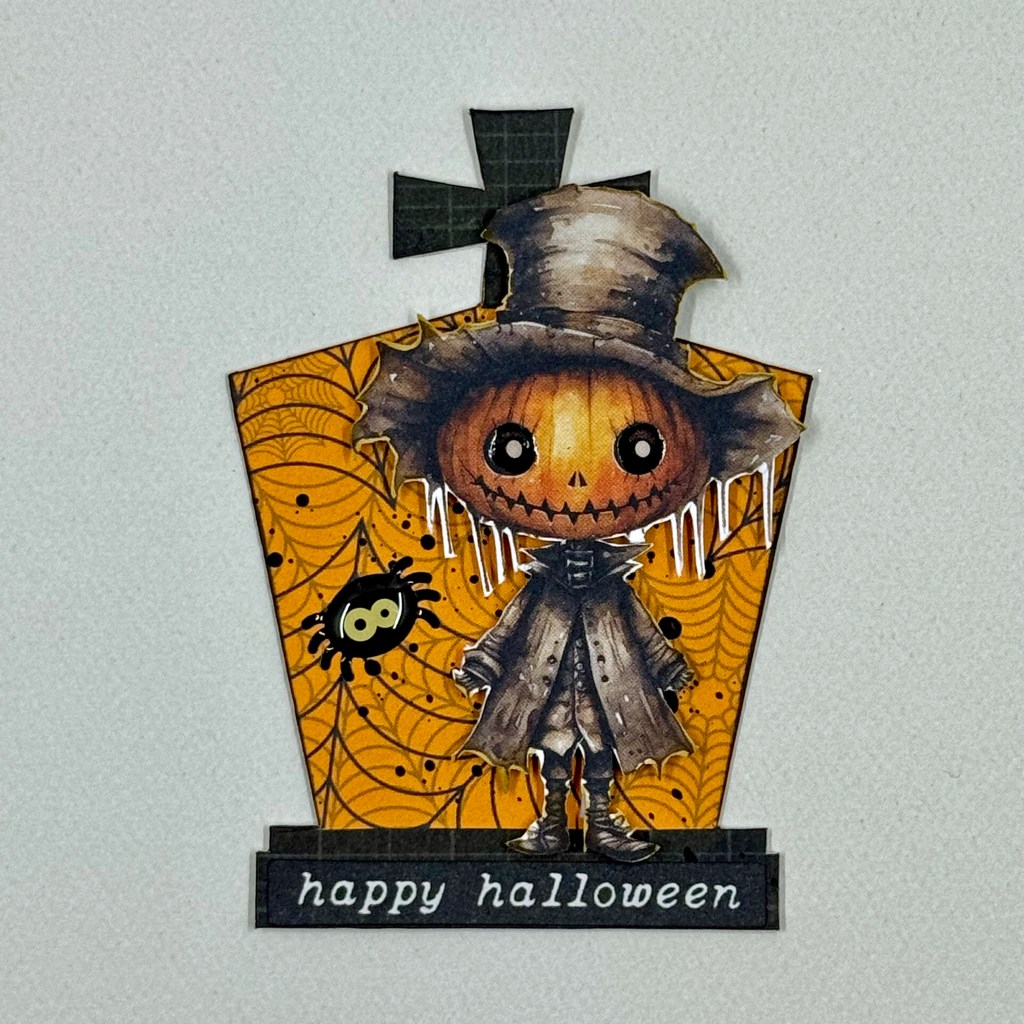
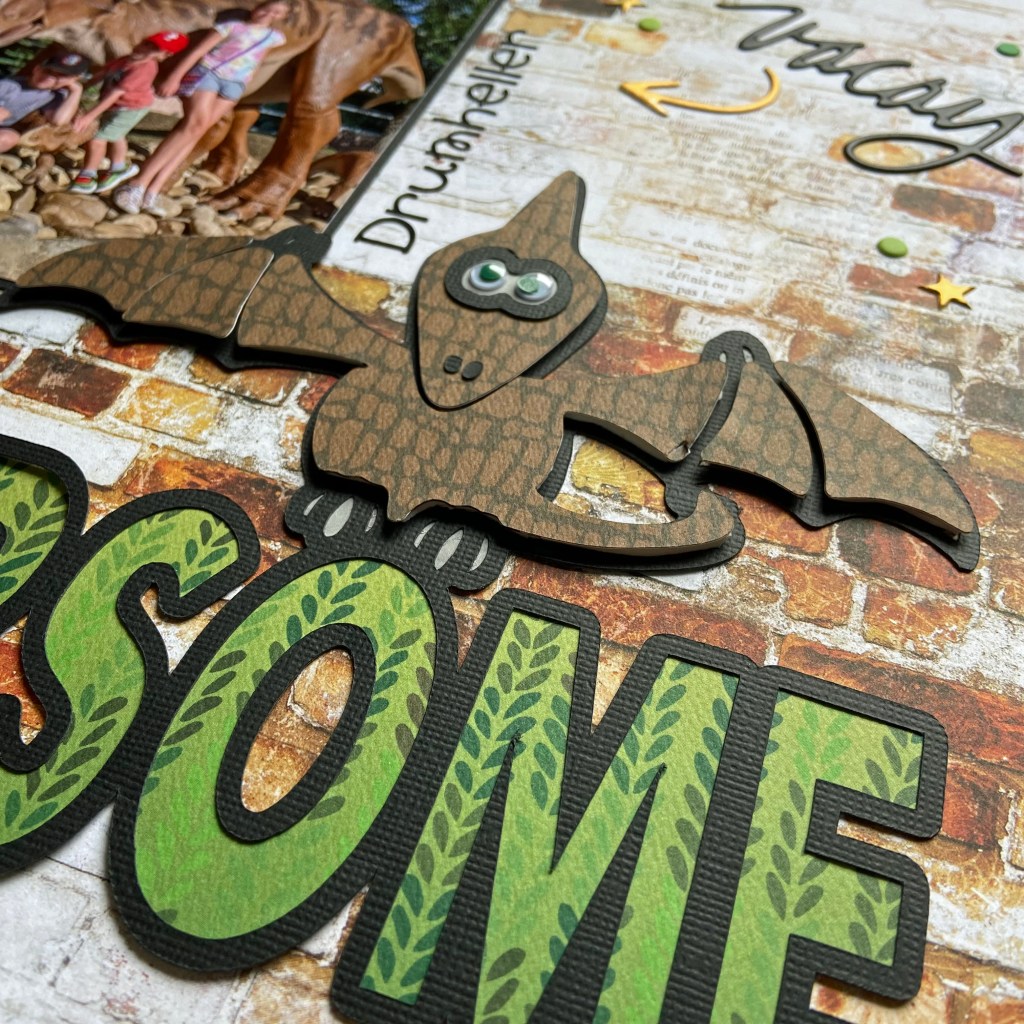
I placed a Halloween phrase at the bottom of each tombstone using Simple Stories Ephemera Bits and Pieces from their Simple Vintage October 31st set. For additional texture and Halloween fun, I added a bat from this same collection of ephemera, and glossy spiders from Doodlebug Designs Shape Sprinkles (Spooky Spiders). To complete the cards I added Glossy Accents to the eyes of each fussy cut image.

And there you have it, friends, my sweet and spooky Halloween post. To all those Trick-or-Treaters, may your baskets be full of your favourite treats and no tricks tonight. Wishing you all a safe and fun Halloween! Until next time, stay safe, stay well, and Happy Scrapping!

Happiness Right Here

Oh, the pure bliss of swimming! And what could be better than swimming in the South Aegean off Naxos, Greece?! My daughter, son-in-law, and family vacationed in Naxos this summer; as you can see from the picture, it was a huge hit! Madison has always been a water baby, so this vacation was right up her alley. When I saw this picture I knew it was the perfect match for the Happiness Right Here cut file from Peartree Cutfiles. Peartree is celebrating its third birthday this month, and this cut file is free for the month of August. You can find the free version here. Come play along with the birthday celebration!

After cutting the file from white cardstock, the letters in the title were inked using Altenew’s Blueberry and Winter Lake inks. The lighter shade (Blueberry) was applied to the top of each letter and the darker (Winter Lake) was applied to the bottom to mimic the colours in the sea and the differences you see as the light hits the water.

I chose the backside of the Seashore patterned paper from Paper House’s At the Beach Collection to document this special moment.

The soft jewel tones and gentle waves of the sea in the picture drew me to the Waves Border cut file to compliment this layout.

Rather than cut the file from coordinating paper with my Silhouette, I chose to stitch it. My first step was to flip the file horizontally and use a sketch pen to draw the design on the back of the patterned paper. I then used a paper piercer to hand pierce the pattern in preparation for stitching. I then gathered coordinating jew tone embroidery floss to mirror the colours of the sea in the picture and began stitching. A total of 8 colours were used to complete this design (Anchor Embroidery Floss: 130, 131, 160, 161, 185, 186, 187, 188). A chain stitch was used and I randomly changed threads as I worked my way through the design. I purposefully choose lighter tones for the top of the wave, and darker tones for those below. This process took several hours, but the results were well worth it!

The final touches to complete the layout were adding the date and the location of the picture. These were done by using the Swimming Pool Doodlebug Designs Alphabet Sout Puffy Stickers.

I’m so happy to share in the celebration of Peartree Cutfiles 3rd Birthday. Their birthday challenge was a lot of fun and made me think outside of the box. Thanks for joining me today, and until next time, stay safe, stay well, and Happy Scrapping!

Happy Happy Day

Oh, the excitement of turning 4! Ben waited in anticipation of his 4th birthday for many weeks. When the day finally arrived, it did not disappoint! You can see his excitement in all these pictures. In fact, it was quite contagious! It’s funny how we don’t get quite this excited about our birthdays as we get older. We truly should take a lesson from these younger folk, and get the most out of every special occasion. Carpe Diem, friends!

As I began to design this double-page layout, I knew I wanted something bold, bright and reflective of Ben’s excitement. Ben was wearing a T-shirt I made for his big day. Green is his favourite colour, hence the bright lime green T-shirt! I turned to an older Doodlebug Designs paper and embellishment collection called Dragon Tails to coordinate with his T-shirt. In addition to the patterned paper, I chose to add stencilling as one technique to help offset some of the white space and also to help create the mood of the layout. I chose 3 ink colours that coordinated perfectly with the paper to achieve this look. Using one of Vicki Boutin’s Radiate Stencils, from the Color Study collection, I randomly placed these colourful images across both pages.

I created my own cut file in Silhouette Studio for the number 4 and enlarged the cut file to fit within the borders of a 12′ x 12′ piece of white cardstock. Before cutting out the number, I used the offset function to highlight the outline of the number. This outline was then turned into a stitching file. You will find an excellent tutorial on turning your cut files into stitching files here. Once the cut file was completed, I stitched the bright blue border around the number 4 using DMC thread. I then selected 8 coordinating patterned papers from the Dragon Tails collection and cut them into 1/2″ strips. Using fringe scissors, I cut across the strips leaving a 1/4″ border free at the top. Double-sided tape was added to the back of each fringed piece along the 1/4″ top border. I cut a spare piece of plain paper slightly larger than the number 4 and began adding the strips to the spare paper, overlapping them to hide the plain 1/4″ border. The completed piece was then positioned and secured to the back of the cut file. I love the dimension this resulted in!

In addition to scrapbooking, I also make approximately 150 cards a year for family and friends. Nothing makes me happier than maximizing the use of my supplies across both these paper crafting passions. This layout is an excellent example, as I utilized several stamps and die sets to complete this design. These fun balloons belong to a Simon Says Stamp! collection created by Cathy Zielske called Balloon Greetings. All of the sentiments on the balloons belong to this set with the exception of the CELEBRATE sentiment. This sentiment belongs to a Concord & 9th stamp set called POP-UP PAR-TAY. Each balloon was then inked around its edges with coordinating ink.

The word WISH was created using a die cut from My Favourite Things. This die was also part of my card-making supplies. I chose 4 coordinating patterned papers from the Dragon Tails line to create this. Craft foam was glued to the back of each of the letters in WISH and all of the balloons to create more dimension in the layout. The final touches included adhering the small colourful Sprinkletz Embellishments (called Beach Balls) from Buttons Galore & More over both pages, and adding the present to the bottom of the page. The small Beach Balls were a perfect fit to coordinate with the stencilled images. The present came from the Dragon Tails coordinating odds & ends ephemera package.

Well, that’s a wrap on my design process for this layout. I hope I’ve inspired you to try a few new techniques on your next layout. May all your celebrations be as much fun as this one was! Until next time, stay safe, stay well, and Happy Scrapping!

Travel

Travel is the only thing you buy that makes you richer. I couldn’t agree more with this statement!

Hello Friends! I’ve been absent from my blog for quite some time for good reason. Last August, my daughter and her family of 5 moved to Austria on a 3-year contract. Incredible changes for all of us, but BIG OPPORTUNITIES as well! Over the fall and winter, my husband and I have travelled twice to Austria to visit with our family and explore Europe. We feel fortunate to have the opportunity to do so, and the next trip is well underway in the planning stages.

It feels good to be back in my scrapbook room creating again, and this layout seemed the logical place to start sharing with you. It was inspired by my Aunt who asked “Do you know how many steps you’re taking on these journeys?” That question got me thinking, and when I was back home I sat down with an excel spreadsheet and my fitness tracker to figure it out. We were constantly on the go, taking advantage of every day and opportunity while we were overseas. However, I had no idea we had logged over 1,000 kilometres and almost 1 & 1/2 million steps! Of course, I had to scrapbook this accomplishment and include the beautiful places we visited during our travels.

I turned to the Designs by Reminisce collection called Take Flight to create this layout. The specific paper is called “In the Clouds“. I love how the plane’s wings stretch across the whole page, and I knew I could fill in the white space below with lots of trip details. I turned to Microsoft Word and my Canon PRO-100 to print these details directly onto the 12″ x 12″ patterned paper. Before taking this step, I printed a draft copy onto a 12″ x 12” piece of vellum, and overlay it on the patterned paper to ensure everything fit within the space available. This process allowed me to make any adjustments required without wasting the beautiful patterned paper.

Once the picture was in place, small wooden airplanes were added to emphasize that we made multiple trips during our stay. These wooden airplanes were a Dollar Store purchase. The tails on the planes were traced with a thin Sharpie Marker by utilizing the Mini Swirls & Dots stencil from The Crafters Workshop. I have owned this stencil for well over 10 years, and I don’t believe it is still available.

The globe was stamped using my 12″ by 12″ Memory MISTI. This stamp comes from a travel collection called Road Trip by Recollections and was purchased at Michaels. The sunglasses are a small wooden embellishment also purchased at the Dollar Store. They were sprayed black and then covered with Ranger’s Glossy Accents to help them stand out and look more authentic. The title phrase was added using my type cardstock stickers from Doodlebug Designs Inc., and Malaga (found below the picture) was added using black Alphabet Soup Puffy Stickers, also from Doodlebug.

I hope you’ve enjoyed my first travel post. I look forward to sharing more of our travels and our family’s adventures overseas soon. Until next time, stay safe, stay well and Happy Scrapping!

Roarsome

In late June, we travelled out west for our son’s wedding. My daughter and her family planned a few side trips while we were there, and Drumheller was their first destination. Drumheller, Alberta, is located northeast of Calgary. It is known as the dinosaur capital of the world, and it was a huge hit with our grandchildren!

I chose the Roarsome title from Peartree Cutfiles to showcase a picture from their trip. I loved the addition of the dinosaur on top and wanted to make it a bit whimsical as I designed the layout. The patterned papers in the title come from an older Carta Bella Paper Co collection aptly entitled Dinosaurs.

While I backed the words in the title, I chose to lift the pieces of the dinosaur by securing a piece of black fun foam underneath each piece to create dimension and the illusion of flight. I added green googly eyes to the dinosaur to enhance the whimsical feel of the layout. Once the title was complete, both the picture and title adhered to the fun background paper 12″ Life in Color Bricks. This background page also belongs to an older BoBunny collection called Life in Color.

The final elements of the layout came together quite quickly. The “vacay” puffy phrase and accent stickers came from a Vicki Boutin collection of Thickers called Loving This. The date and location of the picture were documented with Doodlebug Design Inc.’s teensy-type stickers.

And there you have it, a simple and whimsical page that focuses the attention on the picture and title. Thanks for stopping by today, and until next time, stay safe, stay well and Happy Scrapping!

Stella

Meet Stella. She belongs to my future Daughter-in-Law, Tanis. Stella is one of the biggest cuddlers I’ve met to date. Stella lives to be in your lap, bed, or, as you can see, your book! On our last trip out west to visit, Stella spent a great deal of time in my lap. And I loved every second of it. But don’t get the wrong impression, Stella gives as much as she gets! Who wouldn’t want to spend their day giving and getting love?!

When I saw this picture of Stella begging for some more “me time”, I knew it needed to be scrapbooked. Lucky for me Paige Evans, who also gives so much to her crafting community, provided a free Sketch and Stitch cut file in her Facebook Group Paige Evans – Happy Scrappy Place. The specific cut file is named Time Spent With Cats, and the link should take you to Dropbox to download it. I knew I would stitch the cut file in black embroidery floss to match Stella. I needed a background paper that complimented the black stitching and was sturdy enough to withstand the extensive stitching process. Vicki Boutin‘s Ready-to-Use Mixed Media Paper met all the criteria. The beautiful pink background was a lovely complement to the black, and it also provided a fun mixed media look without having to do all the work. This particular background came from Vicki’s Color Study collection.

I chose to resize the cut file a bit smaller than the original design. The stitching took quite some time to complete, but I find the process very relaxing and the results very rewarding. It was fun to watch the shape of the cat come to life as the stitching progressed.

To keep in line with the black and pink design, I sought out embellishments in these colours to complete the layout. The ephemera banner directly below Stella’s picture comes from a black and white paper collection from Echo Park called Capture Life. The three adorable black kittens found on the page come from a die-cut set from Impression Obsession called Cat Set (KIE083-K). Stella’s name was incorporated using Thickers Puffy Letter Stickers called Starlight. I’ve had this set of Thickers for some time. The combination of pink, white, and black letters fit perfectly in this layout. The final touch was including the pink Baby Hearts by Doodlebug Designs.

This page brings a smile to my face every time I look at it. I hope it brings a smile to yours as well! Thanks for joining me today, and until next time, stay safe, stay well, and Happy Scrapping!

Gingerbread Fun

HO HO HO! It’s just two more nights until the big day! Where did December go? Today I’m sharing a layout that documents Maddie building her gingerbread house last December. She had a blast putting it together, but I think she enjoyed eating the candy best of all!

I chose the Gingerbread House Two cut file from Confessions of a Paper Addict (COAPA) as the main focal point for this layout. The whimsical lines in this cut file reminded me of the fun I had with Maddie as she decorated her gingerbread house. The cut file comes in SVG format, so I used the trace function in Silhouette Studio to trace it before ungrouping it to backfill the sections. I also find that using the Fill section to colour in each piece facilitates a quicker process when preparing to cut.

The main paper line for this layout is Hot Cocoa from American Crafts. It came in a paper pad of 48 papers. I used this paper collection in November 2019 to make a Christmas Album for a class at ScrapFest. It also has a whimsical feel and was an excellent fit for this cut file. I chose the kraft paper with the snowmen and falling snow for the base page of the layout. The red paper with snow falling, black paper with snowflakes and black paper with peppermint candies were all used to construct the gingerbread house cut file. I fussy cut the peppermint candies to fit the scalloped border of the roof and the pinwheel candy to the left of the front door. I chose an embossed white paper for each section laden with snow. I turned to glitter papers from My Favorite Things paper collections to back the windows and fill the wreath. For added dimension, I used pop dots to add the wreath to the front of the house. A red acrylic dot from doodlebug design worked perfectly for the doorknob.

The Christmas Tree to the right of the gingerbread house comes from Memory Box Inc. It is called the Flowering Christmas Tree. I slid it partially behind the gingerbread house and wrapped some of its limbs in front. I added rhinestones to the centre of each flower to complete the Christmas tree.

All of the snowflakes in this layout came from a collection by Sizzix called Snowfall Thinlits Dies. This set was made exclusively for Stampin’ Up! a couple of years ago. It is an extensive set of snowflake dies in multiple sizes. I’ve used this set multiple times and have never regretted the investment. I purchased them through a good friend and Stampin’ Up! demonstrator, Margie Stares. Check out Margie’s Stampin Up! blog for lots of inspiration. To enhance the magical feel of this layout, I added rhinestones to each snowflake. The final touch was adding the title using doodlebug designs teensy type letters in white. I chose the round letter stickers to mimic the falling snow and snowmen on the patterned paper. 

I appreciate you stopping by today and hope you’ve found some inspiration for your Christmas layouts. May your holiday season be full of magic, incredible moments and lots of love!

Until next time, stay safe, stay well, and Happy Scrapping!

EEK

I hope you all had a wonderful, safe and fun Halloween yesterday. I love dressing up as a witch and handing out candy to all the excited children. Today’s post focuses on another picture from last year’s celebrations. With Covid restrictions and a ban on trick-or-treating, we celebrated in our driveway. Thank goodness for good weather!

I utilized Echo Park’s Halloween Party collection kit once again. The background for this layout is the backside of patterned paper HP250004 entitled Something Wicked. It is such a fun collection of papers and stickers. I’m sure I’ll be using it for many layouts.

The title for the layout, EEK, is a Silhouette Design Store cut file by Jillibean Soup (Design ID #386850). I resized the file to make it a bit bigger and cut it out of black cardstock. I love creating layers, textures, and stitching on my layouts. The spider webs in the cut file provided the perfect backdrop for adding in some soft stitching. The first step was to pierce holes in the spider webs found in the letters E and K. The spider webs were stitched using three strands of light silver DMC floss (#762). To enhance the spooky feel of the layout, the title was backfilled using Lawn Fawn’s Metallic Cardstock in Holographic 2.0. Ranger’s Glossy Accents was used to adhere the stitched cut file to the holographic background.

The large cut file at the top of the layout is entitled Halloween Corner by StudioIlustrado. It is also in the Silhouette Design Store (Design ID #65854). It was cut from black cardstock and the pumpkin eyes, noses, and mouths were kept to create a shadow effect. I choose to highlight the pumpkins and the ghost, leaving the bats flat on the page. This created continuity in the layout as the bats in both cut files appear to merge into one big cut file, encircling the photo. I used the knife tool in the Silhouette Studio software to isolate the ghost and pumpkins. This allowed me to cut the specific part of the cut file I desired, rather than having to waste paper by cutting out the entire cut file in another medium. The ghost was cut from vellum and adhered slightly offset with vellum tape. The pumpkins were cut from heavy orange textured cardstock and adhered with 3D foam squares by Scrapbook Adhesives.

A few simple elements were added to complete the layout. Two spooky spiders from Doodlebug Designs shape sprinkles were placed in the upper left and lower right spider webs. The small black and white sticker entitled Halloween Fun was placed above the picture on the right-hand side. The sticker was included in the Halloween Party collection pack.

Thanks for stopping in and until next time, stay safe, stay well, and Happy Scrapping!

Party!

I’m long overdue in posting this two-page layout for Ben’s 2nd Birthday! There’s nothing better than a summer birthday when the air is hot, the water refreshing and the birthday cake is ice cream! We are so lucky to have the opportunity to celebrate this sweet boy’s Birthday at the cottage.

The gorgeous ink base pages for this double page layout came from a craft smart paper pad called Rainbow Inks purchased at Michael’s. This paper pad is an excellent alternative for someone like me who is slightly intimidated to create the backdrop myself. I was attracted to the turquoise page with the internal square offset and rotated the second page to balance the double page layout.

I love the Star Cake cut file from Peartree Cutfiles. It was perfect for documenting Ben’s big day. The file was cut from black cardstock and then the interior pieces were offset with coordinating patterned papers from Doodlebug Design’s Party Time paper pack. Lawn fawn’s “holographic 2.0” paper was used to back the stars in this cut file. The number 2 was added to the cake using a chipboard piece from Basic Grey called dark chocolate chip.

I enjoy making my grandchildren shirts for their Birthday and found the perfect design for a two-year-old in the Silhouette Design Store. The Two Nado Birthday Phrase was designed by Sarah Bailey (Design ID#315079). I used black and turquoise Heat Transfer Vinyl to create Ben’s t-shirt. I replicated this design for the second page of this layout. 

The rest of the layout came together quickly using several “odds & ends” from Doodlebug Design’s Dragon Tails ephemera package. The PARTY title, coordinating birthday presents and stars on both pages all belong to this package. The green Happy Birthday stickers are also a Doodlebug Design product and belong to a multicolour cardstock sticker sheet. You can stretch your scrapbook stash when companies coordinate the colours between different paper collections and releases! The finishing touch was to add the date using white Thickers Happy Life foam letter stickers. 

We sure had fun celebrating Ben’s 2nd Birthday, and I’m excited to add these pages to his personal scrapbook. I hope you’ve found some inspiration to scrapbook a special birthday in your family. Until next time, stay safe, stay well and Happy Scrapping!

Master Gardener

Let me introduce you to my Grandpa, Harold Russell. He was a gifted carpenter by trade, but a master gardener in his retirement. My grandparents lived in Mississauga in a house he built. They lived at the end of a dead-end street with a huge lot to the left of the house that Grandpa turned into a massive vegetable garden. I often spent a couple of weeks with my grandparents during the summer months when I was young. My memories of these times included lots of time in the garden with Grandpa and watching my Nana cooking, canning and freezing all the bounty that resulted from his hard labour. Grandpa built a large cold cellar in the house and it was always fun to get inside to see all the filled jars from Nana’s canning efforts.

My favourite memories of Grandpa’s garden were visits in June when we were allowed to pick fresh strawberries ourselves, and later in the season when we picked fresh carrots. There’s nothing quite like a freshly picked carrot washed under the garden hose! It was one of my favourite treats from his garden! I also remember baskets of fruit and vegetables begin loaded into our car before we returned to London after a visit. Grandpa was a kind and patient man, and he treated his treasured vegetable garden with as much love and tenderness that he afforded his grandchildren. You can see how proud he was of his produce in these pictures. That squash! I wish I knew how many pounds it weighed, but you can see the delight on his face with the result. Grandpa introduced us to many new vegetables that we have never experienced before. Spaghetti squash was our favourite of all.

Marcy and Milly SVG‘s #freebiefriday cut file called Garden Words Background was the perfect file to document this story. You can find all the free cut files on the Marcy Milly SVG Facebook page. Once the file was sized to my liking for the layout, I created an offset of the cut file using Silhouette Studio software. The small sections that made up the centres cutouts of all of the letters were removed to provide a solid base. Then both sections of the cut file were cut on respective green and black cardstock. I chose not to centre the cut file on the offset background, and offset it slightly to the right to provide a more dramatic effect.

Simple Stories recent Simple Vintage Farmhouse Garden collection worked beautifully to help tell this story. Not only did I love the colour graphics in The Sweet Life patterned paper, but I loved the subtle pictures of garden vegetables in the rest of the paper. I used various pieces to embellish this layout from the coordinating Bits and Pieces and Garden Bits ephemera packs. The From the Garden sticker, seen in the photo with the large squash, came from the Cardstock Stickers found in the 12×12 Collection Kit. The title – Master Gardener – was added using doodlebug designs inc my type cardstock stickers.

I had a great time working on this layout and going down memory lane! So pleased to have a cut file that fit my Grandpa’s passion perfectly! Be sure to follow the Marcy Milly SVG page on Facebook to grab this #freebiefriday cut file and many more! Also, look for the post announcing a new monthly newsletter to keep informed on new monthly cut files. Sign up is via email. For all my gardening friends out there, I wish you the best growing season yet! Until next time, stay safe, stay well and Happy Scrapping!