Ben & Cocoa Take An Elfie

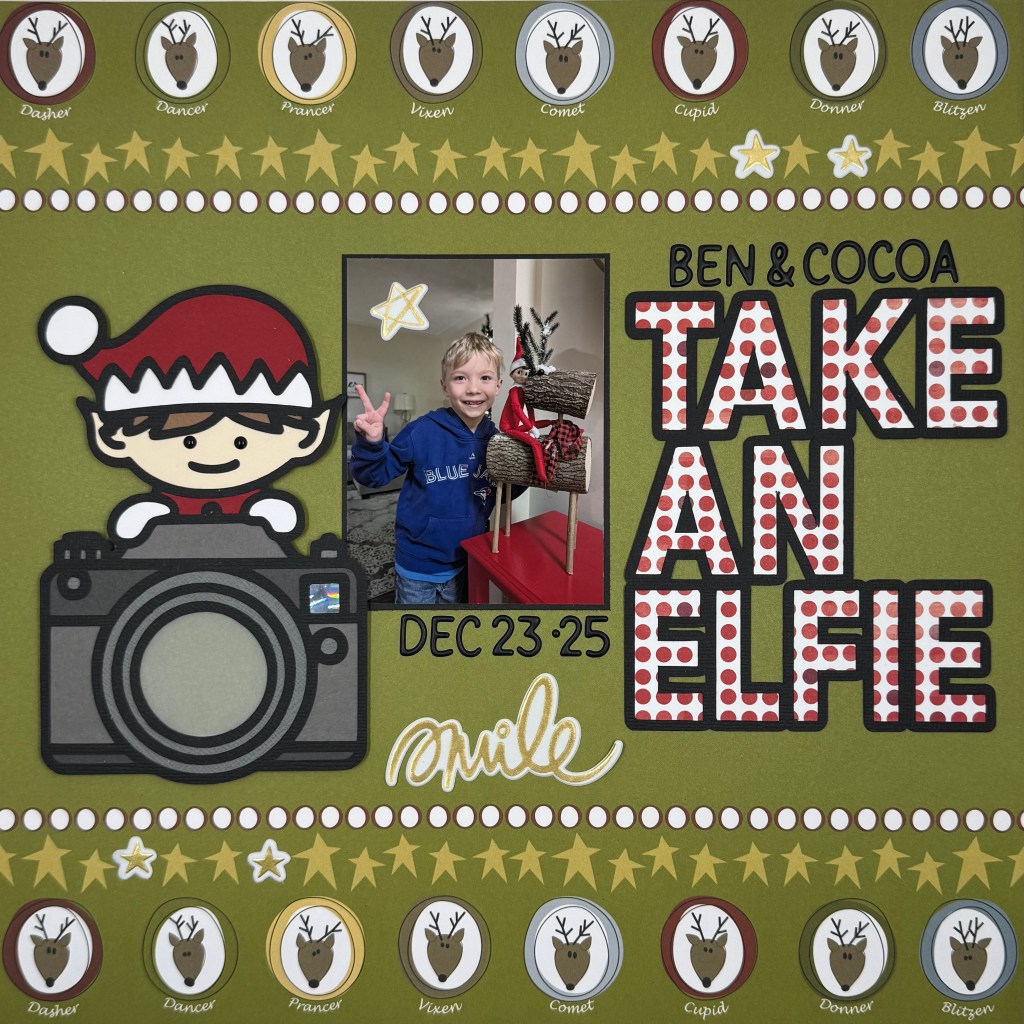
Happy New Year, my scrappy friends! I hope your Christmas was full of love, laughter, and wonderful memories. We were very fortunate to have our entire family home for the holidays this year! A rare treat, and we enjoyed every moment together. Christmas is extra special when you have a family member who still believes in Santa. It makes every day special and Christmas Eve and Christmas Day magical! Our youngest Grandson still believes in Santa Claus and the magic of his Elf on a Shelf, Cocoa. This year, my daughter took a cute picture of the two just before Christmas. Ben was so excited to count down the days as Christmas approached.

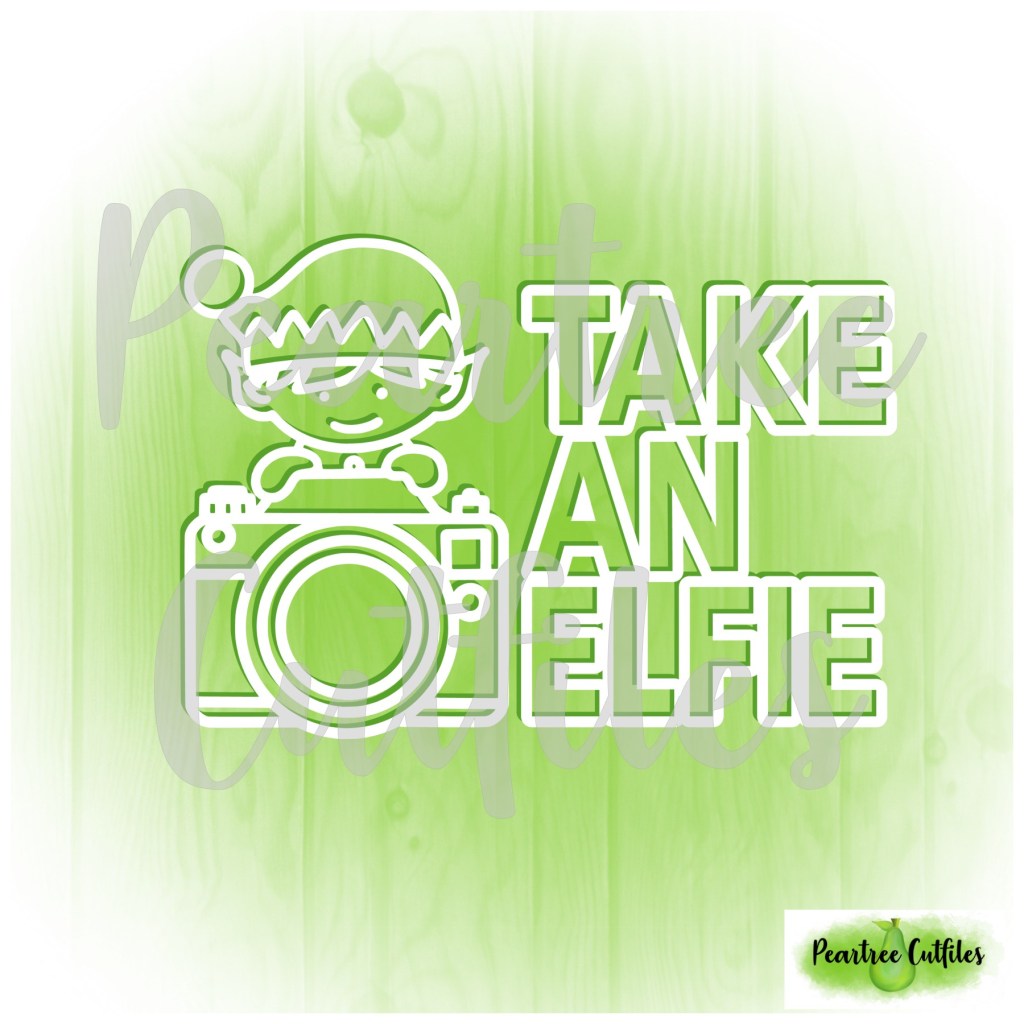
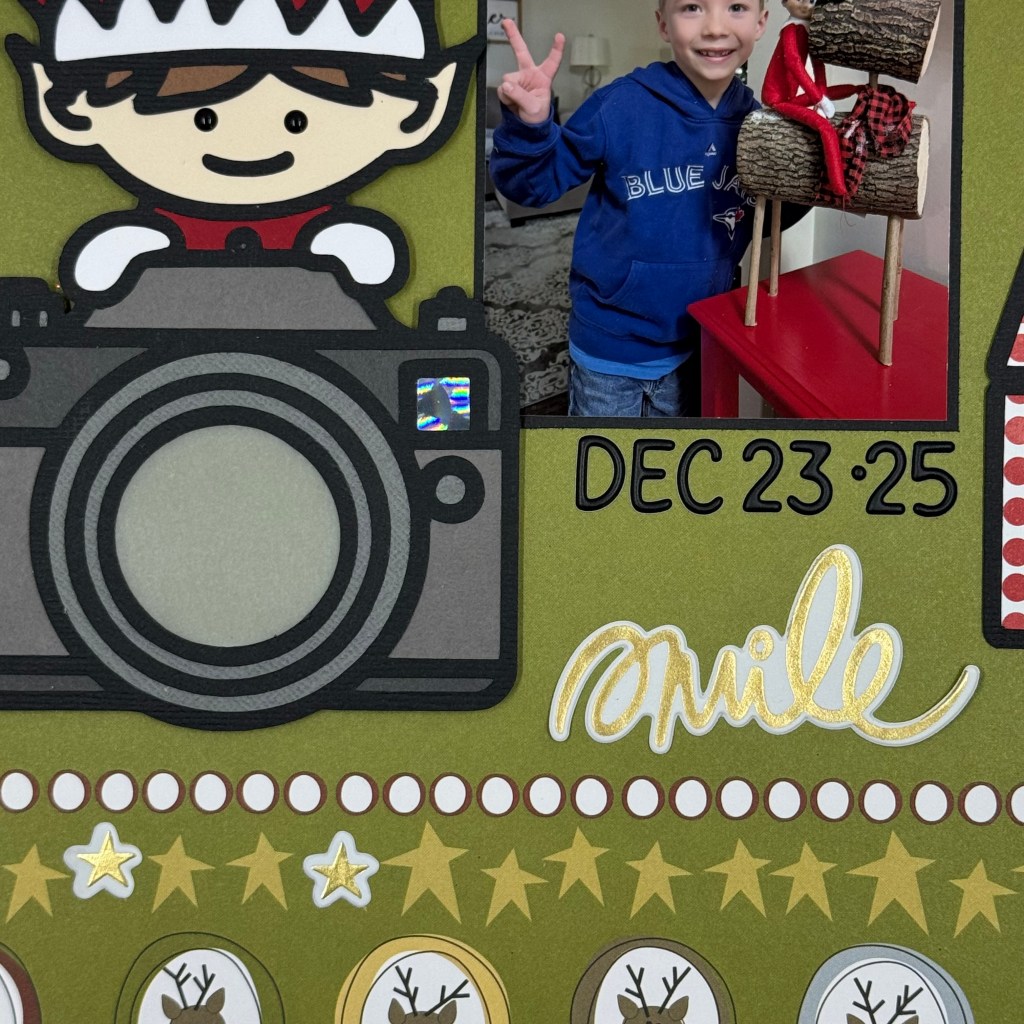
I dug deep into my patterned paper stash to find this background paper from 3bugsinarug, entitled Reindeer Games. Peartree Cutfiles had the perfect cut file to document this special picture. The Take An Elfie cut file contains two cut files: the title and the elf with a camera. I chose to back the elf and the camera with multiple coloured cardstock pieces, used vellum for the camera lens, and the Holographic 2.0 paper from Lawn Fawn for the camera’s flash. I find working with small paper pieces like the eyes in the elf quite tedious, so I opted to use Concord & 9th’s black enamel dots instead. Next, I backed the Take An Elfie title with patterned paper from BoBunny entitled Mistletoe. This patterned paper has also been in my Christmas collection for several years.

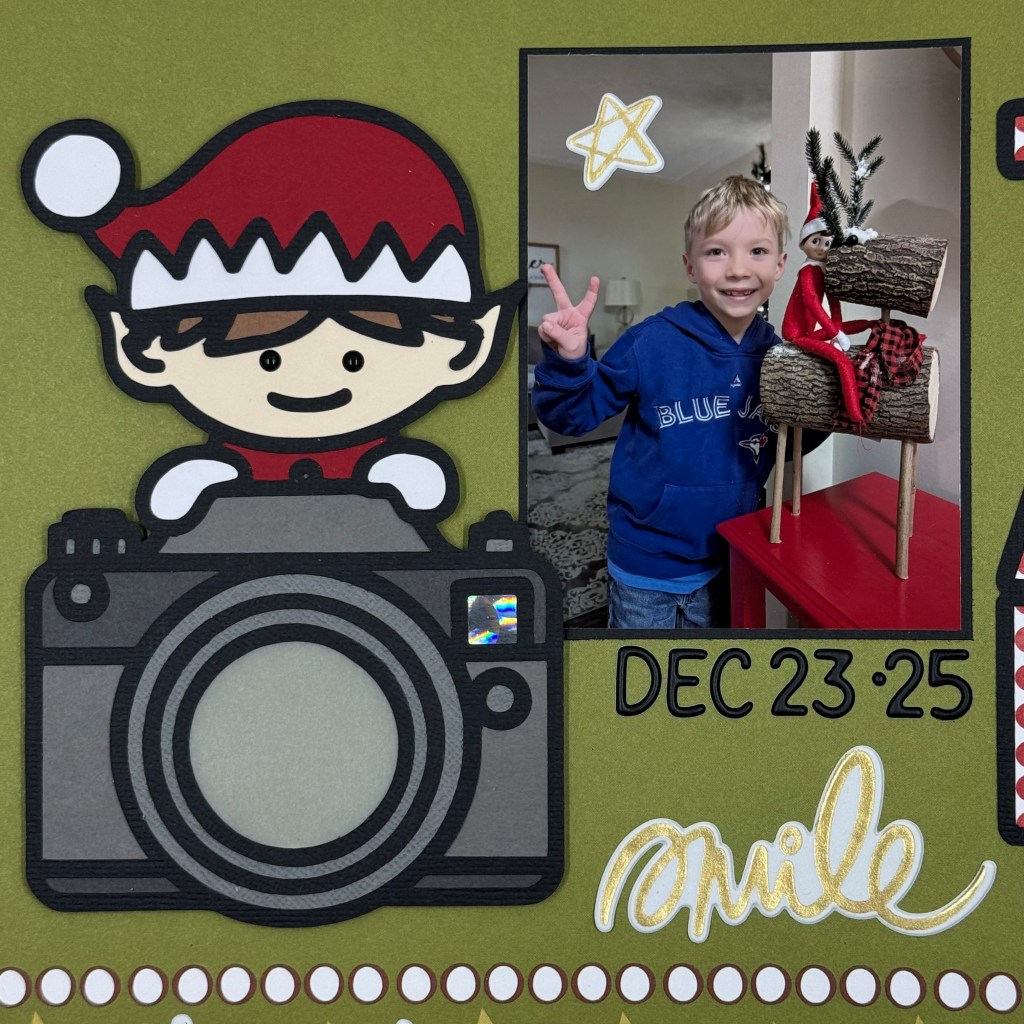
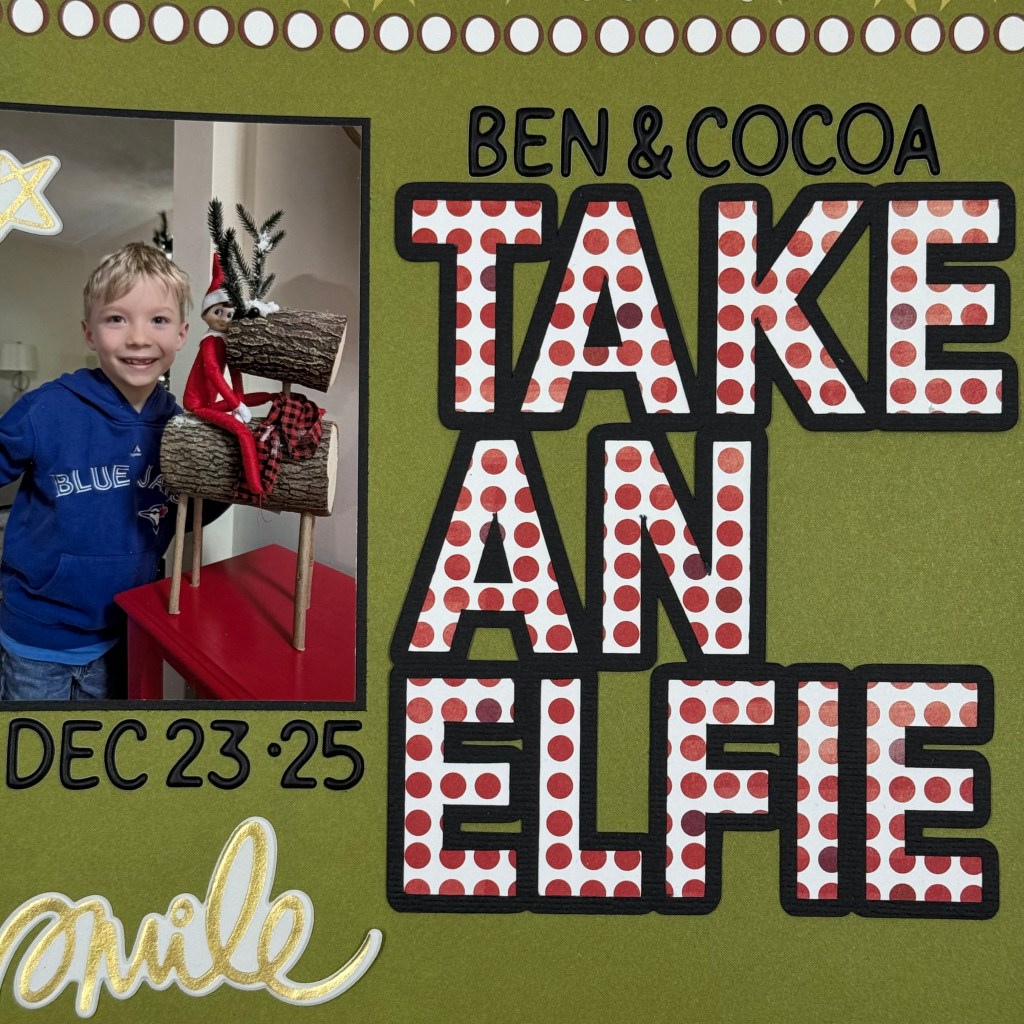
To complete the layout, I adhered the two cut files on either side of the picture. The elf and the camera were adhered using double-sided adhesive foam tape. I did not adhere the foam tape to the back of the vellum lens. I used Doodlebug Designs Black Alphabet Soup Puffy Stickers to add the names and date to the layout. And finally, I added some gold accents to the page using Vicki Boutin’s Thickers from her Print Shop and Warm Wishes collections.

And that’s a wrap on my first Christmas layout for 2025. Thanks for popping in today. Until next time, stay safe, stay well, and Happy Scrapping!

Summer Vibes

This photo of my grandson Owen just sums up everything about summer for me. Spending time at our cottage in Muskoka is our favourite summer activity! My daughter captured this image on another glorious day last summer. My grandchildren love the water and spend most of their day swimming. You can see the look of contentment on Owen’s face – a perfect day, doing the things he loves most in the place he loves most.

The Summer Vibes cut file from Cut to You was the perfect cut file to document this moment. I chose coordinating papers from the Legendary collection by Cocoa Vanilla Studio for this layout. The yellows, oranges and greens were a perfect fit with the photo. I wanted the title to pop on the page and black cardstock helped achieve this look. The letters for the word summer were offset in Silhouette software to back the file, but the yellow letters for the word vibe were cut to fit the outline perfectly. These letters were backed using Taylored Expressions Foam Sticky Strips and placed within the corresponding black letters. This provided texture and dimension to the title. I mirrored this technique in the sun portion of this cut file, backing the two main sun sections and popping up the sun rays. This helped to provide balance to both sections of the layout.

The chipboard trees in the bottom left of the layout came from Scrapaholics. They came in a set of three called Snowy Trees. They too were a perfect fit for the cottage landscape and helped pull more green into the layout. I coloured them with Tim Holtz Distress InksPeeled Paint and Brushed Corduroy before adhering to the page.

Some of the final touches for this layout included adding the stickers to the left of the photo and attaching the “noteworthy” tab at the top of the photo. Both of these elements came from the Legendary collection. The last element was adding the date with doodlebug design inc’s my type cardstock stickers. I feel it is really important to attach a date to a layout as the days and years fly by before we know it!

Thanks for stopping by today, I hope you’ve enjoyed our bit of heaven up north! We will open the cottage soon and we look forward to another amazing year of memories at our happy place! Until next time, stay well, stay safe, and Happy Scrapping!

You Are Some Bunny Special

Did you know the Easter Bunny is 6′ tall and that he has a kind and generous heart equally as large? I am very lucky to have a dear friend Gerry, who rented an Easter Bunny costume to spread some joy to young and old this past Easter. He offered to come and surprise our grandchildren and even brought the chocolate eggs to spread more cheer! We were very honoured to be on his list of visits this past Easter. Maddy and Owen couldn’t figure out who was in the costume. Owen asked me where he came from and I replied that I found him hopping around in my backyard. Owen quickly responded with “No Nana, he drove here – I can see his van in your driveway!”. That boy doesn’t miss a trick! Ben was quite taken with the Easter Bunny. After the visit was over, he kept asking his Mom if the Easter Bunny could come to Easter Dinner! Wouldn’t that be something to see!

Coordinating papers from 3 separate Doodlebug Designs collections were used to complete this layout; Springtime, Hello Spring and Easter Parade. Two cut files were used to create this fun page. The large title cut file comes from Cut to You and is called Some Bunny Special. You can find it here https://createdbygwen.com.au/product/some-bunny-special-title-cut-file/. I selected 5 coordinating patterned papers from the 3 collections listed above to back the title and add further whimsy to the layout.

The bunny cut file in the bottom left comes from Peartree Cutfiles and is called Floral Bunny Ears https://www.peartreecutfiles.co.uk/product/floral-bunny-ears/.

I only wanted to use the head and ears of this file and did not want the floral sections. To achieve this and minimize wasted paper, I positioned the cut file at the bottom of the white cardstock, leaving the floral portion outside the cutting area of the Silhouette mat. Hopefully, this tip will have you looking at some of your cut files a bit differently and get you thinking about how you can manipulate them to fit the vision of your project. The bunny ears were cut from white cardstock and backed with a soft textured white cardstock and coordinating pink patterned paper. This picture provides a closer look.

The banner in the top right of the layout was made by cutting 5 triangles from coordinating patterned papers. Each of these was backed with fun foam to add some dimension to the project.

The finishing touches on the layout included adding sticker hearts (between the bunny ears) and sticker arrows to the left of the word SPECIAL in the title. The photo was matted with 2 coordinating patterned papers. The journaling found in the bottom right was printed on white cardstock and cut to size. These strips were also backed with fun foam. The 3 hearts found at the end of the journaling come from the Rainbow Hearts Shape Sprinkles by Doodlebug Designs. The date was added using Doodlebug stickers called Sunshine.

It has been such a tough year with COVID, the ongoing restrictions, and multiple lockdowns. Thank you Gerry for providing a welcome diversion from our current situation. Your kindness and generosity were so deeply appreciated! This visit by the Easter Bunny was such a bright spot this Spring and a reminder of better times to come. Maybe next year the Easter Bunny will get to come to Easter Dinner! Until next time, stay safe, stay well, and Happy Scrapping!