Holly Jolly

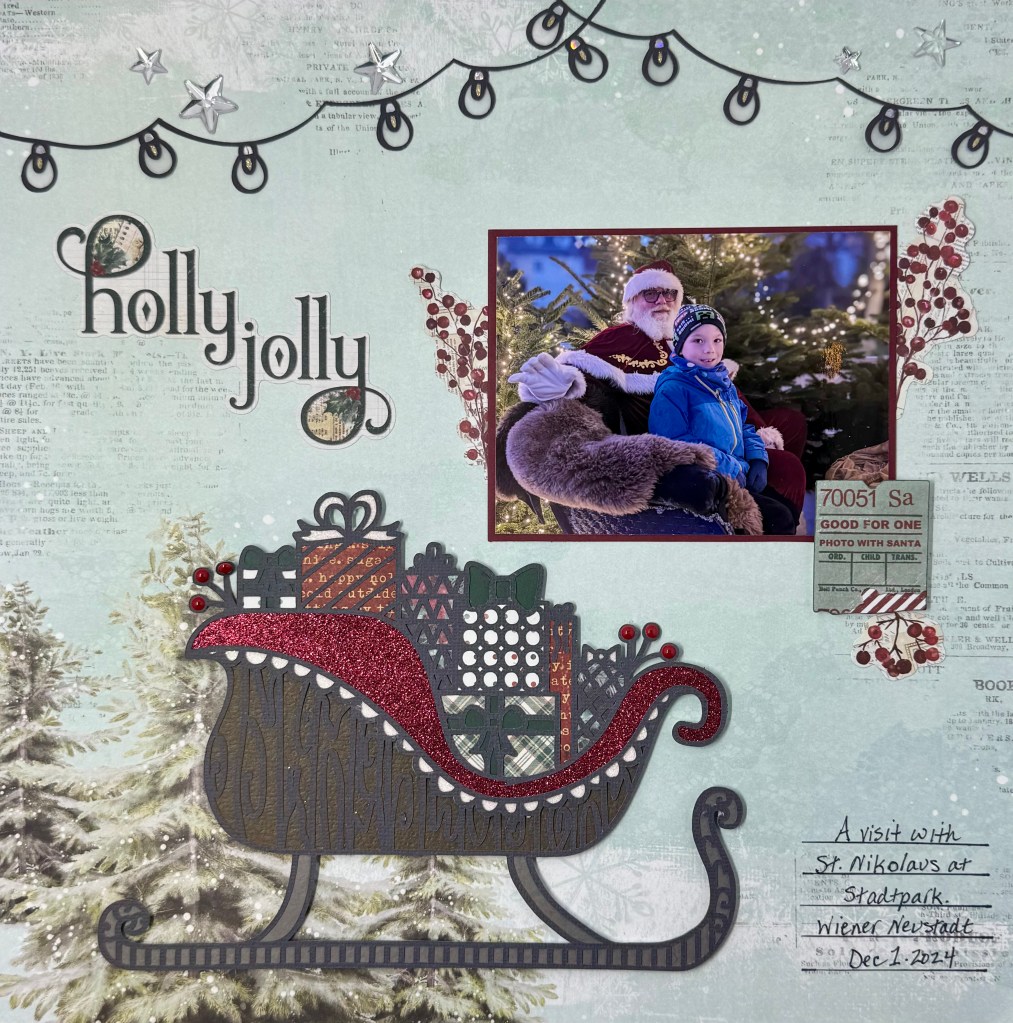
Oh, the magic of Christmas! Our hometown has record snowfalls, which gets me in the mood for all things Christmas. Last weekend, our youngest grandson, Ben, had a heartwarming visit with St Nikolaus at their city park in Wiener Neustadt, Austria. It was a truly special moment for him.

Folklore in Austria tells the tale of Krampus, a devilish-looking character who beats badly behaved children with a birch rod. Krampus is everything a nightmare is looking for! Ben is terrified of Krampus, as he reports his teacher told him that Krampus “steals” children! However, Ben also knows that St. Nikolaus rewards children who are good with gifts, so visiting with St. Nikolaus was a welcome reassurance that all will be well this Christmas.

I created this layout using Paige Taylor Evan’s Sleigh cut file, which is Design ID #456879 in the Silhouette Design Store.

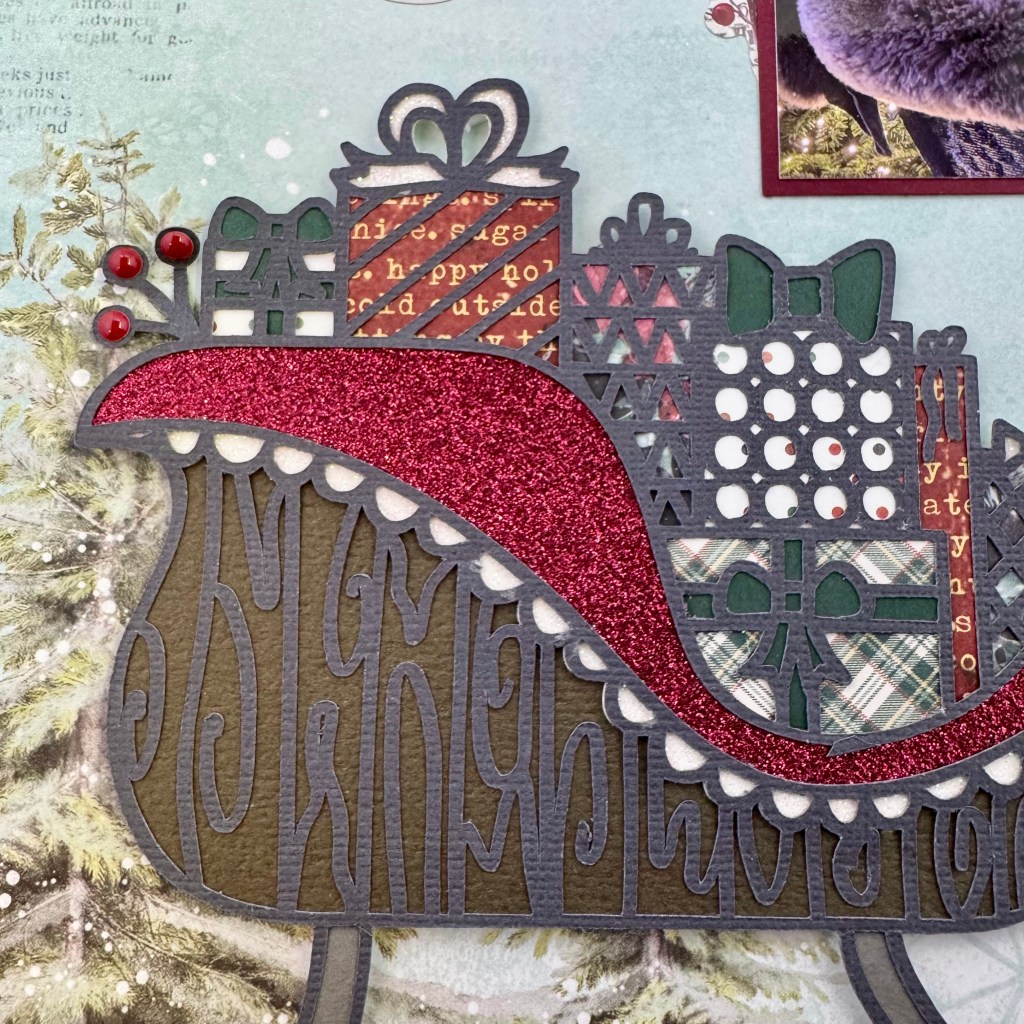
I used various papers to back this cut file, including red and white glitter, cardstock, and different patterned papers from the Simple StoriesSimple Vintage ‘Tis The Season collection. Once I completed the cut file, I adhered it to the layout on white fun foam for added dimension. Small red enamel dots from Carta Bella completed the sleigh. The background paper for this layout comes from the Simple Stories Country Christmas collection. The specific page is called O Christmas Tree.

I wanted to mimic the Christmas lights in the trees surrounding Ben and St. Nikolaus. To achieve this, I modified the Garland cut file, Design ID #1233064, also found in the Silhouette Design Store.

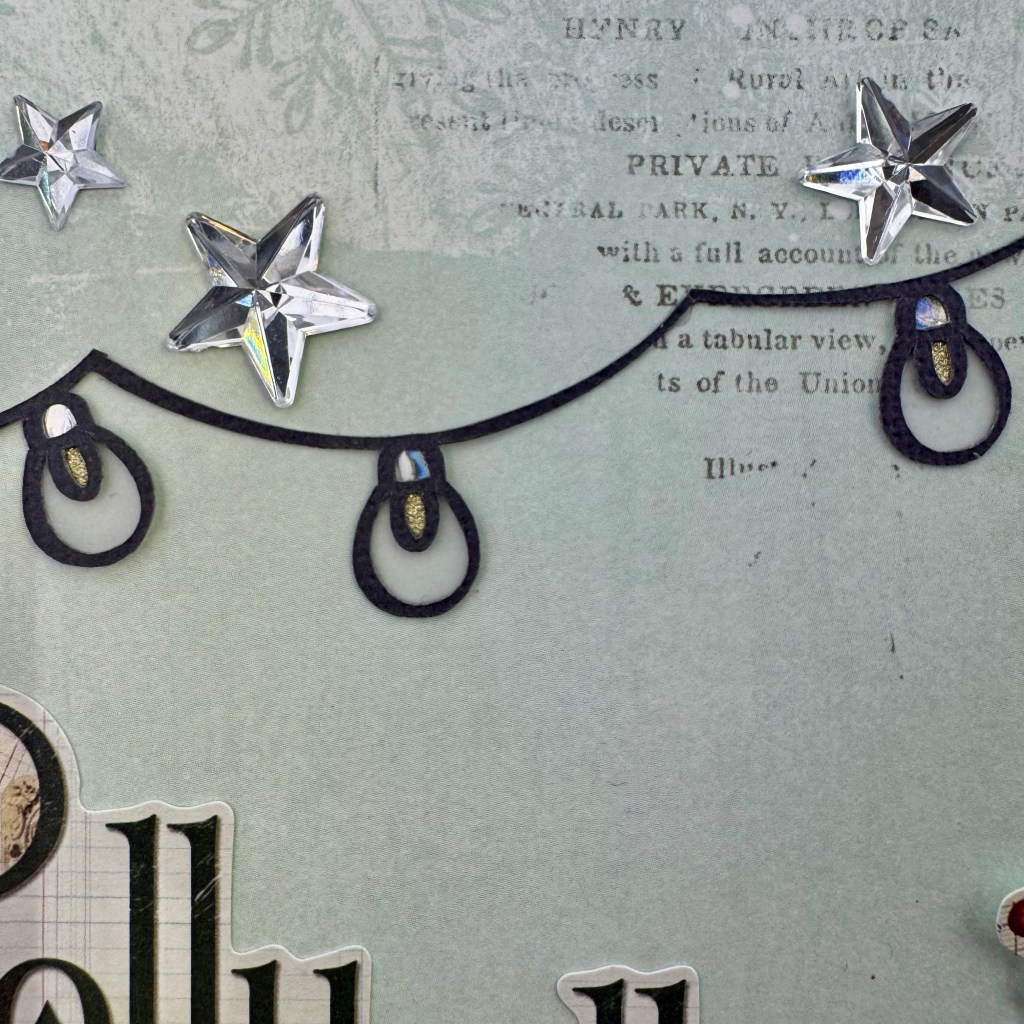
I cut off the upper edge and loops of the design to achieve a more accurate likeness to the photo. I cut two copies of this file to reach the 12′ Garland length. I used silver cardstock, light gold cardstock, and vellum to complete the lights. Next, I added a few silver stars above the lights to enhance the feeling of the evening.

I found the remaining elements in the Simple StoriesSimple Vintage ‘Tis the Season Floral and Bits & Pieces ephemera packages to complete the layout. I used a Sharpie pen to add details and the date to the bottom right-hand corner.

I wish you all a little bit of magic this special holiday season. May 2025 bring us all much happiness and joy!

Thanks for following my scrapping journey. Until next time, stay safe and healthy. Happy Scrapping!

The Best Gift

I am extremely excited to share my first project as a Guest Designer for Paige Evans Christmas Cut & Stitching Files for 2023! Here’s where you can purchase each bundle: 25 Christmas Stitching Cut Files https://bit.ly/25christmasstitchingcutfiles, 25 Christmas Cut Files https://bit.ly/25christmascutfiles. Any of these cut files can also be purchased separately in Paige’s shop: https://bit.ly/digitalcutfiles. With the release of these beautiful bundles, Paige is releasing a free cut or stitching file every day from December 1 – 25th, so don’t miss out on all these beautiful designs. This stitching file is one of Paige’s freebies, and you can grab it from her Happy Scrappy Place Facebook Group.

Embroidery and cross-stitching have been part of my crafting adventure for decades. I jump at any chance to incorporate these skills into a scrapbook layout! This cut file is called Christmas Tree Circles for Stitching. And it’s yours free at https://www.facebook.com/groups/happyscrappyplace! To begin this project, I cut the plain white cardstock to 11 & 1/2″ x 11 & 1/2″, and cut the stitch cut file using my Silhouette Cameo. I chose non-traditional colours for the tree and selected coordinating hues of pink, red and white DMC pearl cotton floss to stitch the tree.

I used a simple back stitch technique, alternating the reds and pinks as I worked through the circles in this cut file. I used the white pearl cotton floss on the smaller circles and filled in the circles using a string art technique. To create a string art effect, randomly stitch your thread from one point to another, working in opposite directions and inserting in another point anywhere to create the effect. Make sure you pass the floss through each point in the pattern. I like the completed result. It made these circles look like 3D ornaments on the tree and integrated more texture into the overall layout. I used this same string art technique on the gold start at the top of the tree. I used a chain stitch in brown floss around the tree trunk. This stitch helped provide a sturdy look to the large tree.

I turned to Paige’s magical Sugarplum Wishes Collection to create this whimsical layout. Sugarplum Wishes transport me to a world of wonder and enchantment. How fitting for the Christmas Season! Once I completed the stitching I centred and adhered the page to the bright red candy cane paper (paper 7) from the collection. My photo was also matted on this bright, fun paper. To build the title for the design, I used coordinating Christmas Sweater Thickers and the red foil letters found in the generous sticker pack.

I used a combination of embellishments from the Sugarplum Wishes collection to complete this layout. In addition to placing several poinsettias from the Floral & Snow Flake Die Cuts package to frame the design, I used the Santa and sweater from the collection of Ephemera Die Cuts to add to the page. I love adding texture and dimension to my layouts, and one of the poinsettias and Santa were backed with fun foam to achieve this effect. I randomly filled the centres of the poinsettias with enamel dots from the Sugarplum Wishes collection and added a small white pompom to Santa’s hat to further enhance this effect.

The presents below the tree belong to the Sugarplum Wishes Foam Stickers sheet. I punched the number 25 found on coordinating patterned paper in the collection (paper 8) and adhered it to the layout using more fun foam. I “hung” the remaining ornaments (penguin, candy canes, gingerbread men & reindeer) on the tree using matching puffy stickers.

Be sure to visit Paige’s Happy Scrappy Place Facebook Group to collect the free Christmas Cut File each day (December 1 – 25)! Thanks for joining me today and I hope I’ve inspired you to try some stitching and playing with Paige’s fabulous products! Stay tuned for another one of my layouts from these incredible cut files next week. Until then, stay safe, stay well, and Happy Scrapping!